How to Format Write Protected USB Flash Drive 3 Free Ways
Summary
This article explains how to remove write protection from a USB drive. I will introduce three effective methods to achieve this.
Table of Contents
What is Write Protection on a USB Pen Drive?
Write protection is a locking mechanism that prevents any edit operations on devices like USB pen drives, SD cards, and external hard drives. It can be used to protect the data on the device and also prevent virus infection. However, sometimes devices can become corrupted, making it necessary to remove write protection. So, how can you remove write protection?
#1. Write Protection Switch on the SD/USB Flash Drive
Some USB flash drives have a write protection switch on the shell. You can check if your pen drive has this switch when you find your thumb drive is write-protected. Turn off the switch, then try using it on your computer again.
 Turn off the write protection switch on the USB
#2. Free Tool to Remove Write Protection from USB Pen Drive and Format USB (2 Parts)
There is an easier way to disable write protection from a USB pen drive: IM-Magic Partition Resizer Free, a freeware tool for managing disk partitions. You can use it to remove write protection and format the USB flash drive on Windows. It is 100% safe and effective.
Part 1: Remove write protection from the USB stick with the free tool
You can follow these steps to remove write protection from a USB pen drive:
Step 1: Right-click the disk/USB/SD on its left header side in the software, and select the "Clear Read-only Attribute" option.

Step 2: Confirm clearing the read-only attribute on the selected disk/USB/SD.

Part 2: Format the disk, USB, or SD card
Step 1: Install IM-Magic Partition Resizer Free on your computer, and run the program.
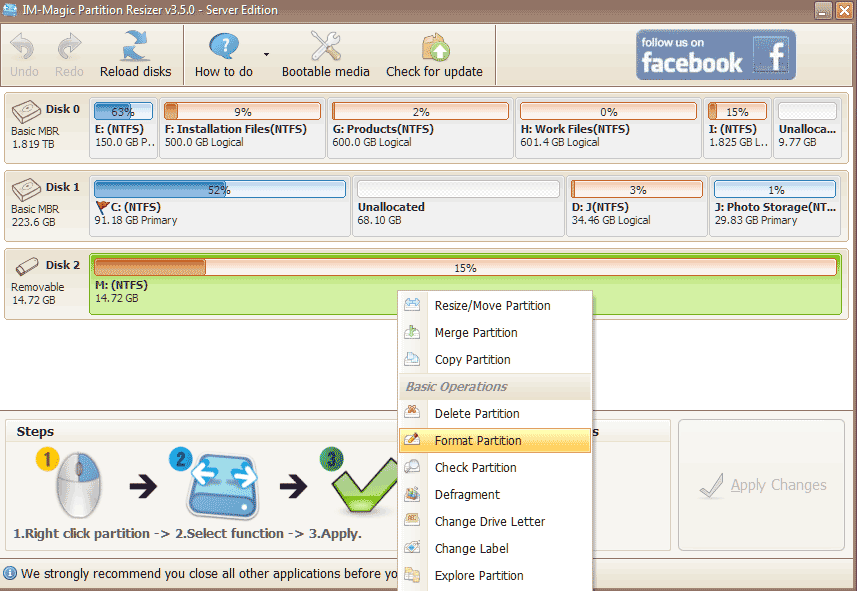
Step 2: Select your USB pen drive, right-click it, and choose “Format Partition.”
 Format write protection from USB pen drive
Step 3: Click 'Apply Changes', then the write protection on the USB pen drive will be removed.
#3. Disable Write Protection from USB Flash Drive with CMD
CMD (Command Prompt) can help you deal with write protection, but you need to be careful to avoid making mistakes that can cause major problems. Follow these instructions to remove the write protection from a USB flash drive:
Step 1: Run CMD on the Windows system.
 Remove write protection with diskpart command prompt
Step 2: Type "diskpart" in the window.
 Remove write protection with diskpart command prompt
Step 3: Type “list disk” in the window.
 Remove write protection with diskpart command prompt
Step 4: Type “select disk 2” in the window, where disk 2 is your USB pen drive.
 Remove write protection with diskpart command prompt
Step 5: Type “attributes disk clear readonly” in the window, then you're done.
 Remove write protection with diskpart command prompt

