How to Delete a Partition When "Delete Volume" is Greyed Out in Disk Management
When you open Disk Management to delete a disk volume in order to repartition the disk, you may find that the option 'Delete Volume' is greyed out and cannot be selected.

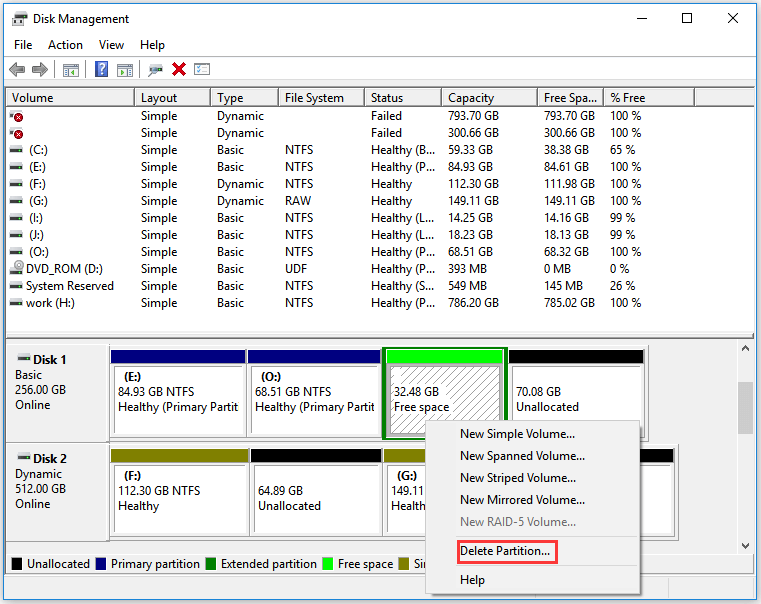
When the 'Delete Volume' option is available, it will look like the image below.

If the disk is occupied (by a page file, system files, or virtual memory files), even after deleting all files in the partition and restarting the computer, the issue may persist. Even reformatting the disk may show that it is still occupied.
Simply deleting all files won’t work in this case. You will need to remove the settings causing the issue if the partition is set to store system files, such as the page file, system files, or virtual memory.
What Causes the ‘Delete Volume’ Option to Be Greyed Out in Windows 11/10/Server?
The Causes:
If the ‘Delete Volume’ option is greyed out in Disk Management on Windows 11/10/8/7 or Windows Server, the issue may be due to the following causes:
- Page File: If a page file is stored on the partition you want to delete, you will not be able to delete it.
- System Files: If system files are installed on the partition you want to delete, the ‘Delete Volume’ option will be unavailable.
- Virtual Memory Files: If virtual memory is set on the partition you want to delete, deleting or formatting the volume won’t work.
- Recovery Partition: If the partition is a recovery partition or system reserved partition, the ‘Delete Volume’ option will be greyed out.
Quick Navigation:
- Fix for Greyed Out Delete Recovery Partition
- Remove Virtual Memory from Partition
- How to Delete Free Space on Extended Partition
- Force Delete a Partition with DiskPart
- Delete Partitions with IM-Magic Partition Resizer Free
- Expand Drive Without Deleting a Partition
#1: How to Delete a Recovery/Reserved Partition
Windows does not allow you to delete its recovery partition or system reserved volume directly. However, you can use a free third-party tool to delete it.

For Windows 11/10/8/7 => Download Partition Resizer Free [100% Free]
For Windows Server 2025-2003 => Download Partition Resizer Server [Free Demo]
Also read: How to Delete the Recovery Partition
#2: Remove Virtual Memory from a Partition
Follow these steps to remove virtual memory from the partition you want to delete:
- Right-click This PC and select Properties to open the System Properties window.
- Click the Advanced tab, then click Settings under the Performance section.
- In the pop-up system properties window, select Advanced Options and then click Change.
- In the Performance Options window, select the Virtual Memory tab, then click Change.
- In the Virtual Memory settings window, select the partition you want to delete (the one with virtual memory) and set it to None under "No paging file". Then click Set and OK.
- After making these changes, a prompt will appear asking you to restart your computer. Click OK and restart the system.
- After restarting, open Disk Management again, and the partition should be deletable (remember to back up any important data before deleting it).
#3: How to Delete Free Space on an Extended Partition
If the delete option is greyed out for free space on an extended partition, follow these steps:

Solution: Create a new volume to enable the delete option.
- 1. Right-click the free space, create a new volume, and confirm the changes.
- 2. Right-click the new volume (formerly free space), and the option to delete the volume/partition will now be available.

If this doesn't work, try the following:
Delete nearby logical partitions (usually to the left of the free space) on the same disk first. This will make the entire space available for deletion.
Step 1: Open Disk Management again and delete the logical partitions in the extended partition by right-clicking them and choosing Delete Volume.
Step 2: Confirm the deletion.
Note: Please backup all data before deletion.
#4: Force Delete a Partition with DiskPart
Sometimes, when using Windows to manage disk partitions, some partitions may not be deletable, and the right-click menu does not offer a delete option. In such cases, follow these steps:

If the command does not work, you can force delete the partition using the DiskPart command prompt.

Steps:
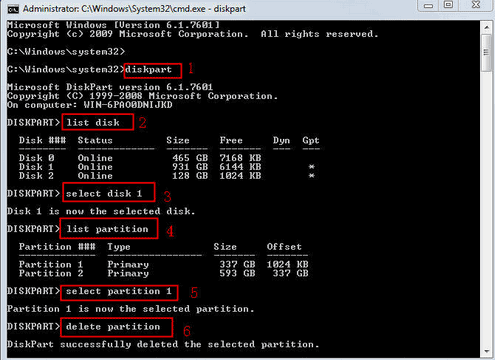
- Step 1: Run the Command Prompt as Administrator and enter diskpart.exe.
- Step 2: (Optional) Enter rescan to refresh the disk settings.
- Step 3: Enter list disk to display the list of disks.
- Step 4: Enter select disk X (replace "X" with the disk number you want to delete).
- Step 5: Enter list partition to display the partitions on the selected disk.
- Step 6: Enter select partition Y (replace "Y" with the partition number you want to delete).
- Step 7: Enter delete partition override to delete the selected partition.
Note: If you want to delete a recovery partition using DiskPart on Windows 11/10/8/7 or Windows Server, refer to this video for guidance.
#5. Delete One or All Partitions with IM-Magic Partition Resizer Free
If the "Delete Volume" option is greyed out in Disk Management, you can try using the free software IM-Magic Partition Resizer. This tool can not only delete a single partition but also delete all partitions on a disk for free. Here’s how to delete a partition when it cannot be deleted in Disk Management.
For Windows 11/10/8/7 => Download IM-Magic Partition Resizer Free (100% Free)
For Windows Server => Download IM-Magic Partition Resizer Server (Free Demo)
Step 1: Download and install IM-Magic Partition Resizer Free for Windows 11/10/8/7 computers, and open it.
Step 2: Right-click the disk partition that you want to remove. An option “Delete Partition” will appear in the pop-up box to delete the volume.

Step 3: Confirm the deletion.
Delete All Partitions? You can click on the disk icon (instead of a single partition) and an option “Delete All Partitions” will be available. This will allow you to delete all partitions on the disk.
Step 1: Right-click the disk (e.g., Disk 1) instead of a partition and select "Delete All Partitions".

Step 2: Confirm the deletion and click the "Apply Changes" button.

Deleting Partitions for Windows Server: IM-Magic Partition Resizer Server is designed for deleting volumes on Windows Server 2003, 2008, 2012, 2016, 2019, 2022, and all versions/editions. (This is a paid edition.)
Note:
- You cannot delete a system partition on any Windows computer.
- All data on the deleted partition will be erased. Please back up your data before deletion. If you accidentally delete a partition, professional tools can help undelete it, provided it hasn't been overwritten by new files.
- To permanently delete files on the partition, use the “Wipe Partition” option in Partition Resizer.
Delete a Partition to Extend Another Partition? Try IM-Magic Partition Resizer Free
If you want to delete a volume to redistribute free space to another disk volume, IM-Magic Partition Resizer allows you to do this without losing data or deleting the partition. The tool enables you to move free space from one partition to another, ensuring 100% data safety.
Here’s how to move partitions while keeping your data and OS safe:
Step 1: Right-click the partition you want to move and select “Resize/Move Partition.”

Step 2: When the mouse cursor turns into a cross arrow, move the partition to the right.

The free space will be moved to the left side of Partition D, as shown in the image above.
Step 3: Right-click the C drive, select the “Resize/Move Partition” option, and extend the C volume. When the mouse cursor turns into a double-arrow icon, drag the partition border to the right to claim the free space. Click “OK.”

Step 4: Click the "Apply" button in the software to apply the changes.

Afterward, you will have an extended boot volume.
More Functions from Partition Resizer:
IM-Magic Partition Resizer provides more disk management functions, including converting logical partitions to primary partitions, changing disk MBR to GPT, shrinking partitions, merging partitions, extending partitions, deleting partitions, and more.
For more details, visit: https://www.resize-c.com/howto/
FAQs
Q: Cannot delete partition in Disk Management on Windows 10?
A: The "Delete Partition" option may be greyed out for the following reasons:
- 1. The system volume cannot be deleted.
- 2. The free space has logical partitions on its left side that need to be deleted first.
- 3. The partition has been set to save system files, such as page files or system files. These settings must be removed before deletion. (This guide provides detailed steps on how to remove these settings.)
You can delete a partition using the following methods:
- 1. Use the diskpart override command.
- 2. Use the free software IM-Magic Partition Resizer to delete the partition.
- 3. If you want to delete a system partition, you can use Partition Resizer with a bootable ISO to delete the system partition.
More Related Articles You May Like
- Free software to convert disk to gpt without losing data - free download Partition Resizer to convert gpt...
- Delete partition on Windows 10 - all solutions for deleting partitions on Windows 10...