Extending C Drive on Windows Server 2022/2019/2025/2016/2012 without Losing Data or Reformatting Disk
The Background: How to Increase Windows Server C Drive Disk Space with or Without Software?
Running out of disk space on the C drive can be a frustrating experience, especially in Windows Server environments. Fortunately, there are several ways to increase your C drive's disk space, with or without using third-party software. This article will guide you through multiple methods to free up space, along with effective techniques for extending the C drive using built-in tools or a professional third-party utility. This way, you can expand the C drive without needing to format it.
Ways to Expand C Drive Space on a Server
- Increase server C drive space without software - 5 methods, including clearing temp files, uninstalling programs etc.
- Extend C drive using Disk Management
- Extend server C drive using Diskpart
- Extend boot volume using a Third-Party Tool
Part 1: Several Ways to Increase C Drive Disk Space Without Software - 5 Methods
Note: The methods in Part 1 can help free up disk space on the C drive from a few MB to several GB, depending on your machine's performance. The methods in Part 2 offer ways to extend your C drive by even more GBs of space.
# 1. Clear Temporary Files
Windows generates temporary files that can accumulate over time. You can free up space by deleting these files:
- Press **Win + R** to open the Run dialog, type `temp`, and press Enter. Delete all files in the folder.
- Again, press **Win + R**, type `%temp%`, and delete all files in this folder as well.
Or you may use the following cleanmgr cmd to clean the c drive temp files.
%SystemRoot%\System32\Cmd.exe /c Cleanmgr /sageset:65535 & Cleanmgr /sagerun:65535

# 2. Uninstall Unused Programs
Removing programs you no longer use can free up significant disk space. To uninstall programs:
- Go to **Control Panel > Programs > Programs and Features**.
- Select any program you no longer need and click **Uninstall**.
# 3. Disk Cleanup Utility
The built-in Disk Cleanup tool can help you reclaim disk space:
- Search for **Disk Cleanup** in the Start menu.
- Select the C drive, then choose the file types you want to delete, such as system files, Recycle Bin items, and temporary files.
# 4. Manage System Restore Points
System Restore can consume considerable disk space. You can manage these points:
You can delete all the previous restore points here
 Or you may choose to delete all but the most recent restore point.
- Right-click on **This PC**, select **Properties**, then click **System Protection**.
- Choose the C drive, click **Configure**, and adjust the amount of disk space allocated for restore points.
# 5. Use Storage Sense
Windows includes a feature called Storage Sense that automatically frees up space:
- Go to **Settings > System > Storage**.
- Enable **Storage Sense** and configure it to delete temporary files automatically.
Also read: how to free up disk space on c drive
Part 2: 3 Ways to Extend System Drive C
This section covers methods to increase Windows Server C drive space using Disk Management, Diskpart, and a Third-Party Tool. The Windows built-in utility can expand the C drive under certain conditions, such as NTFS format, contiguous unallocated space, and the 2TB limit for MBR disks. Here is a comparison of the different tools to help you choose the best option for your needs.
| IM-Magic Partition Resizer* | Diskpart | Disk Management | |
|---|---|---|---|
| Extend NTFS C Drive |  |
 YES when right unallocated space is contiguous to C YES when right unallocated space is contiguous to C |
 YES when right unallocated space is contiguous to C YES when right unallocated space is contiguous to C |
| Extend Fat32 C Drive |  |
NO | NO |
| Move Partition Including the System Reserved/Recovery/OEM Partition |  |
NO | NO |
| Move Unallocated Space |  |
NO | NO |
| Delete System Reserved or Recovery partition |  |
 |
NO |
| Delete OEM Partition |  |
 |
NO |
| Delete Partition |  |
 |
 |
| Redistribute space to C drive without deleting adjacent volume if no unallocated space is available |  Shrink a volume to create unallocated space first Shrink a volume to create unallocated space first |
NO | NO |
| Merge Partition to C |  |
NO | NO |
| Convert MBR to GPT without Losing Data |  |
NO | NO |
| Clone Partition |  |
NO | NO |
| Clone Disk |  |
NO | NO |
| Migrate OS (Upgrade to a Larger Disk) |  |
NO | NO |
| User Interface (Easy to Use) |  |
NO |  |
| Price | Download Win 11-7 (100% Free) Download Win Server (Free Demo) |
FREE | FREE |
All the above tools are subject to the following terms and conditions on Windows:
- The MBR disk has a maximum storage limit of 2TB.
- Unallocated space must be contiguous to the C drive before extending. (Partition Resizer Server can help move partitions and unallocated space without data loss, whereas Windows built-in utilities cannot perform this action.)
1. Extend C Drive in Disk Management
Terms and Conditions: Disk Management can only extend the C NTFS volume when there is adjacent unallocated space. Plus there is no way to convert the FAT32 C drive to NTFS without the OS reinstallation.
To extend the NTFS C drive using Disk Management, follow these steps:
- Right-click on This PC and select Manage.
- Click on Disk Management.
- Right-click on the C drive and select Extend Volume.


If the option is grayed out, ensure there is adjacent, contiguous unallocated space to the right of the C drive. You may need to delete the adjacent partition to create this space. Disk Management cannot delete the recovery or OEM partition by itself; there is no way to proceed with Disk Management if the recovery or OEM partition is blocking the way.
2. Extend C Drive Using Diskpart Command
Terms and Conditions: Diskpart on Windows Server OS can only extend the C NTFS volume when there is adjacent unallocated space.
To extend the C drive using Diskpart:
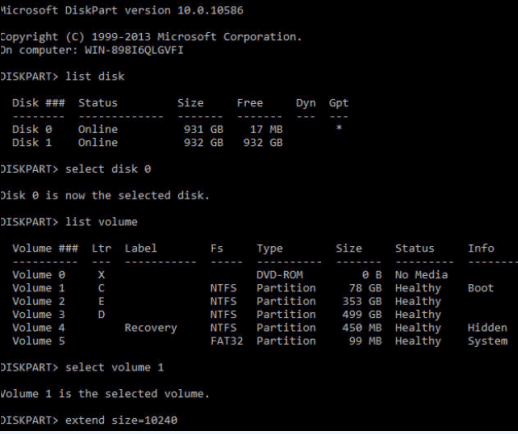
- Press Win + R, type
cmd, and press Enter. - Type
diskpartand press Enter. - Type
list volumeand find your C drive. - Type
select volume C. - Type
extendand press Enter. Ensure you have adjacent, contiguous unallocated space before executing this command.
Here is an image that shows the steps to list disks, list volumes, select the C drive, and extend it. (Make sure to check the available unallocated space, which is displayed in Disk Management.)

Note: As with Disk Management, Diskpart cannot move partitions or unallocated space, so ensure the right-side space is unallocated.
Note: You cannot extend the volume if there is a recovery or OEM partition blocking the path. You will need to delete these partitions first if you want to continue with Diskpart when your C drive is NTFS. Alternatively, you can use IM-Magic Partition Resizer Server, which can help move unallocated space and extend FAT32 and FAT16 drives without losing data.
3. Extend C Drive Using a Third-Party Tool
If Disk Management and Diskpart do not meet your needs, consider using a professional tool like IM-Magic Partition Resizer Server. This software allows you to:
- Shrink a larger volume to create unallocated space next to the C drive.
- Move unallocated space even if it is not contiguous to the C drive.
Steps to Use IM-Magic Partition Resizer:
- Download and install the software.
- Open the application and locate the partition you want to shrink.
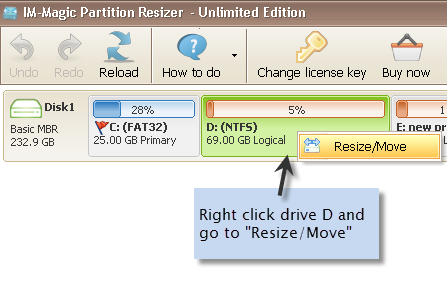
- Right-click on the large partition and select Resize/Move to shrink and produce unallocated spaces if there is no unallocated space on the disk. (You may skip this step if the unallocated space is already on the disk)


- Move the in-between partitions to move the location of the unallocated space if it is not adjacent to the c drive. (You may skip this step if the unallocated space is already contiguous to the c drive). The following video will show you how to move a partition without losing data. Also read: how to move a partition or unallocated space
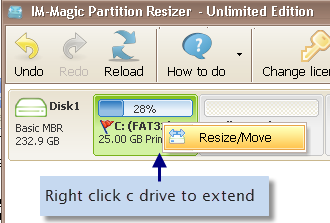
- Finally, right-click on the C drive and choose Resize/Move Partition, drag the c drive border to cover the unallocated space.


- Click APPLY CHANGES in the software to get the above steps applied, and wait to see a larger expanded c drive without losing data.

Shrink D/E and Expand C Drive (Same Disk)
Example 1: C and D (large D) → Shrink D, and add unallocated space to C drive without data loss using IM-Magic Partition Resizer Server.
Shrink E, Move D, and Expand C Drive (Same Disk)
Example 2: C, D, and E (large E) → Shrink E, move D, and add space to C drive without data loss.
Merge C and D (Adjacent Volume) to Expand C Drive without Data Loss
Add Space from Another Disk (RAID Required, Across Disks)
Video 1: Building RAID Arrays
The following video explains how to configure RAID for Dell PowerEdge Servers. For other servers, refer to specific guides available on video platforms.
Video 2: Adding a Disk to a RAID Array
Once the disk has been added to the RAID array (e.g., RAID 5), redistribute the new space with these steps:
- Initialize the disk in the software/disk management to see the unallocated space.
- Right-click the partition and select Resize/Move Partition to move the unallocated space adjacent to the C drive.
- Right-click C and select Resize/Move Partition to extend the C drive.
- Click Apply Changes to confirm the steps.
Configuration Example: C, D on Disk 1; New Disk 2 → Build RAID, add unallocated space to RAID, move the unallocated space to C by moving D, then extend C.
Clone C Drive to a Larger HDD/SSD
Another effective method to expand the C drive is to clone it to a larger disk, gaining additional unallocated space.
Clone MBR Disk to GPT Disk
If you are cloning a disk smaller than 2TB to a larger (3TB+), the following video explains how to convert an MBR disk to GPT without data loss.
Why Choose IM-Magic Partition Resizer Server?
This software offers key features for safe operation:
- Virtual Operations: Allows previewing operations before applying.
- Rollback Protection: Ensures data safety in case of power loss.
- Fast Algorithms: 300% faster for extending partitions compared to other tools.
## FAQs
# Q1. How to Extend C Drive Without Adjacent Contiguous Unallocated Space
If you don’t have adjacent contiguous unallocated space, you need to delete the right-side adjacent volume to create it. Alternatively, using a third-party tool can help you move or resize partitions without data loss.
# Q2. How to Extend C Drive with Free Space from Another Drive
To extend the C drive using free space from another partition:
- Delete the adjacent right-side volume to create contiguous unallocated space.
- Or use a tool like IM-Magic Partition Resizer to directly move free space from one partition to the C drive without losing data.
# Q3. How to Extend C Drive from Free Space on Another Disk
For redistributing space from another disk, you may need to construct a RAID array and use IM-Magic Partition Resizer Server. This method allows you to allocate space from one disk to another effectively.
# Q4. How can I add space to the C: drive from another disk (RAID required)?
To add space to the C: drive using RAID, you’ll need to ensure your server supports RAID expansion. With compatible RAID management software, add a new disk to the array, then reconfigure to extend the C: drive. Be sure to back up your data before proceeding, as this can be a complex and data-sensitive operation.
# Q5. Why is the "Extend Volume" option for the C: drive grayed out in Disk Management?
The "Extend Volume" option may be grayed out because no unallocated space is directly adjacent to the C: drive. Disk Management requires contiguous unallocated space next to the drive to extend it. You may consider third-party software if you need to move partitions to create this space.
# Q6. How can I increase C: drive space on Windows Server 2019?
To increase C: drive space on Windows Server 2019, you can use unallocated space if available, or shrink other partitions. If the "Extend Volume" option is disabled, consider using third-party disk management software. Always back up your data before making disk changes.
# Q7. Can I resize the C: drive on Windows Server without losing data?
Yes, resizing the C: drive without data loss is possible with third-party partitioning tools that allow live resizing. Be sure to back up your data before proceeding, as partition resizing involves potential risks.
# Q8. How do I clear space on the C: drive on my server?
Clear space on the C: drive by removing unused files, uninstalling unnecessary applications, and deleting temporary files. Using Disk Cleanup or relocating large files to other drives can also help optimize space usage on the C: drive.
## Conclusion
Managing disk space on your C drive is crucial for maintaining the performance of your Windows Server. Whether you choose to clear up space through system tools or extend your C drive with built-in utilities and third-party software, these methods will help you reclaim valuable storage and ensure smooth operation. If you encounter difficulties, don’t hesitate to consult further documentation or seek professional assistance to resolve any issues.