3 Ways to Create/Move Unallocated Space Including without Data Loss
Description: To expand your disk drive, adjacent unallocated space is vital. You may have to create unallocated space from another drive and move the unallocated space contigous to expand hard drive space. Follow this piece of information to understand how to create and move unallocated space on Windows 11/10/7 and Windows Server OS 2012 2016 2019 2022 etc.
Disk Management VS Partition Resizer
The following table compares the Windows built-in tool, Disk Management, with IM-Magic Partition Resizer, a free tool for disk management.
| Disk Management | IM-Magic Partition Resizer* | |
| *Create Unallocated Space |  |
 |
| Move Unallocated Space | NO |  |
| Move Partition | NO |  |
| Move System Reserved Partition | NO |  |
| Move Recovery Partition | NO |  |
| Move OEM Partition | NO |  |
| Shrink FAT32 Partition | NO |  |
| Extend FAT32 Partition | NO |  |
| Shrink NTFS Partition |  |
 |
| Extend NTFS C Drive |  YES when right unallocated space is contiguous to C YES when right unallocated space is contiguous to C |
 |
| *Extend Drive Over 2TB in MBR | NO | NO |
| Price | FREE | FREE |
| Download Win 11-7 (100% Free) Download Win Server (Free Demo) |
*Create unallocated space: Creating unallocated space can be performed by both Disk Management and Partition Resizer by shrinking a large volume or deleting a volume. (Disk Management cannot shrink a FAT32 volume.)
*Need to extend a volume over 2TB on an MBR disk? Solution: Convert the disk from MBR to GPT without losing data by using IM-Magic Partition Resizer, as GPT disks support storage capacities over 2TB. (Disk Management can only convert a disk from MBR to GPT after all volume were removed.)
*IM-Magic Partition Resizer is provided on resize-c.com.
Quick Navi
Method 1. Create and move unallocated space using IM-Magic Partition Resizer
IM-Magic Partition Resizer Free is popularly known for its characteristics. It includes free, efficient, and powerful resizing software allowing users worldwide to distribute, extend, copy, shrink, delete, format, and make unallocated space into partition without destroying the data on the partition.
It provides support to PCs that run on Windows OS like Windows 7/8/10/11, Windows Vista, and Windows XP. Being marked in the disk space management software because of the resizing guide, it demands the users perform only 4 simple steps. Moreover, it's 100% secure and doesn't hamper a single file on the disk.
A. Shrink volume to create unallocated space
For Windows 11/10/8/7/Vista ==> Download IM-Magic Partition Resizer Free (Free)
For Windows Server all versions ==> Download IM-Magic Partition Resizer Server (Free Demo)
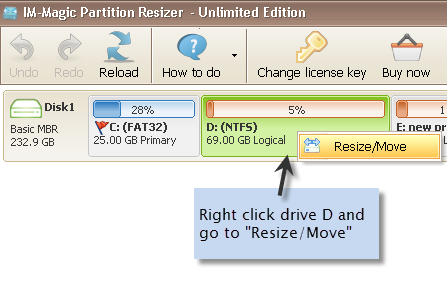
Step 1: Complete the downloading, installation, and launching the process of the IM-Magic Partition Resizer. Right-tap on a partition having sufficient space and choose "Resize/Move."
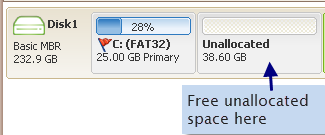
Step 2: Move your arrows to shrink the targeted partition to accumulate free space. You will notice the free space like unallocated volume.
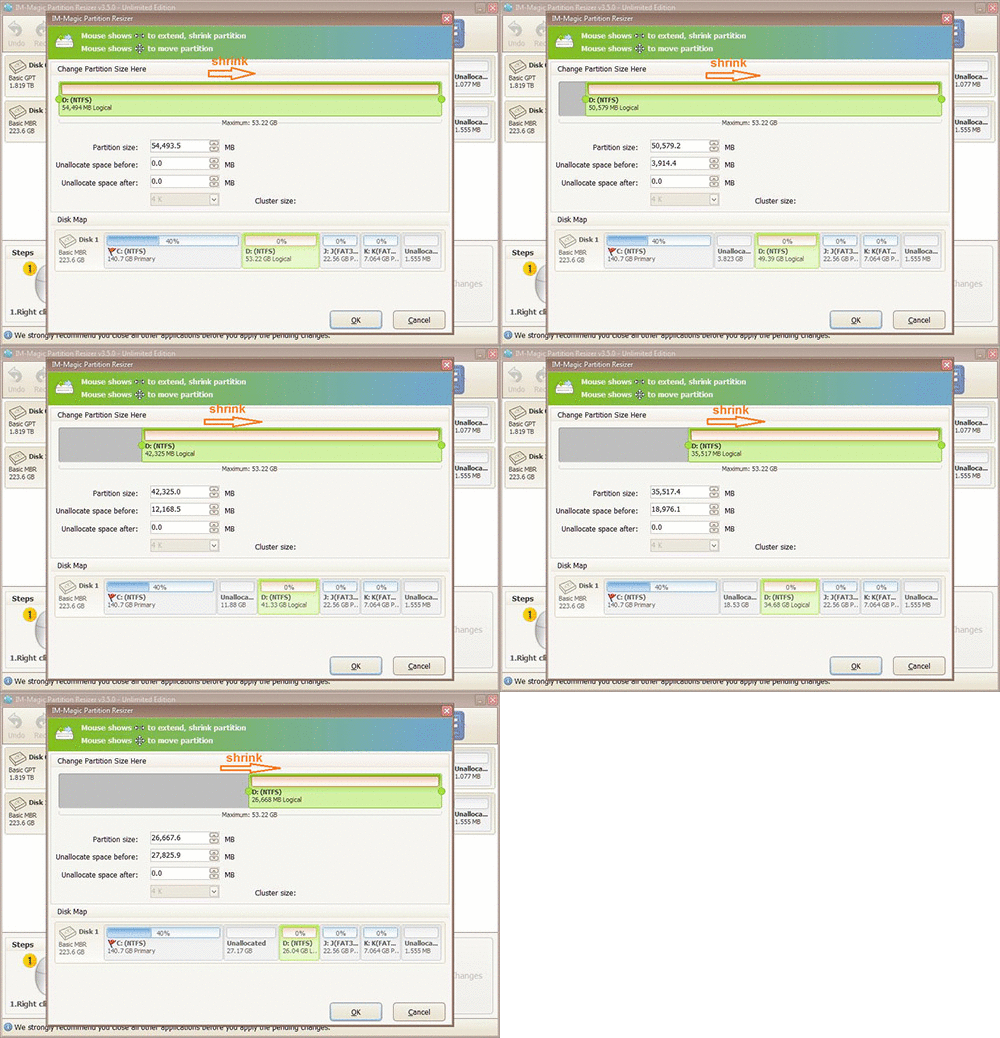
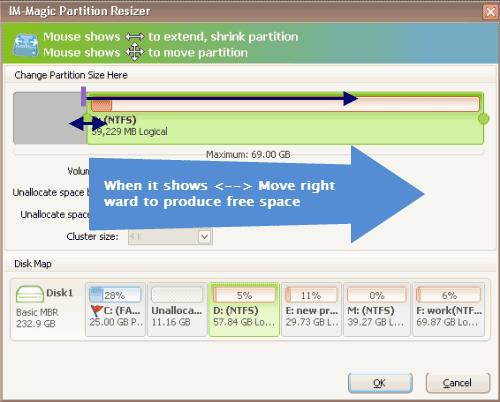
Note: If the unallocated space is not created adjacent to the drive you want to expand, you need to right click the partition that stands in between, choose 'Resize/Move' and then move it to change the location of the unallocated space.
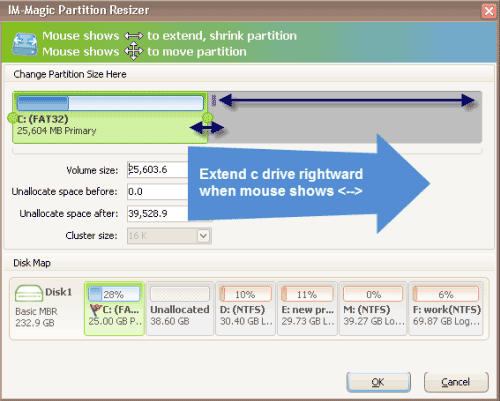
Step 3: Start merging the unallocated volume to your target C drive as an example. Right click on C drive and opt to "Resize/Move." Move the border of the c drive when the mouse shows arrows to add the unallocated volume to the C drive. 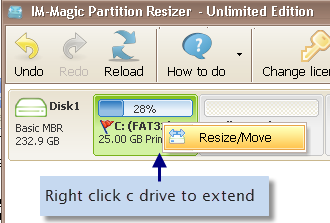

Step 4: Tap the 'Apply' button to finalize the changes, and you will have a larger volume. (Note: All steps prior to this are virtual, and this step applies those changes in reality.)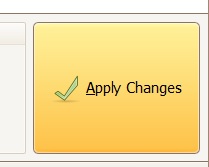
If there are partitions that stand in-between, you may move partitions safely with Partition Resizer.
B. Move Unallocated Space or Partition Without Losing Data
Moving the partition will help change the location of the unallocated space. If there is unallocated space around the partition, right click the Partition in Partition Resizer, choose RESIZE/Move, then move it left-forward or right-forward will help change the location of the unallocated space.
Note: Disk Management and Diskpart cannot move partitions.
The following video shows how to move partitions without losing data with Partition Resizer.
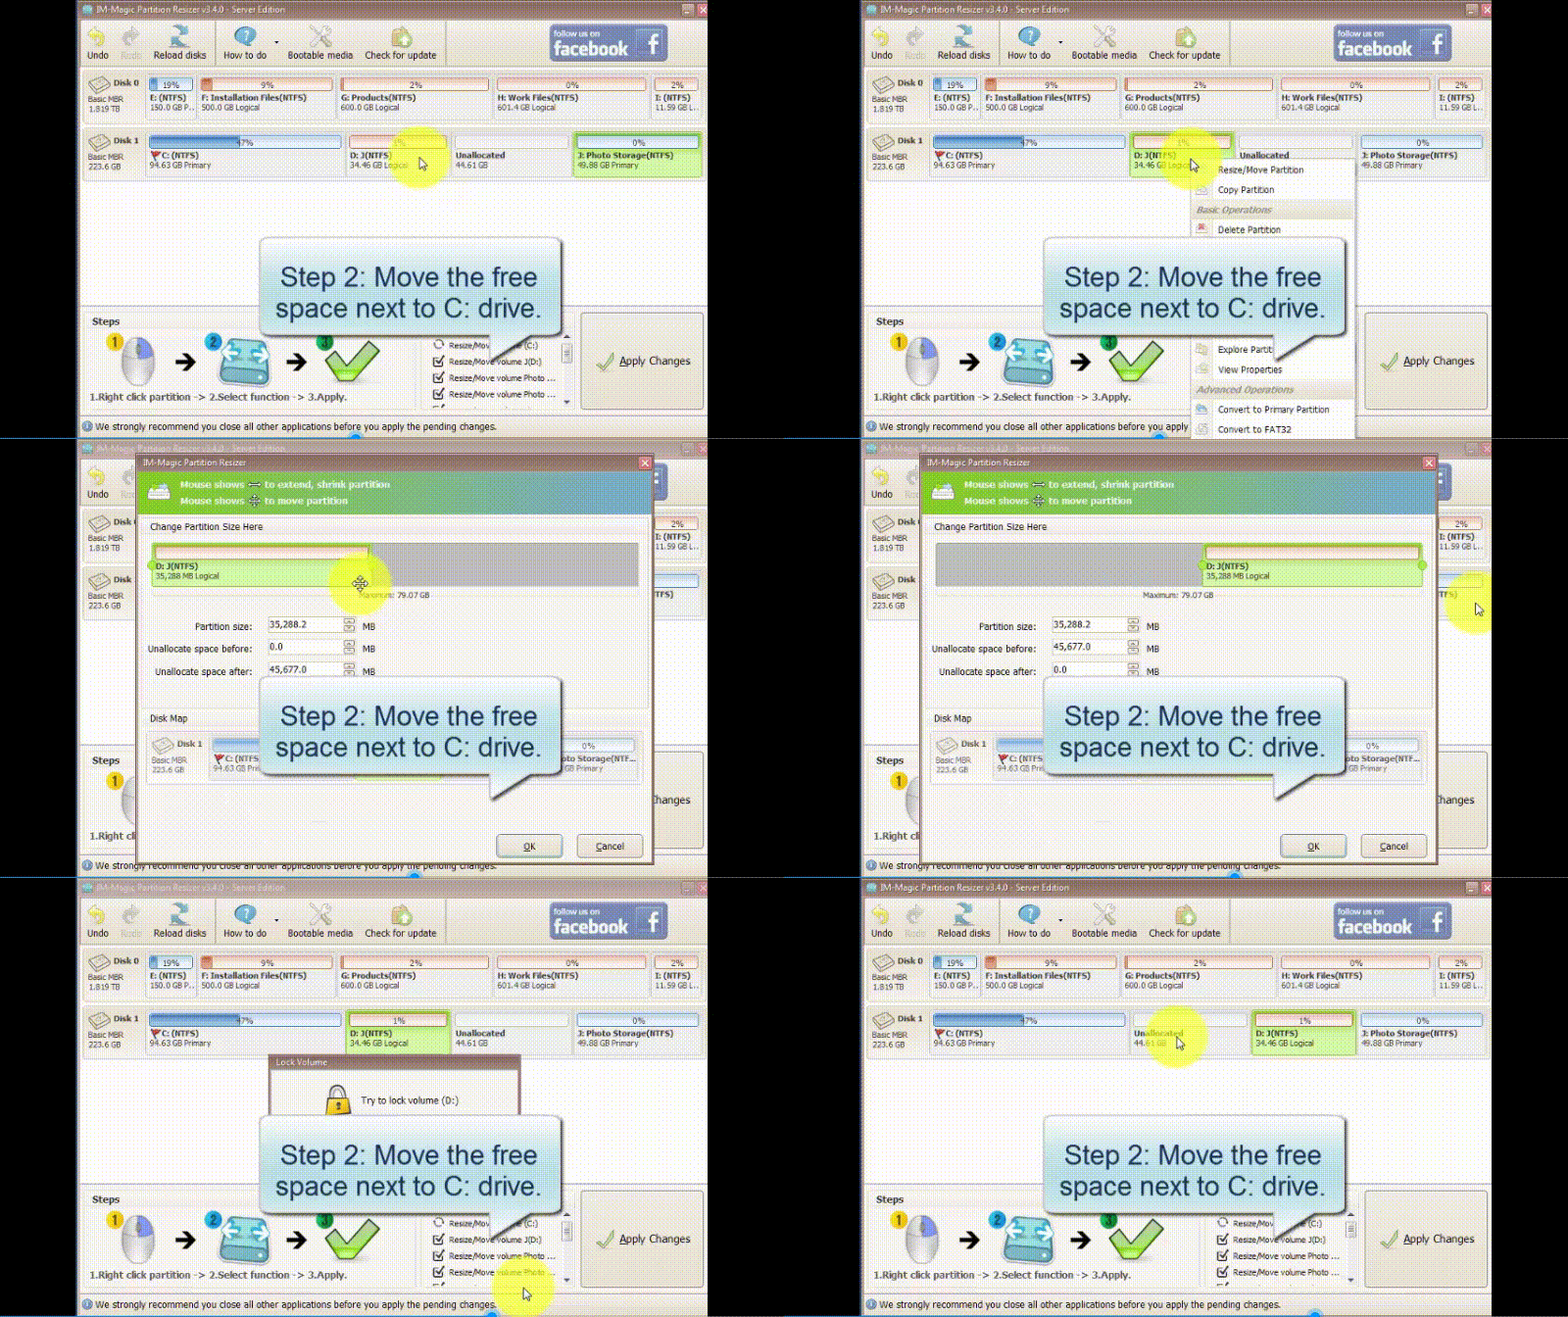
For moving unallocated spaces, you may follow these steps:
- 1, Right click the partition which is next to the unallocated space, go to RESIZE/MOVE PARTITION option
- 2, Move the whole partition right or left forward when the mouse shows cross arrows in this window, click OK in this window, and then the unallocated space will be moved to the right or left. (The steps will all stay virutal and won't be true until you click APPLY CHANGES in the end)
Video: how to move a partition without losing data
Create unallocated space with Disk Management
Method 1: Shrink Partition
During shrinking a partition, all the ordinary files are relocated on your disk by default to create unallocated space windows 11 10. However, it doesn't require reformatting the disk to shrink any partition. Instead, just follow the step-by-step guide below to proceed with it.
Step-by-step guide:
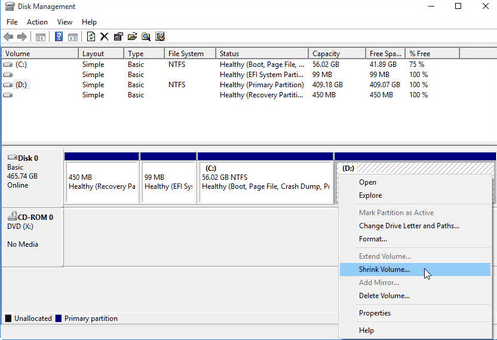
Step 1: Right press on the partition you require to shrink, and tap “Shrink Volume.”
Step 2: Enter the number of sizes you are willing to get, like unallocated space.
Or you may type any amount as you like to create.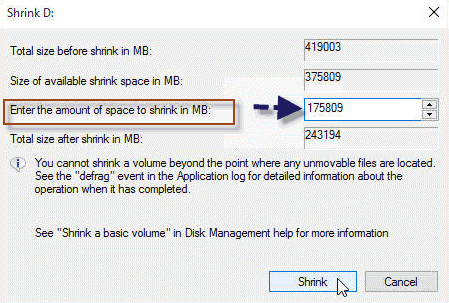
Step 3: Confirm the whole process; you quickly get the unallocated space.
Method 2: Delete Partition
If you delete a partition, it will remove all the data stored on it. Therefore, it's recommended to refrain from deleting a partition unless you are certain that you don't have any data stored on your partition. Instead, apply the below steps to delete the partition in Microsoft Windows.
Step 1: Right-tap on the drive and choose “Delete Volume.” This would remove every data on your partition and make sure to backup all your essential files.
Step 2: It would make unallocated space into partition. However, you are free to use disk management to extend the C drive or any drive you want to get it expanded. (You need to use Partition Resizer Free to move the drives that stand in the space of partitions and get your unallocated space close to the one you want to expand)

Frequently Asked Questions
Q1. How to convert free space to unallocated space in Windows 11/10/8/7?
To convert free space from one disk drive to be unallocated space, you may use the following methods.
Method A: Partition Resizer Free to convert free space to unallocated space
- 1: Download and install Partition Resizer,
- 2, Right click the large drive that has free space (in Partition Resizer, right click the large drive)
- 3, Shrink the large drive
- 4, Confirm the changes, and then the free space from large volume will be converted to unallocated space in your disk that you can redistribute it to other drives as you wish
Method B: Shrink large drive that has free space with Disk Management to create unallocated space by shrinking
A: Right-tap on the Free space on the left logical part and select resize. Drag the logic's left side towards the right to open up the unallocated space to the D. Tap Apply. In Disk Management, right-tap on D, followed by extending it to the Unallocated Space
Q2. How to make unallocated space with diskpart cmd?
You may shrink a large volume with diskpart to create unallocated space, or delete volume with diskpart to create unallocated space. We will show you the first part: how to shrink a volume to create unallocated space with diskpart cmd in Windows 11/10 comptuers.
- 1, Run cmd with admin privileges
- 2, Type diskpart and press enter
- 3, Type 'list disk'
- 4, Type 'list volume' to list every volume on the disk
- 5, Type 'select volume *', when you want to shrink the large d volume that is listed with volume #2, then you may type 'select volume 2' and press enter as an example.
- 6, Type 'shrink volume size=10240' when you want to shrink 10GB, the exact number of space is depending on your own needs
And then you may come back to your pc disk management to find that the unallocated space is next to the volume you shrinked.
Q3 The problem: how to move unallocated space adjacent to the target drive?

Answer: Free tool IM-Magic Partition Resizer can help move partitions without losing data that stands among the target volume and the unallocated space, and then you may clearly see the unallocated space will be allocated to the drive you want to expand in this tool.
See how unallocated space is moved adjacent to the target drive:

Also read: how to move partition in Windows 11/10
Q4. How to allocate unallocated space to C drive in windows 11/10/8/7?
Case1: Unallocated space is next to the C drive. If you want to make the unallocated space to the c drive, you may do this with Disk Management if the unallocated space is already next to the C drive.
Go to the disk management via the run window by clicking on the Windows key + Run together. Enter 'diskmgmt'. msc'. Tap 'OK.' After loading the disk management, right-tap on your C drive. Choose the extend volume option for extending the C drive along with the unallocated space.
Or you may use free tool Partition Resizer to add unallocated space to c drive without losing data.
Case2: Unallocated space is NOT next to the C drive. If the unallocated space is far from the c drive that you want to expand, you may use free tool Partition Resizer to move the volumes that stand in between, and then the unallocated space can be safely moved next to any drive you want to expand.
See how this following moving volume can help reallocate the place of unallocated space in a disk.

Note: The unallocated space in disk 1 cannot be moved to disk 2 or other disks. You need to build raid array to get the job done.
Q5. How to use unallocated space on SSD?
A: Click Win+R to open the 'Run' dialogue and enter the "diskmgmt. msc" command. Tap 'OK' to enter the main part of Disk Management. Then, right-tap on the unallocated space on the SSD drive, choose “New Simple Volume,” and follow the above prompts to create a new volume.
Q6. How do I add unallocated space to free space?
A: Visit 'This PC,' right tap on it and select "Manage" > "Disk Management." Right-press on the unallocated space and select "New Simple Volume." Proceed with this wizard to complete the remaining procedure.
Q7. How to create unallocated space?
A: To create some unallocated space, shrink the hard drive. While you are shrinking the hard drive, the existing face becomes unallocated. Right-tap on the main drive and choose shrink volume. Enter the amount you require for shrinking the hard drive by MB (megabytes).
Background Introduction:
Any kind of physical space on your hard drive not belonging to your partition is considered 'unallocated‘ in disk management.
Moreover, users cannot see it in Windows File Explorer, which is the leading cause of the hard drive's inability to create unallocated space diskpart. As a result, users can't use the unallocated space just like other general partitions for storing the data.
What’s unallocated space for?
You may use the unallocated space to add it to any other volume or use it to create a new volume especially when after a certain point of time, you may notice that your PC has started running slowly, doesn't respond to your commands appropriately, or the screen becomes black, and the system lags. Your system partition that is generally assigned with the C drive letter is showing a red mark because of insufficient drive space.
Conclusion
When your C drive segments don't have space and run out of unallocated space, you might have a tough time playing out any undertaking on your PC.
While working Windows 11, assuming you have run over little compacted space accessible close to your C drive, you could address whether to make unallocated space contiguous to the target partition.
To direct you on such issues, this article manages answers for how to create unallocated space windows 11 10.