Reclaim Disk Space Windows Server 2012 R2 - 6 Ways
Summary
C drive in low disk space in Windows server 2012 r2? You can reclaim disk space in Windows server without data loss easily.
Table of Contents
How to Clean Up Disk Space in Server 2012 R2?
Disk space issues are a common challenge in Windows servers. Here, we'll explore various methods to reclaim disk space in Windows Server 2012 R2. From basic to advanced methods, this guide helps you regain valuable storage space.
Basic Cleanup Steps
Clean #1 - Remove internet browsing history, cache, and temporary files. Use the browser's settings or the Disk Cleanup tool. Deleting files from the Temp folder is a quick way to free space:
- Press Windows + R, type %temp%, and press Enter. Delete the contents of the folder.
- Repeat with temp (type
tempin the Run dialog and delete files).
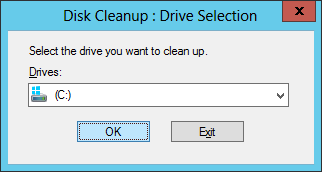
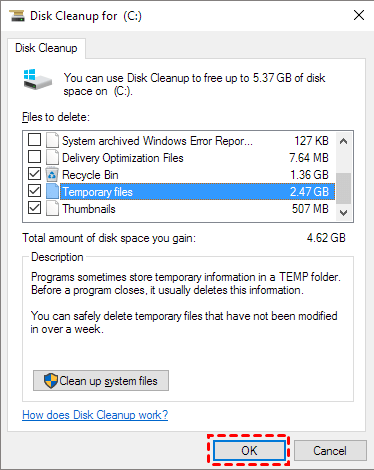
Clean #2 - Use the Disk Cleanup Tool for a deeper cleanup:
- Press Windows + R, type
cleanmgr, and press Enter. - Select the drive (e.g., C:) and click OK.
- Check unnecessary file categories (e.g., Recycle Bin, Temporary Files) and click OK.
Clean #3 - Delete error and dump files from your profile's Temp folder. Run %temp% to access it and delete all files.
Clean #4 - Remove Shadow Copies if enabled. To do this:
- Right-click on the drive, go to Properties → Shadow Copies.
- Delete older copies and keep only the most recent.
Clean #5 - Uninstall unused programs via Control Panel → Programs and Features.
Clean #6 - Adjust virtual memory and the Recycle Bin settings:
- Right-click on Computer → Properties → Advanced System Settings.
- Under Performance, click Settings → Advanced → Change.
- Move the page file to another drive or reduce its size.

Resize Disk Space in Windows Server 2012
Sometimes, cleanup efforts aren't enough, especially if the C: drive is nearly full. Resizing partitions can help reallocate space efficiently.
Using the Built-In Disk Management Tool
The Disk Management tool can be used to shrink or extend partitions:
- Right-click on Computer → Manage → Disk Management.
- To shrink a partition, right-click the drive → Shrink Volume. Specify the size to reduce.
- To extend, right-click the drive → Extend Volume. Ensure unallocated space is available next to the partition.
Note: Disk Management has limitations. It cannot move unallocated space, and extending partitions often requires deleting adjacent volumes, risking data loss.
Extend Disk Space with IM-Magic Partition Resizer
IM-Magic Partition Resizer is a user-friendly and powerful tool to resize partitions without data loss. It allows for easy partition shrinking, extension, and moving of unallocated space.
Steps to Extend a Volume
- Download, install, and launch IM-Magic Partition Resizer.
- Right-click the partition to shrink and select Resize/Move. Drag to create unallocated space.
- Right-click the target partition (e.g., C:) and drag its border to include the unallocated space.
- Click Apply to execute changes.
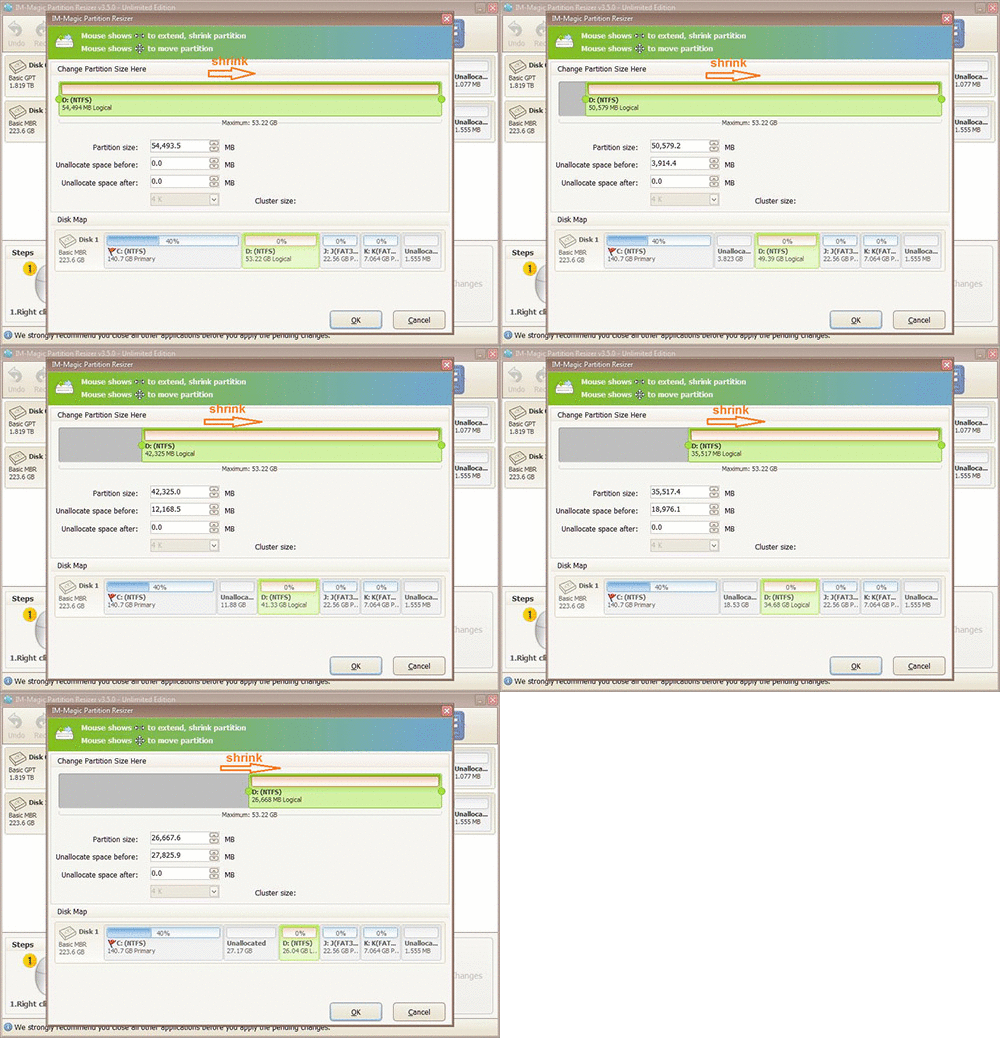
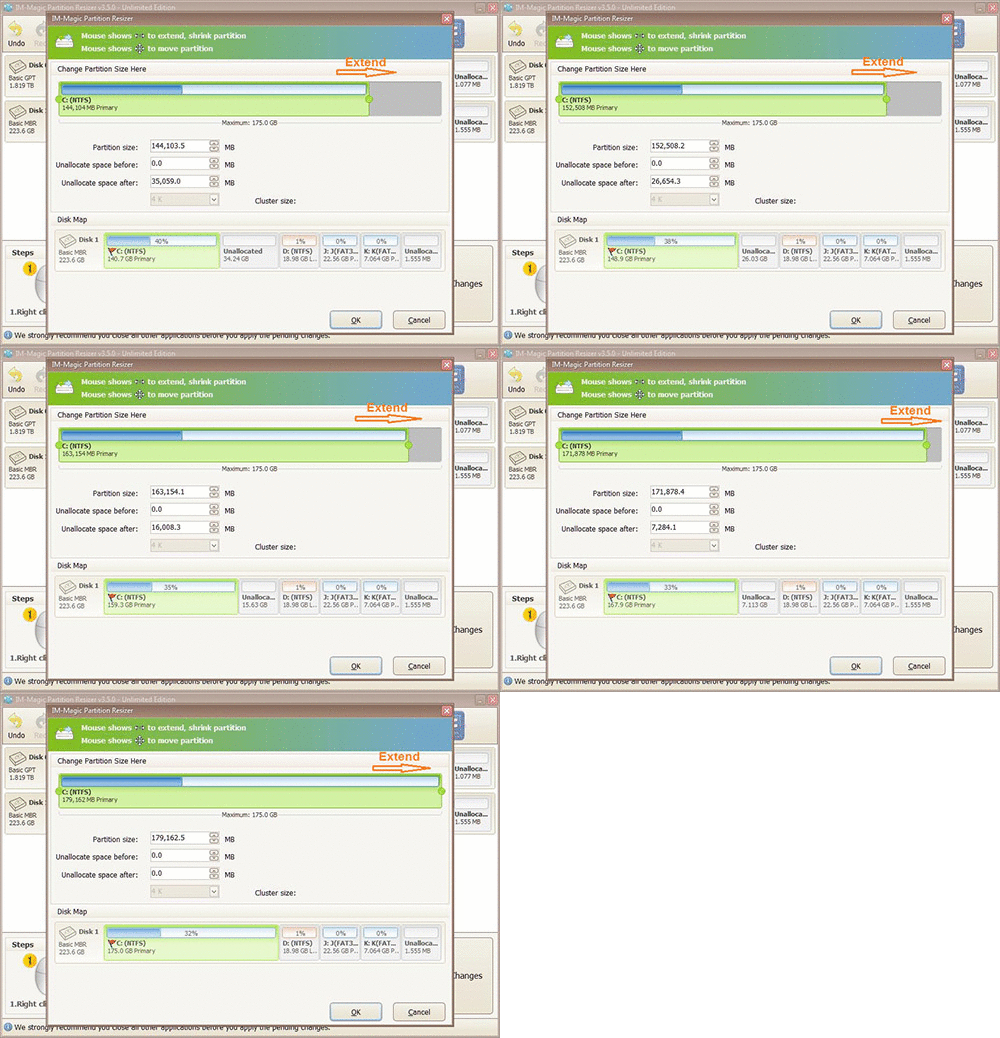

IM-Magic Partition Resizer ensures data safety with its rollback feature during operations. It supports all major Windows editions.
Extra Tips to Optimize Disk Usage in Windows Server
- Enable Storage Sense (if available): Automatically clear temporary files and manage storage.
- Use NTFS Compression: Compress less-used files to save space. Right-click a folder → Properties → Advanced → Enable compression.
- Monitor Disk Usage: Use tools like TreeSize or WinDirStat to analyze large files and folders.
- Regular Backups: Move older data to external storage or cloud solutions.
Follow these steps and tools to effectively manage disk space on your Windows Server 2012 R2. Happy optimizing!
Related Product
- IM-Magic Partition Resizer Server - Partition space redistributing software that works for Windows Server 2003-2022.
