Unable to Extend Volume Disk Management Server 2019 -- How to Fix It
Summary
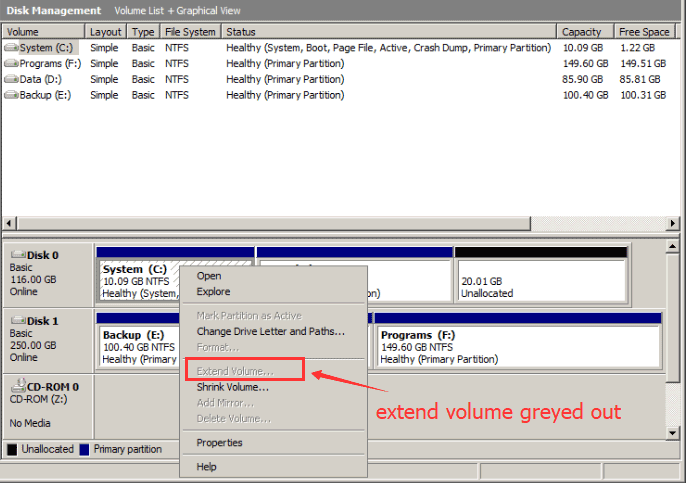
This page explains how to resolve issues when extending a volume in Windows Server 2019 fails, particularly when the "Extend Volume" option is greyed out.
Table of Contents
Background
Windows Server 2019 provides advanced disk management capabilities, but users may encounter issues when attempting to extend a volume. These problems can disrupt server operations, making it crucial to resolve them promptly.
Reasons Why the "Extend Volume" is Greyed Out
- No Adjacent Unallocated Space: Extending a volume requires unallocated space next to the partition you wish to extend. If no space is available, the option will be disabled.
- Unsupported Partition Type: The "Extend Volume" feature supports only NTFS and RAW partition types. Other types like FAT32 are not compatible.
 Extend volume grayed out on Windows server
Options to Solve the Cannot Extend Partition Problem
Here are several methods to resolve the issue:
- Check for Unallocated Space: Verify if there is unallocated space adjacent to the partition you wish to extend. Use Disk Management to create or move unallocated space.
- Delete Adjacent Partitions: If no space is available, you may delete the adjacent partition (e.g., D drive) to make space for extending the C drive. Note: Back up your data before proceeding.
- Use Third-Party Tools: Tools like IM-Magic Partition Resizer can bypass these limitations and provide more flexibility in managing partitions.
Using PowerShell or DiskPart Commands
For users who prefer using native tools, PowerShell or DiskPart commands can help manage partitions:
Using PowerShell
Get-Partition | Select-Object DriveLetter, Size, PartitionNumberCheck the available partitions and their sizes. Then:
Resize-Partition -DriveLetter C -Size 50GBThis command resizes the C drive to 50GB, provided unallocated space is available.
Using DiskPart
- Open Command Prompt as Administrator.
- Type
diskpartand press Enter. - Type
list volumeto view available volumes. - Select the volume to extend:
select volume X(replace X with the volume number). - Extend the volume:
extend size=XXXX(replace XXXX with the desired size in MB).
Video Tutorial to Resize Partitions with Partition Tool
[Guide] Steps to Extend Volume Without Data Loss
Follow these steps to resize your partition using IM-Magic Partition Resizer:
- Download, install, and launch the program.
- Right-click the large volume and shrink it to create unallocated space.
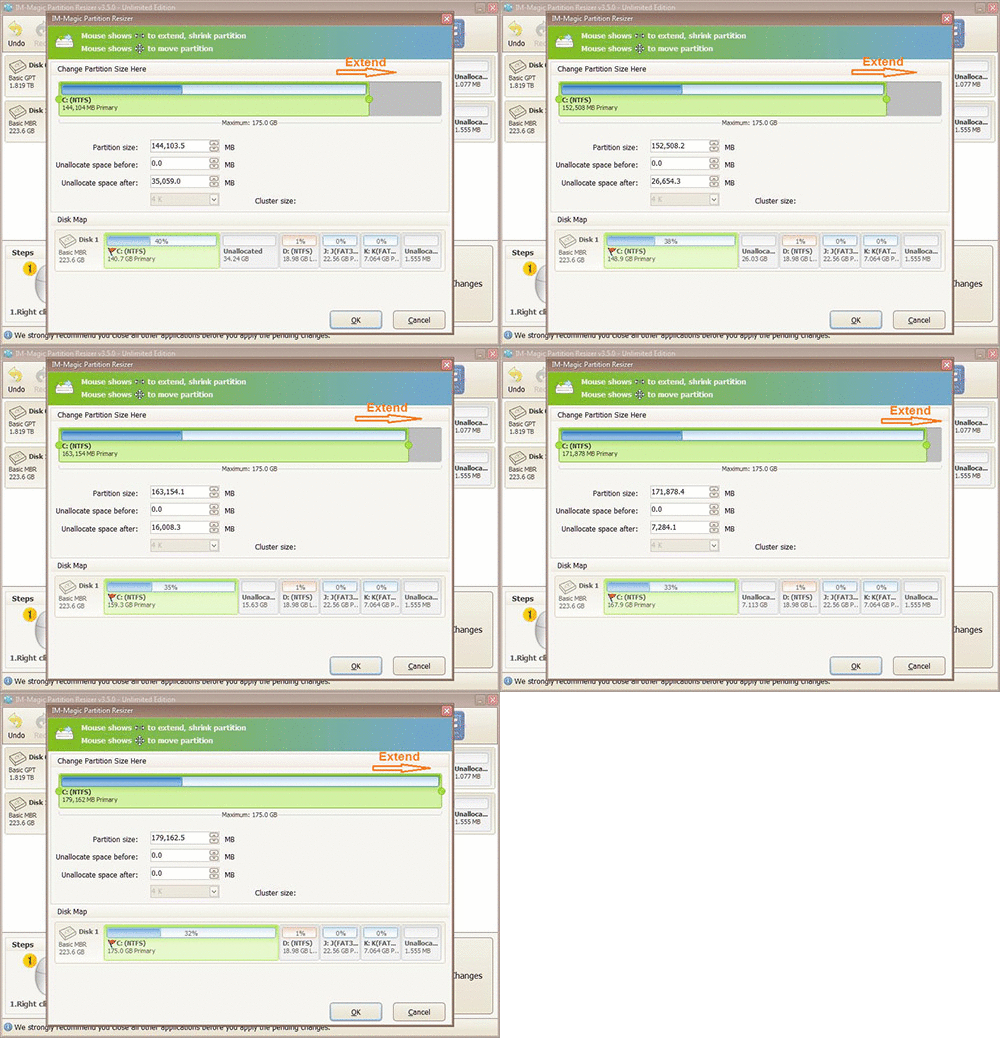
- Right-click the target volume (e.g., C drive) and drag its border to extend into the unallocated space.
- Click "Apply" to confirm and save changes.
 Steps to resize your partition when you cannot extend volume
For more details, check the official guide.
Related Product
- IM-Magic Partition Resizer Server - Partition space redistributing software that works for Windows Server 2003-2022.
