VMware Increase Disk Space Greyed out Fixes
Summary
This page will tell the way to increase the size of disk partition in VMware when Windows PC built-in tool was unable to extend the partition.
Extend VMware Disk Partition on VMware Settings
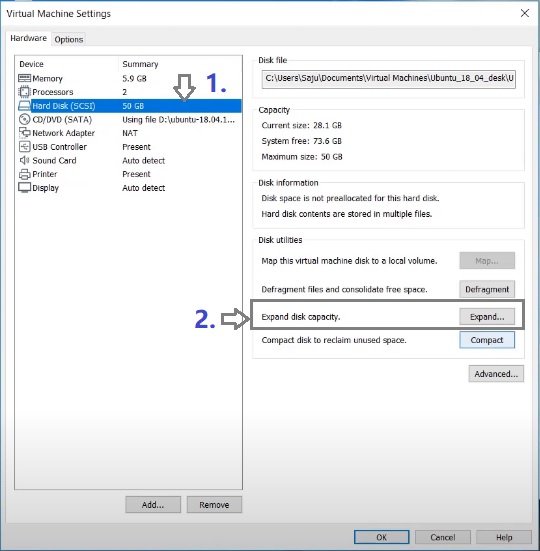
After expanding the VMware disk size, unallocated space will be created on the disk. You can use the free tool, IM-Magic Partition Resizer, to add the unallocated space to any drive inside the Windows OS.
Moving partitions can help change the location of the unallocated space. Extending a volume requires adjacent unallocated space, whether using Windows built-in tools like Disk Management, Diskpart, or third-party software like IM-Magic Partition Resizer.
Here is a video that shows how to add free space to a partition without losing data:
Note: Since there is already unallocated space, you don't need to shrink a volume as shown in the video.
For Windows 11/10/8/7 => Download Partition Resizer Free [100% Free]
For Windows Server 2025-2003 => Download Partition Resizer Server [Free Demo]
Steps to Extend Virtual Disk Partition with Partition Software
Step 1:
Download, install, and start IM-Magic Partition Resizer Server. Right-click a partition with lots of free space and select the "Resize/Move" option.
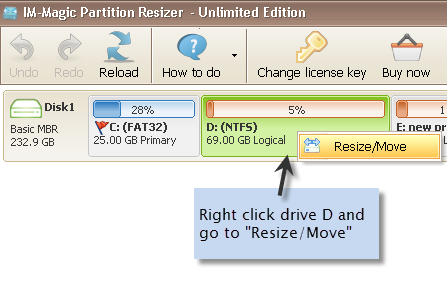
Redistribute disk space from a large volume in Windows Server.
Step 2:
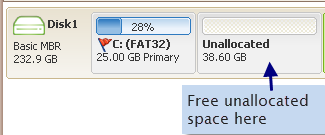
Drag the mouse to move the arrows and shrink the selected partition. You will see some free space, which will appear as unallocated space.
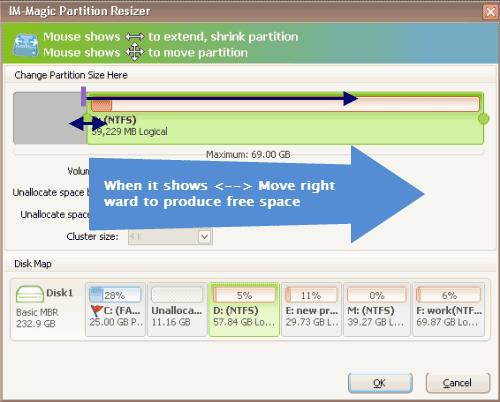
Shrink other large partitions to produce free space for the C drive.
Step 3:
Move the unallocated space close to the partition you want to extend. Right-click the partition and select "Resize/Move."
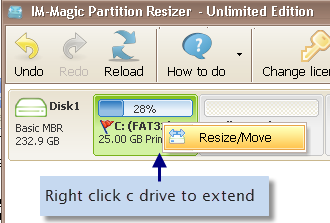
Right-click the C drive to start extending it.
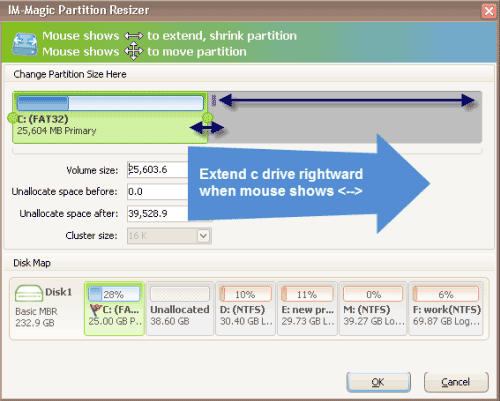
Step 4:
Drag the arrows to add the unallocated space to the partition and then click the "Apply" button.
VMware Increase Disk Size Greyed Out
VMware’s volume extension option may be greyed out due to the following reasons:
- No adjacent unallocated space is available.
- The drive you want to expand is using a non-NTFS file system.
- A recovery or reserved partition blocks the way.
- The disk has reached the maximum size limit (e.g., 2TB for MBR disks).
- Free space is present, but it is not unallocated space.
Using IM-Magic Partition Resizer can resolve these issues if there is free space on other partitions. However, if there are no other partitions or no free space, you will need to increase the virtual disk size before resizing the partition.
To extend a virtual disk:
- Right-click the virtual machine and choose "Editing Settings."
- In the "Virtual Machine Properties" dialog box, increase the disk size.
Problem:
If the "Disk Provisioned Size" option is greyed out, it may be due to existing snapshots.
Solution:
Delete the snapshots to unlock the Disk Provisioned Size option.
Tips
- Unallocated space is always required to resize the disk partition, so ensure there is free space on other partitions within the same virtual disk.
- Windows Disk Management can extend or shrink partitions but cannot move them.
- Diskpart can extend partitions on older systems like Windows Server 2003 but cannot extend system or FAT32 partitions.
- IM-Magic Partition Resizer ensures safe partition resizing without data loss or system crashes.
More Related Articles You May Like
- Windows 2012 extend system partition - professional partition sofware can work on windows server 2003 vmware to extend system partition...
- windows server extend c drive space - partition software to increase size of c drive on windows server 2000/2003/2008/2012, sbs 2003, sbs 2008, etc...
- windows server 2012 r2 extend c drive - windows partition software is capable of extending c drive on windows server 2003 r2...
- windows extend partition unallocated space - if system partition doesn't have enough free disk space on windows server 2003, you don't need to panic...
Related Product
- IM-Magic Partition Resizer Server - Partition space redistributing software that works for Windows Server 2003-2025.
