How to Safely Extend C Drive on Windows Server 2012 (100% Data Safe)
Overview
If your C drive is running low on space, your Windows Server 2012 system may experience performance issues, failed updates, or other problems. This guide will show you how to safely extend the C drive without data loss using a powerful partition management tool.
Why You Need to Extend the C Drive on Windows Server 2012
Running out of space on the C drive can lead to various issues such as system slowdowns, failure to install software, and the inability to apply updates. Here’s why extending your C drive is essential:
- Improved System Performance: A full C drive can significantly slow down your server. By extending the C drive, you give the system more room to run efficiently.
- Prevent Data Loss: As your C drive fills up, Windows may begin to delete temporary files or fail to back up your system properly. Increasing available space prevents this.
- Facilitate Software Installations and Updates: Many applications and updates require free space on the C drive. Extending the drive ensures these operations can continue without issue.
Tools You Need to Extend the C Drive
To extend your C drive without losing data, you'll need a reliable partition management tool. IM-Magic Partition Resizer Server is one such tool that allows you to resize partitions safely and effectively.
Download IM-Magic Partition Resizer Server
Get the software for all Windows Server versions by clicking the link below:
Download IM-Magic Partition Resizer Server
How to Extend C Drive on Windows Server 2012: Step-by-Step
Step 1: Backup Your Data (Recommended!)
Although IM-Magic Partition Resizer is designed to work safely without data loss, it’s always a good idea to back up your important files before modifying disk partitions. IM-Magic Partition Resizer also offers disk or partition backup inside of the software. You can also use tools like Windows Backup, a cloud service, or an external hard drive to back up your data.
Tip: A full system image backup can be extremely helpful in case anything goes wrong.
Option: You can use IM-Magic Partition Resizer to upgrade your disk to another larger disk including the OS without reinstallation.
Also read: how to upgrade disk to larger HDD/SSD
Step 2: Download and Install IM-Magic Partition Resizer
Once you've backed up your data, download IM-Magic Partition Resizer Server from the link provided above. After downloading, follow the installation instructions. Once installed, launch the program to begin resizing the partitions.
Step 3: Shrink Another Partition to Create Unallocated Space
To extend the C drive, you need to create unallocated space by shrinking another partition (one that has free space). Here’s how:
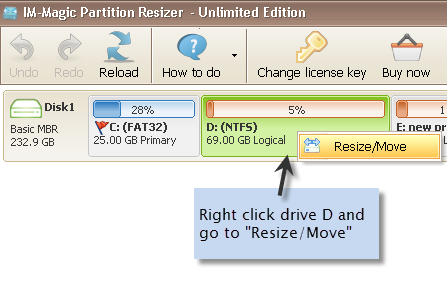
- Right-click on a partition that has enough free space (e.g., D drive, E drive) and select "Resize/Move".
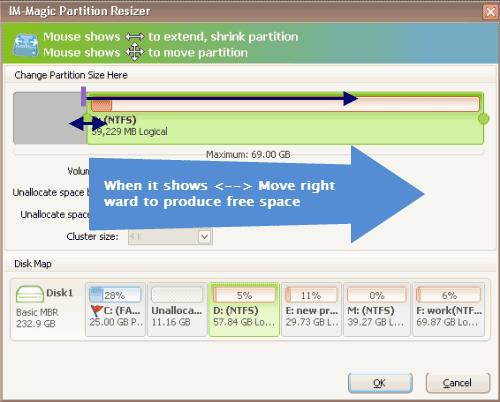
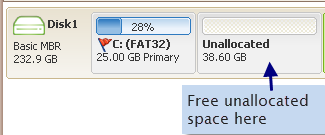
- Use the arrows to shrink the partition and create unallocated space. This space will be used to extend your C drive.

Step 4: Move Unallocated Space Next to C Drive
Now that you have unallocated space, it must be adjacent to the C drive to extend it. IM-Magic Partition Resizer makes this easy:
- Right-click on the C drive and select "Resize/Move".
- Drag the unallocated space next to the C drive using the software’s drag-and-drop interface.

Note: You cannot extend the C drive unless the unallocated space is immediately next to it. If it’s not, you’ll need to move partitions around (which IM-Magic makes simple).
Step 5: Extend the C Drive
Once the unallocated space is next to the C drive, you can now extend the partition:
- Right-click the C drive and select "Resize/Move".
- Drag the slider to extend the C drive into the unallocated space.
- Click "Apply" to make the changes permanent.

Tip: If you’re using a virtual machine, make sure the virtual disk is large enough to accommodate the increased size of your C drive.
Step 6: Finalizing the Changes
Once you’ve extended the C drive, the software will apply the changes. Your system will reboot to apply the partition resizing. The process should take only a few minutes, and your C drive will now have more space without any data loss.

How to Fix Common Problems When Extending C Drive
While extending the C drive is straightforward, users sometimes encounter challenges. Here are solutions to common issues:
- Issue: Unallocated space is not adjacent to the C drive.
Solution: You’ll need to move the partitions around to ensure the unallocated space is next to the C drive. IM-Magic Partition Resizer makes this process easy, without needing to delete partitions. - Issue: Disk Management does not allow you to extend the C drive.
Solution: Disk Management in Windows Server 2012 has limitations and may not allow you to extend the C drive if unallocated space is not directly adjacent. IM-Magic Partition Resizer is a better alternative. - Issue: Insufficient disk space to create unallocated space.
Solution: Consider shrinking other partitions (like D or E) that have free space, or consider adding additional physical storage to the server.
Additional Tips for Managing Disk Space in Windows Server 2012
- Regular Maintenance: Make it a habit to regularly check your disk space. You can use tools like Disk Management or third-party software to monitor and maintain disk health.
- Use Disk Cleanup: Run Windows Server’s built-in Disk Cleanup tool periodically to free up space by removing temporary files, system files, and other unnecessary files.
- Consider Expanding Storage: If your server consistently runs low on space, it might be time to add additional storage or set up a more scalable storage solution (e.g., network storage or cloud storage).
What is Unallocated Space, and How to Use It?
Unallocated space is disk space that is not currently in use by any partition or file system. It is essentially free space that can be added to an existing partition, such as the C drive, to increase its size. To extend the C drive on Windows Server 2012, you need to first check if there is any unallocated space on your hard disk. If there isn't, you can create it by shrinking other partitions that have sufficient free space.
Tip: Unallocated space can only be added to a partition that is adjacent to it. If the unallocated space is not next to the C drive, you’ll need to move the space before extending the C drive. Disk Management cannot move partitions, but IM-Magic Partition Resizer makes this process simple and safe.
How to Create Unallocated Space on Windows Server 2012?
If there is no unallocated space available, you can create it using the following steps:
- Open Disk Management by right-clicking "This PC" and selecting "Manage".
- Select "Disk Management" from the left panel.
- Right-click a partition that has enough free space (e.g., D drive) and select Shrink Volume.
- Specify the amount of space to shrink and click "Shrink". This will create unallocated space that can not be used to extend your C drive since the unallocated space is not created at the right side adjacent to the drive you want to expand.
Adjacent unallocated space? Delete the right side volume to create adjacent unallocated space. And then the unallocated space will be adjacent to the one you want to expand.
Conclusion
Extending the C drive on Windows Server 2012 can be done safely and easily with the right tools. IM-Magic Partition Resizer Server is a reliable and user-friendly solution that lets you resize partitions without data loss, helping you to regain performance and avoid system errors. By following the steps in this guide, you can extend your C drive and keep your server running smoothly.

