Clone/Migrate Disk to Larger SSD/HDD
Quick Overview
When cloning a disk from a smaller to a larger SSD or HDD, ensure the source data fits the destination. Use reliable cloning software and back up data beforehand. Adjust partitions as needed, and ensure the source disk and the destination disk have the same MBR or GPT if required(When the target disk is GPT, you need to convert the source disk GPT too). After cloning, verify BIOS settings and boot order to ensure the system boots from the new disk. Ensure proper alignment for optimal SSD performance. Double-check that the GPT disk is correctly recognized and configured in your system's BIOS settings.
Video: How to clone or upgrade to larger SSD/HDD FREE
Note: The larger disk is the destination disk and must be empty, as the cloning process will remove all the old data on the destination disk. The OS disk cloning can only be done from "Migrate OS Wizard" under Tools tab in the free tool Partition Resizer.
Software needed: IM-Magic Partition Resizer, 100% free to clone disks on Windows 11 10 8 7
Larger Disk and GPT?: MBR < 2TB < GPT (By Windows)
The disk style MBR or GPT is often set by Windows and can be changed by some third party software.
When the disk is below 2TB, it usually has MBR and it's easy to clone the disk from a smaller MBR disk to a larger but same MBR disk.
If your disk is 2TB and over, it usually has GPT in Windows computers.
MBR to GPT Cloning (GPT will be changed to MBR): The GPT disk will be changed to MBR automatically during the cloning process if you haven't converted the MBR source disk to GPT.
MBR to GPT Cloning (How to keep the destination disk GPT?): The MBR source disk must be changed to GPT before the cloning, and the PC BIOS must be changed to UEFI too.
How to change a source disk from MBR to GPT and prepare for cloning:
OS Disk: To change an OS disk from MBR to GPT, you can use MBR2GPT, which is provided by Windows for free.
Non-OS Disk: To change a non-OS disk from MBR to GPT, you can use the free tool IM-Magic Partition Resizer.
Note: The larger disk is the destination disk and must be empty, as the cloning process will remove all the old data on the destination disk.
BIOS Key: The BIOS key for most popular motherboards varies by manufacturer: DEL or F2 for ASUS and ASRock, F2 or ESC for Acer, F10 for HP, F12 for Lenovo, F2 for Dell, F1 for MSI, and ESC or F2 for Gigabyte. Refer to your motherboard manual for specific details.
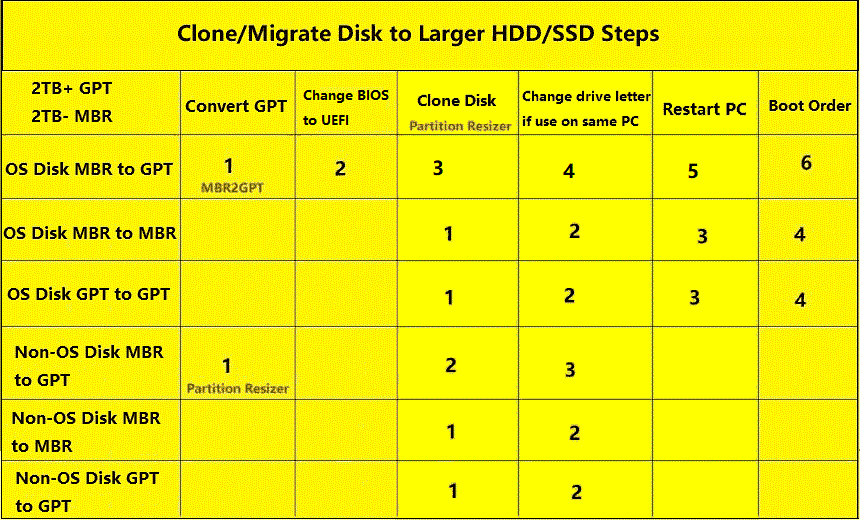
- If you clone a smaller OS disk to upgrade to a larger disk, replace the disk and change the BIOS settings from Legacy to UEFI if it is a GPT disk.
- The boot order only needs to be set if your PC contains more than one bootable OS disk.
- MBR2GPT is provided by Windows under certain terms for OS disks only.
1. Clone OS Hard Disk to Larger SSD/HDD
Preparations:
- Prepare an empty SSD/HDD disk as the destination disk and insert it into your PC. The destination disk must be empty since the cloning process will wipe out any existing data.
- Download and install Partition Resizer on your PC
- Convert the source OS disk to GPT before cloning using MBR2GPT, which is provided by Windows 10 v1703 and later. (You may ignore this step if you do not insist on a GPT disk on the destination disk after cloning.)
- If you just want to clone the system partition, you need to delete the rest partitions and only keep the OS volume to start 'Migrate OS Wizard'
Step1. Convert the OS disk to GPT using MBR2GPT. (You may ignore this step if you do not require a GPT disk on the destination disk after cloning.)
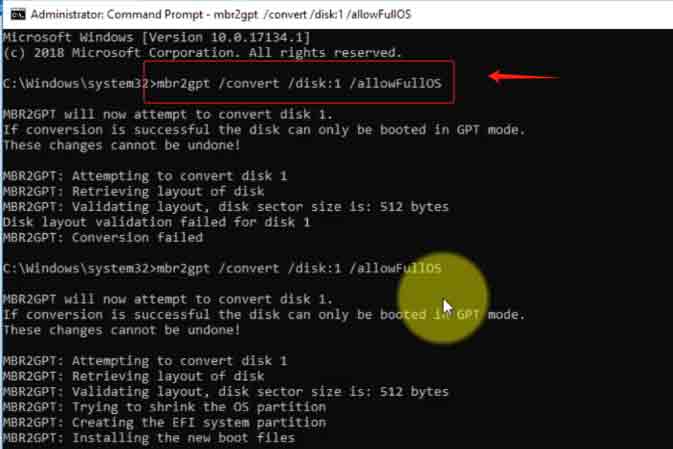
Step2. Changing the computer from BIOS to UEFI. (You can ignore this step if you haven't changed your OS disk to GPT.)
BIOS Key: The BIOS key for most popular motherboards varies by manufacturer: DEL or F2 for ASUS and ASRock, F2 or ESC for Acer, F10 for HP, F12 for Lenovo, F2 for Dell, F1 for MSI, and ESC or F2 for Gigabyte. Refer to your motherboard manual for specific details.
Step3. Click the Tools tab in the software, and choose 'Migrate OS Wizard'
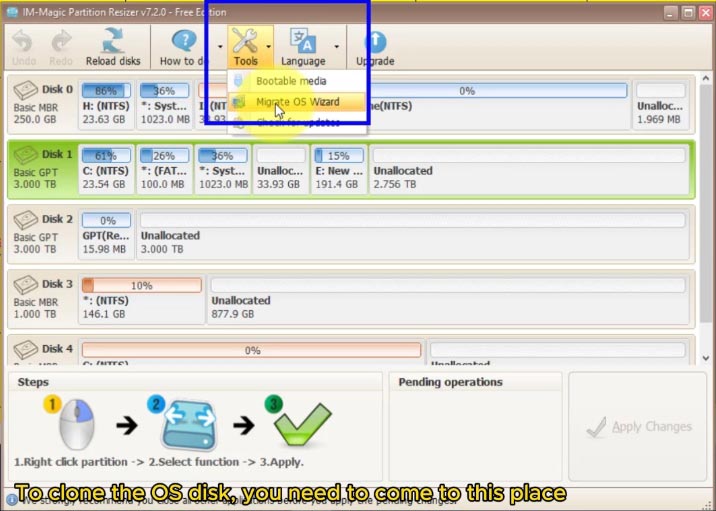
Step4. Choose the destination disk. 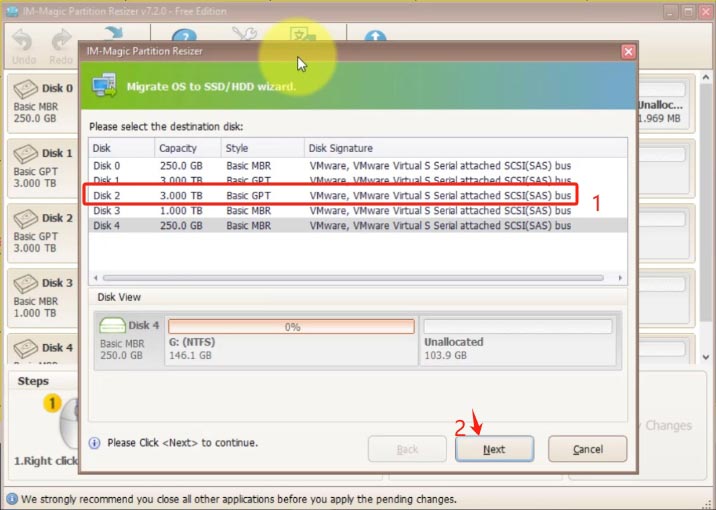
Step5. Click APPLY CHANGES to start cloning.
Step6. Change the drive letter on the destination disk if you want to use both disks on the same PC. (Note: After changing the drive letter for the cloned C drive, Resizer will report an error. Windows will later automatically assign it a new drive letter.)
Step7. Restart and set boot order in BIOS.
BIOS Key: The BIOS key for most popular motherboards varies by manufacturer: DEL or F2 for ASUS and ASRock, F2 or ESC for Acer, F10 for HP, F12 for Lenovo, F2 for Dell, F1 for MSI, and ESC or F2 for Gigabyte. Check your motherboard manual for specifics.
2. Clone NON-OS Disk to Larger SSD/HDD
Preparations:
- Get your disk inserted to PC
- Install Partition Resizer on your PC, and open it
- Prepare an empty disk or the software will remove all partitions and data during the cloning.
Step1. Right click the disk in free tool Partition Resizer, choose "Copy disk"
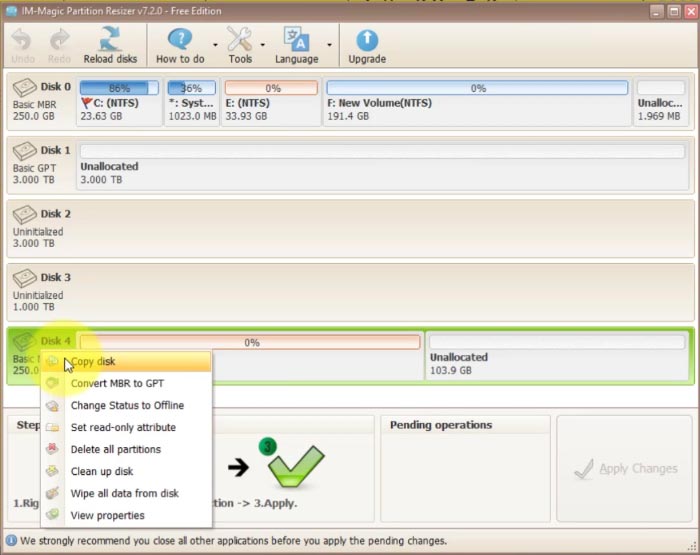
Step2. Select the source disk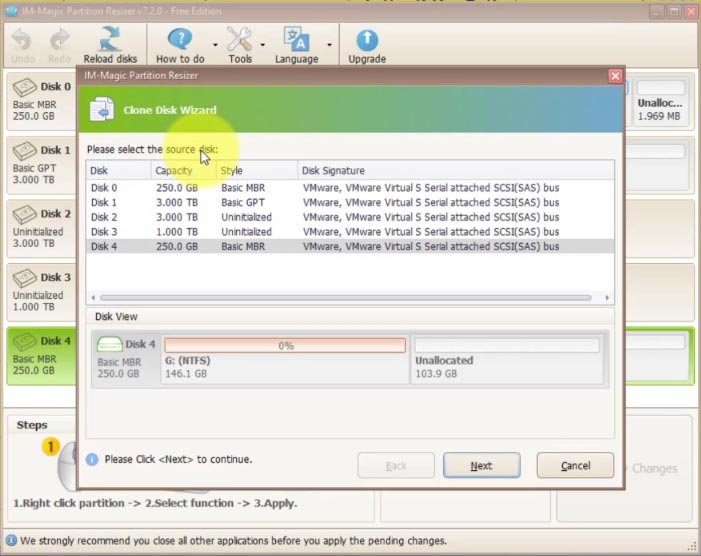
And choose the destination disk
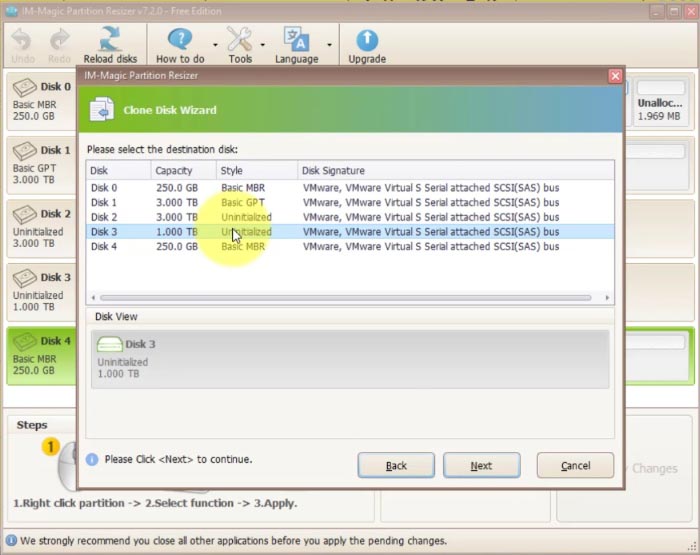
Step3. Confirm and click 'Apply Changes' in the software to start cloning.
Step4. Change the drive letter of the cloned partitions on the destination disk if you want to keep both the source and destination disks on the same PC.
FAQs
How to move SSD to a bigger SSD?
Answer: You need a free tool IM-Magic Partition Resizer to start the free cloning and it only requires a few steps to migrate the disk.
How to clone c drive to larger SSD?
Answer: Here are a few steps to start the cloning without data loss.
- Backup and delete all partitions but only keep the C drive on the disk
- Click Tools tab in Partition Resizer, and then choose "Migrate OS Wizard"
- Choose the destination disk
- Click APPLY CHANGES in the software to start the cloning.