How to Install Windows Server 2022 from a Bootable USB
Table of Contents
- Part #1: Download Server 2022 ISO File
- Part #2-1: Burn Server 2022 ISO to USB and Make Bootable USB Using Rufus
- Part #2-2: Burn Server 2022 ISO to USB Using DiskPart Command
- Part #3: Install Server 2022 from USB
Part 1: Download Microsoft Server 2022 ISO
Download the Server 2022 ISO (64-bit) from the official Microsoft site:
http://www.microsoft.com/en-us/evalcenter/download-windows-server-2022
(64-bit version available, with multiple languages supported.)
Question: Is there a Hyper-V Server 2022 ISO available for download?
Microsoft has announced that Hyper-V Server 2019 will be the last edition of Hyper-V Server, which will be discontinued in 2029. Therefore, there is no Hyper-V Server 2022 ISO available from Microsoft.
Option: Server 2022 Azure Stack HCI is recommended by Microsoft as the successor to Hyper-V Server 2019, but it requires a $10 monthly subscription fee.
To download the SQL Server 2022 ISO, visit: https://www.microsoft.com/en-us/evalcenter/download-sql-server-2022
To download the Dell Server 2022 ISO:
https://www.dell.com/support/manuals/en-us/microsoft-windows-server-2022/win2022_ig_pub/introduction
Part 2: Burn ISO File to Bootable USB Using Rufus
The following video demonstrates how to burn the Windows Server 2022 ISO file to a bootable USB using Rufus, a professional bootable USB creator:
To burn the Windows Server 2022 ISO file to a bootable USB using Rufus, follow these simple steps:
- Download Rufus: Visit the Rufus website (https://rufus.ie/) and download the latest version of Rufus compatible with your operating system.
- Obtain the Windows Server 2022 ISO file: Ensure you have the ISO file for Windows Server 2022. You can download it from the Microsoft website or obtain it from a trusted source.
- Connect the USB Drive: Plug in your USB flash drive into an available USB port on your computer. Make sure the USB drive does not contain important data, as it will be formatted during the process.
- Run Rufus: Launch Rufus by double-clicking the downloaded executable file.
- Select the USB Drive: In Rufus, under the "Device" section, select the USB drive you connected from the dropdown menu.
- Choose the Partition Scheme and Target System Type: Under the "Partition Scheme" section, select "MBR" if your computer uses BIOS, or "GPT" if it uses UEFI. For the "Target System" option, select either "BIOS (or UEFI-CSM)" or "UEFI," depending on your computer's firmware.
- Select the Windows Server 2022 ISO: Click the "Select" button next to the "Boot Selection" field, then navigate to the location where you saved the Windows Server 2022 ISO file. Select the ISO file and click "Open."
- Configure Rufus Settings: Leave the other settings in Rufus as default unless you have specific requirements. You may want to change the "Volume Label" field to give your bootable USB a name.
- Start the Process: Once you've verified the settings, click the "Start" button to begin. Rufus will display a warning about data loss on the USB drive. Ensure you've backed up any important data on the USB drive before proceeding. Click "OK" to continue.
- Wait for the Process to Complete: Rufus will format the USB drive, copy the Windows Server 2022 ISO contents, and make it bootable. This may take a few minutes, so be patient.
- Eject the USB Drive: Once Rufus completes the process, you will see a "READY" message. Safely eject the USB drive from your computer.
Now, you have successfully burned the Windows Server 2022 ISO file onto a bootable USB drive using Rufus. You can use this USB drive to install or boot Windows Server 2022 on a compatible computer.
Part 2-2: Burn Server 2022 to USB Using DiskPart Command (Optional)
Preparations: A USB drive larger than 8GB and the ISO file already downloaded.
Note: Please back up any important data from the USB drive before proceeding, as the process will erase all data on it.
Step 1: Type "cmd" in the search bar, or press Win+X or right-click the Start icon on your computer. Then, select "Run as Administrator" to open the Command Prompt with admin privileges.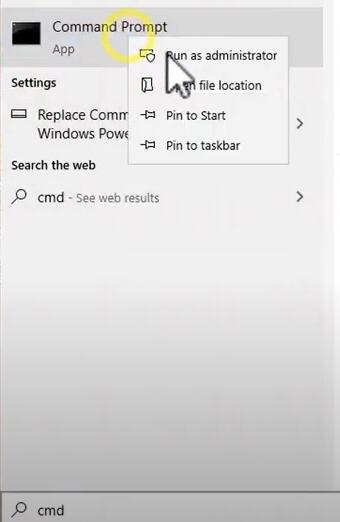
Step 2: Type "diskpart" and press Enter, then use the following commands:
• list disk
• select disk x (“x” is the number of the USB drive)
• clean
• create partition primary
• format fs=ntfs quick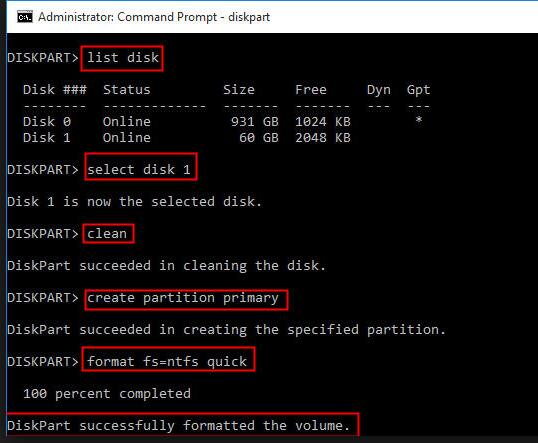
• active
• exit
After exiting DiskPart, do not close the Command Prompt window. Next, locate the Windows Server setup ISO file on your computer and double-click it to mount the ISO.
Type the following commands (or copy and paste them) into the Command Prompt, ensuring that you use the correct drive letters, and hit "Enter":
• xcopy D:\*.* E: /s/e/f (D: is the ISO image drive, and E: is the USB drive letter)
• D:\Boot\Bootsect /NT60 E: /force /mbr
- ★Note:
- You may receive a message such as "File creation error - the parameter is incorrect" or "The install.wim is too large." This happens due to the FAT32 file system's limitations. To solve this, you can split the WIM file into smaller files using the following command: dism /Split-Image /ImageFile:h:\sources\install.wim /SWMFile:r:\sources\install.swm /FileSize:4096.
Part 3: Install Server 2022 from USB
This video demonstrates how to install Windows Server 2022 from a USB drive.
To install Windows Server 2022 from a USB drive, follow these steps:
- Insert the bootable USB: Connect the USB drive containing the Windows Server 2022 installation files to a USB port on the target server.
- Start the server: Power on or restart the server and access its BIOS or UEFI settings. The key to access BIOS/UEFI may vary depending on the manufacturer (common keys include F2, F10, Delete, or Esc). Check the server's documentation or look for on-screen prompts during boot to find the correct key.
- Configure the boot order: In the BIOS/UEFI settings, navigate to the "Boot" or "Boot Order" section. Set the USB drive as the primary boot device, or prioritize it above other devices. Save changes and exit BIOS/UEFI.
- Start the Windows Server installation: The server will now boot from the USB drive and begin the installation process. Wait for the Windows Setup screen to appear.
- Select language, time, and keyboard options: Choose your preferred language, time format, and keyboard layout. Click "Next" to proceed.
- Click "Install Now": On the next screen, click the "Install Now" button to begin the installation process.
- Enter the product key: If prompted, enter your Windows Server 2022 product key. Click "Next" to continue. If you don't have a product key, you can still proceed with a trial version by skipping this step.
- Accept the license terms: Read and accept the license terms by checking the box. Click "Next" to proceed.
- Choose the installation type: Select the type of installation: "Upgrade" (if upgrading from a previous version) or "Custom" (for a clean installation). Choose "Custom" for a fresh installation.
- Select the installation location: If you chose "Custom," you’ll need to select the disk and partition where Windows Server 2022 will be installed. Select the desired disk/partition and click "Next." You can create, format, or delete partitions if needed.
- Wait for the installation: Windows Server 2022 will now be installed onto the selected disk/partition. The process may take some time, so be patient.
- Set up the initial configuration: After installation, the server will restart. Follow the on-screen prompts to configure the region, administrator password, and network settings.
- Complete the setup: Once the initial configuration is complete, Windows Server 2022 will start, and you’ll be logged into the desktop. Proceed with any additional configuration or customization as needed.
Congratulations! You have successfully installed Windows Server 2022 from a USB drive. You can now begin using and configuring the server according to your requirements.
Resource: How to create a Windows bootable USB for UEFI-based systems
How to create a Windows bootable USB for UEFI-based systems
Possible Error and Fixes:
Error: "Windows cannot be installed to this disk 0 partition 1"
1. Press and hold Shift+F10 to open the Command Prompt window.

2. Type diskpart and press Enter to execute.

3. Enter DISKPART command mode, then type list disk to display the current disk information.

4. To format disk 0, type select disk 0, press Enter, then type clean to delete the disk partition.

5. To convert the disk, type convert mbr to convert to MBR, or convert gpt to convert to GPT.

6. Finally, type exit to close the Command Prompt and return to the installation screen to continue with the installation.

7. Click New Disk to install the driver.
Also read: How to install Server 2022
How to Resize or Move Partitions on Server 2022
- How to delete the recovery partition on Server 2022?
- How to move a partition without losing data on Server 2022?
- How to resize a partition without losing data on Server 2022?
You can use the following tool to safely manage your disk, including resizing partitions, moving the recovery partition, deleting partitions, and more—without losing data.
Here’s a video that shows how to move partitions safely:
More Related Articles You May Like
- free to merge two partition on windows 10 without data loss
- free to merge windows partitions to increase size of c drive - how to combine partitions to extend c drive space on windows xp vista 7 8 10...Read more >>
- system partition is nearly full - System partition c drive is full or running out of space...
Related Product
- IM-Magic Partition Resizer Server - Partition space redistributing software that works for Windows Server 2003-2025.