How to Shrink C Drive in Windows Server 2016
Summary
To better manage the disk partitions , sometimes you need to create a new partition to save your some special data, then you need to shrink one partition first . This page is about how to shrink C drive and create another new partitions in Windows server 2016. This solution is compatible for all the server systems.
Table of Contents
Shrink Volume Grayed out Server 2016
“I want to divide my C drive into two partitions, use one partition to install programs, use another one to save some operation files. But I find that the “Shrink Volume” option grayed out at my computer, is this a error of Windows server 2016 or problem of my computer? How can I fix it and enable shrink volume?”
FAT32 volumes cannot be shrinked in disk management and if your disk is old with fat32 file system, it cannot be shrinked under Disk Management.
Solution: Shrink c fat32 drive with Partition Resizer which is a safe tool that can ensure OS safety without losing data.
Why Shrink Volume Grayed out on Windows server
In fact, this problem not only happen to Windows server systems, if you use Windows 11/10/8/7/XP/Vista, you may encounter the same problem. Why Shrink Volume Grayed out in Disk Management?
There are some reasons leading to this problem.
- First of all, you need to make sure file system, because Disk Management on Windows supports NTFS file system only, if your file system is FAT32, exFAT or other, Disk Management functions may grayed out.
- The second reason may be that you have some unmovable files on your partitions, then you will find the “Shrink Volume” grayed out when you try to shrink that partition.
Besides these reasons, disk fragment can also make the “Shrink Volume” grayed out.
How to Shrink Volume C on Windows Server 2016
Enable the Shrink Volume in Disk Management
First, you can convert the file system into NTFS with Diskpart, then use Disk Management to shrink volume and create a new partition.
Notice: This solution will erase all the data on your partition, you can choose this solution if you don’t have important data on it.
Step1: run CMD command prompt.
Step2: type “format F:/fs:ntfs” in the command window,(F is the drive letter of drive you want to shrink)press enter, after it finished, press “exit”.
Then the file system of this drive will be converted into NTFS,. but all the data will be formatted
The advantage of this solution is that you don’t need to install any other programs on your computer, but you need to know this process can be complicated, and it will also delete all your data
Shrink Partition with Partition Manage Tool
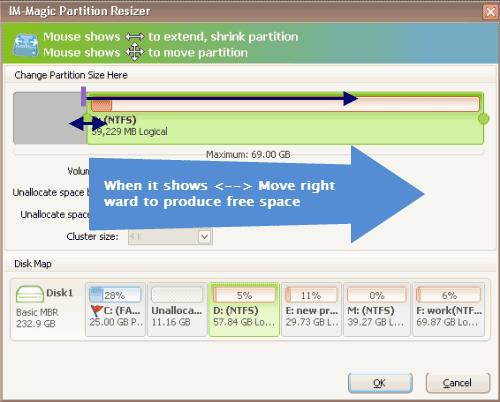
Partition Resizer Server can help shrink any volume on Windows Server without losing data. Follow these steps to shrink a volume safely:
- 1. Right-click the volume in Partition Resizer and select the option "Resize/Move Partition."

- 2. Move the border of the drive to shrink it, or enter the desired size to shrink it accordingly.
 Shrink partitions with Partition Resizer
- 3. Click "Apply Changes" to finalize the resizing. (Operations before this step can be undone until you click "Apply Changes.")
