How to shrink volume on server 2012 without losing data
Summary
Safely shrinking volume on Server 2012 is possible with several ways especially when it's unable to extend the partition on Server 2012. You can get information about how to shrink volume on server 2012 and resize your partitions without losing data.
Table of Contents
Shrink Partition on Windows Server 2012 with Disk Management
Shrinking a large volume in server 2012 disk management is possible if you right click a large volume and then the Shrink Volume will show up in the pop up box. Here are the steps to start shrinking a volume on your machine.
Step 1 - Open Disk Management in your computer, you may click the Start icon -> Run, and type Diskmgmt.msc
Step 2 - Once the Disk Management has loaded the devices, right click the large volume from which you can spare some free space, and click Shrink Volume option in the pop up box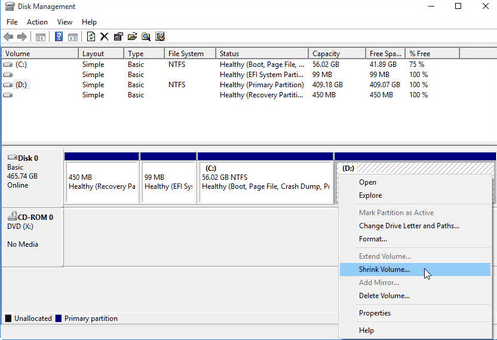
Step 3 - Enter the size which you want to make it to be unallocated space in the shrink size box
Step 4 - Proceed the steps and confirm the changes.
And then the disk partitions will have some Free space available on the disk map like this.

Note: If you want to convert free space to unallocated space, you may right click the Fres Space and then delete volume to make it unallocated for further operations.
Note: how to change free space to unallcoated space
Tutorial: Shrink Volume with Partition Resizer Server 2012 (100% Safe, No data loss)
The shrink problem that we discussed above can be easily fixed by using this tool. The C drive can be shrunk beyond the locations of unmovable files. Your data is always safe and intact when you are shrinking any drive using this tool. The rollback feature keeps your data safe if your computer is shutdown accidentally while performing shrink.
Download and install free trial version of IM-Magic Partition Resizer Server/unlimited edition.
Follow these simple steps to shrink volume on server 2012:
1. Right click drive and select Resize/Move Partition:
 Resize partition without partition tool.
2. In the next step, drag the left border with your mouse to shrink the D drive and press OK. You can create unallocated space on left or right side by dragging the left border or right border.
 Steps to resize your partition
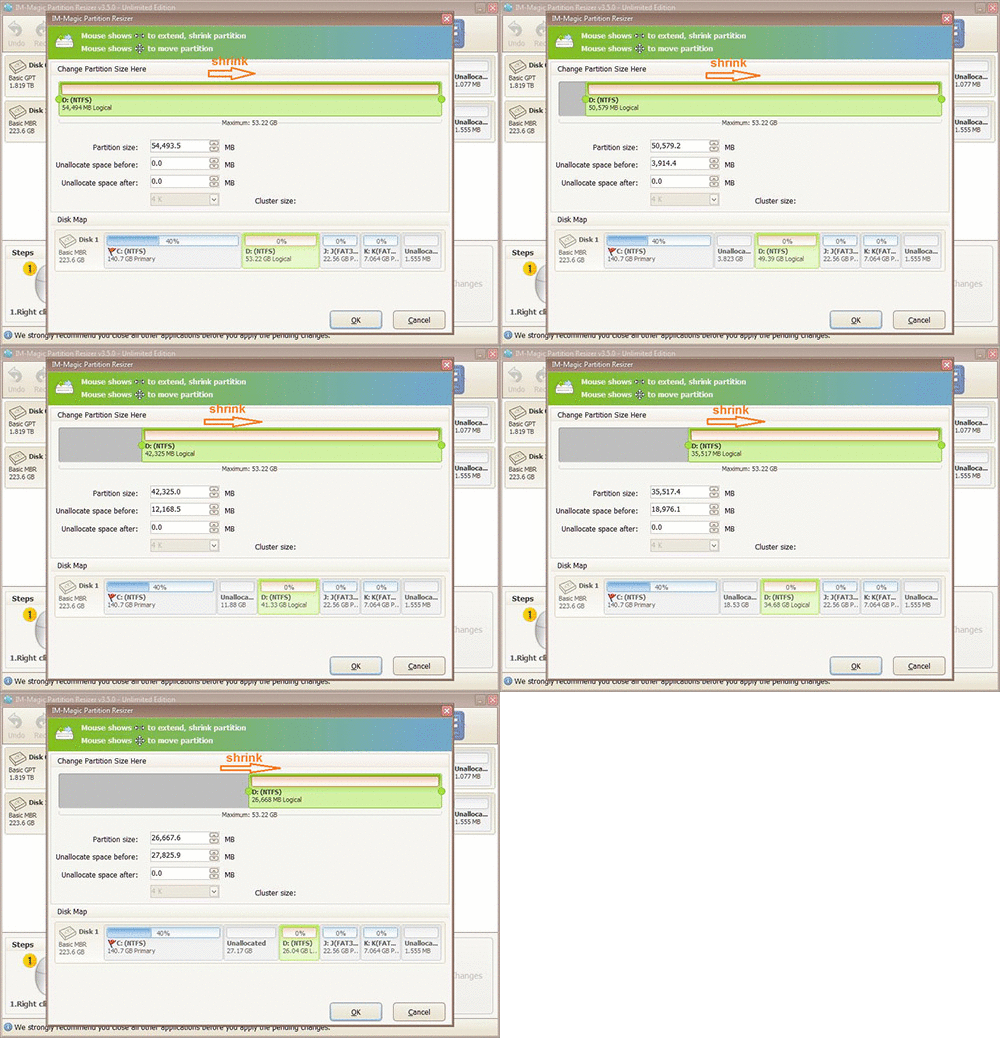 Steps to resize your partition
3. You will see your drive size is reduced and also an unallocated space is created as shown below.
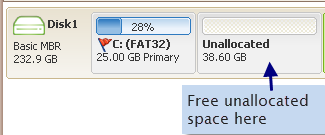
Create a partition: You may right click the unallocated space and then create a partition using this free space.
Moving the unallocated space to another drive: You need to move the unallocated space next to the target drive at first with IM-Magic Partition Resizer.
Note: If the unallocated space is far from the target volume, you may right click the volumes that stand in between, and click RESIZE/MOVE PARTITION in the pop up box, and then move the partition when the mouse shows cross arrows in the software, and then the volumes can be safely removed and then unallocated space will be next to the target drive that you want to extend.

Right click the target volume, and then go to RESIZE/MOVE PARTITION, to extend the volume with nearby the unallocated space.
4, Click APPLY button in the software to get every step applied.
You can follow the same steps to shrink your C drive. You need not worry about unmovable files.
The good thing is that this tool is available for all the windows versions. With the trial version you can test the IM-Magic server edition and see how good it is designed to do the disk resizing tasks. If you are satisfied, you can buy the paid editions to perform other tasks on your drives without much effort and technical knowledge.
Video - This following image shows how to move a partition safely in Partition Resizer Server
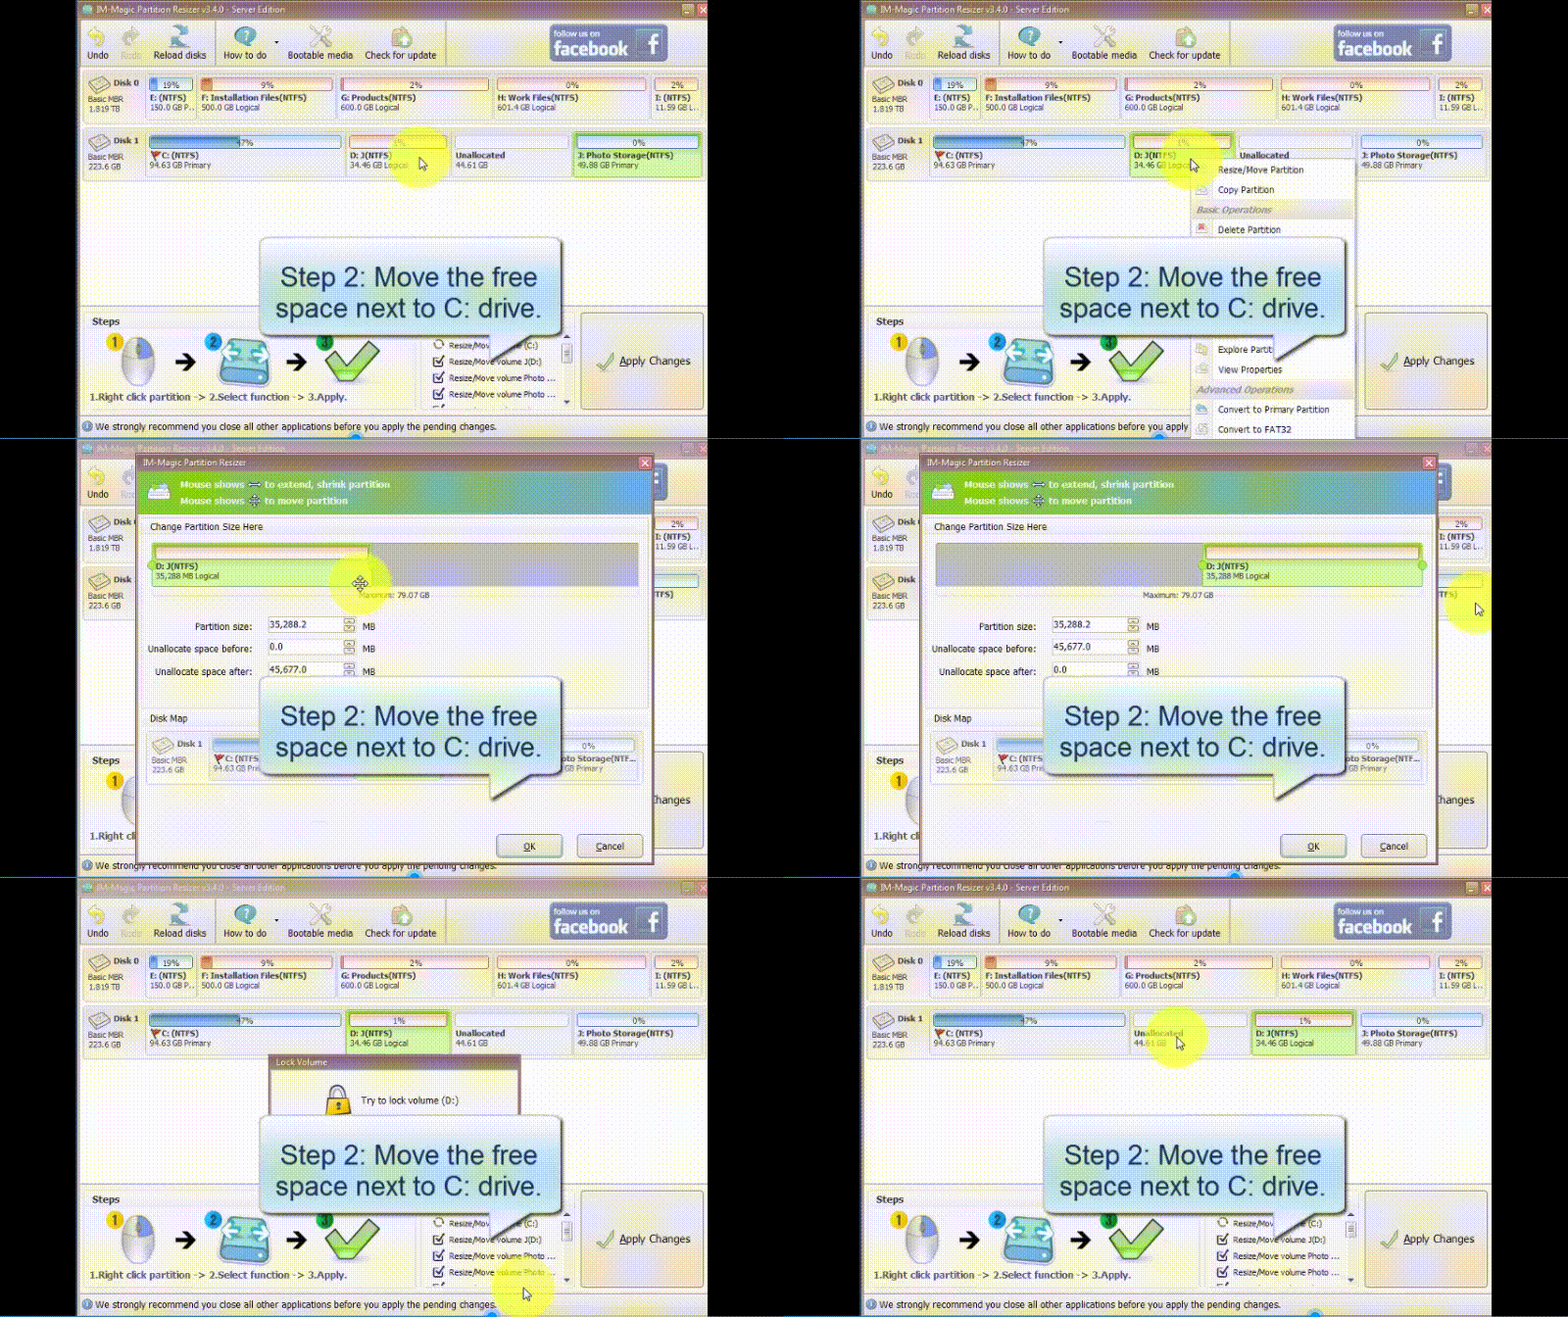
Also read: how to move unallocated space to c drive or targeted drive
How to shrink volume using diskpart cmd in server 2012
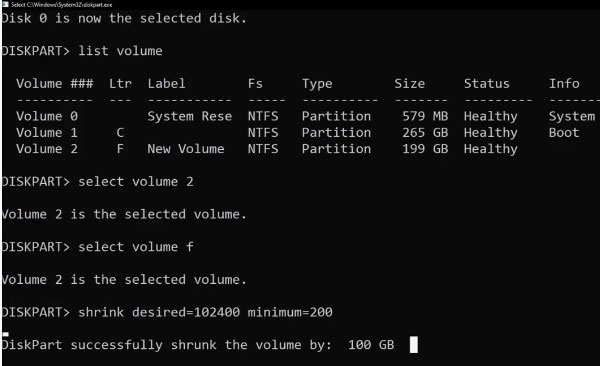
Here are the steps to shrink volume with diskpart
- 1, Run cmd and type Diskpart in the RUN (Run cmd with admin privileges)
- 2, Type "list disk" in diskpart and the diskpart will show a list disks
- 3, Type 'select disk *' and diskpart will get the * disk selected for further operations
- 4, Type 'list volume' and diskpart will list all volumes on the selected disk
- 5, Type 'select volume *' to get the one you want to shrink selected
- 6, Type "shrink desired=102400 minium=200" to shrink a 100GB if it's available from the disk.
Note: 1024 means 1GB and if you want to shrink 10GB, then you may type "shrink desired=10240" to get a 10GB free space after shrinking.
Also read: how to shrink volume with diskpart
How to shrink c drive in server 2012
To create a new volume after shrinking c drive, you may go with the following steps:
- 1, Right click c drive in Partition Resizer Server, go to RESIZE/MOVE PARTITION, and move it's border from right to left and produce unallocated space
- 2, Right click the unallocated space, and click Create Partition and finish the wizard
- 3, Click APPLY to get every step applied to your server 2012
To add the new unallocated space to other volumes after shrinking the c drive, you may go with the following steps:
- 1, Right click c drive in Partition Resizer Server, go to RESIZE/MOVE PARTITION, and then shrink c drive by moving its border from left to right forward and get unallocated space
- 2, If you want to add the unallocated space to the nearby partition, you may right click the nearby partition, go to RESIZE/MOVE PARTITION and then claim the unallocated space, and then click APPLY to get the changes done.
- 3, If you want to add the unallocated space to other drives other than its close partition, you need to move the unallocated space next to the target volume by moving the partitions that stand in the way by right clicking the partition, go to RESIZE/MOVE PARTITION, and move volumes when the mouse turned cross arrows; when the unallocated space is next to the target drive, you may right click the target drive, go to RESIZE/MOVE PARTITION to claim it by extending the border, and then click APPLY in the software
Also read: how to shrink c drive on windows server 2012
Question: how to shrink e/g/h/f volume and extend c drive in server 2012?
If you want to extend another drive in your disk and get the free unallocated space added to c drive, you may go with the following steps:
- 1, Download and open Partition Resizer Server
- 2, Right click the drive you want to shrink, and go to RESIZE/MOVE PARTITION, shrink it by moving its border from left to right and then the unallocated space will be produced
- 3, If there are partitions that stand between it and then c drive, you may right click the volumes and click Resize/Move partition, move the partition when the mouse shows cross arrows, and then the unallocated space will be moved next to the drive you want to expand (If there were several partitions that stand between the unallocated space and then c drive, you may move them one by one)
- 4, Right click the c drive and go to RESIZE/MOVE PARTITION and move its border to claim the unallocated space
- 5, Click APPLY to get changes done
Also read: how to move unallocated space or how to move partition
Quesiton: How to shrink partition without data loss?
With Windows disk management, you can shrink any volume to create free space. You can then create a new volume from this free space.
To Shrink volume on server 2012, use disk management tool. You can go to disk management by either right-clicking on windows on bottom left and selecting disk management or by typing diskmgmt.msc from the run option.
In disk management you can see all your drives(volumes) along with unallocated space. Right click the drive which you want to shrink. Ensure you have enough free space on the drive which you want to shrink. Select Shrink Volume. In the next window mention the size to shrink in MB and click on shrink button. The drive will be shrunk and unallocated space will be created right side of the selected drive.
There would be a situation when your computer is having only one partition or you have allocated more space to C drive. Now you want to create other volume by resizing partition Windows server 2012. If you try to shrink C drive, the shrink operation may fail. Since C drive stores system files, some system files are unmovable. This restricts built-in disk management tool to shrink the C drive beyond the locations of these unmovable files.
To fix such shrink problems, use a third party software which not only shrinks your C drive but are also capable to perform many disk related activities. One of the best tools to shrink volume on server 2012 is IM-Magic Partition Resizer.
Related Product
- IM-Magic Partition Resizer Server - Partition space redistributing software that works for Windows Server 2003-2022.
