How to Extend C Drive with Diskpart or Free Tools when Diskpart Failed
Summary
If your C drive run out of space, you can find the best solutions here to extend c drive with free tools when diskpart cannot extend boot c drive.
Table of Contents
C Drive is Full - Can I Extend C Drive with Diskpart CMD?
When your C drive is full and you want to extend it, you may wonder whether it is possible to extend the volume using the Diskpart command.

Using the Diskpart commands, you can extend, create, delete, shrink, clean, and perform other disk resizing tasks under certain conditions, which will be illustrated in the following sections.
Truth: Regarding the expansion of the C drive, CMD Diskpart, diskpart.exe, and Powershell can only expand an NTFS C drive when there is adjacent unallocated space on the same disk. If your C drive does not meet this condition, fortunately, there is an alternative—a free tool called IM-Magic Partition Resizer, which we will introduce, along with a tutorial on how to change the volume size without losing data in this article.
When Can the C Drive Be Extended Using Diskpart or Powershell?
| Extend Volume | Diskpart | Disk Management | Partition Resizer |
| Unallocated Space | Partition(NTFS) | NO | NO |  |
| Unallcoated Space | Partition(FAT32) | NO | NO |  |
| Extend Partition(NTFS) | Unallcoated Space | YES | YES |  |
| Extend Partition(FAT32, OS Drive) | Unallcoated Space | NO | NO |  |
| Extend Partition(FAT32, NON-OS Drive) | Unallcoated Space | YES | YES |  |
| Partition(NTFS) | Recovery | Unallcoated Space | NO | NO |  |
| Partition(FAT32) | Recovery | Unallcoated Space | NO | NO |  |
⚠Note: Diskpart can only extend C ntfs volume when there is contiguous unallocated space to the right of the drive you want to expand. No recovery partition or other partitions should be between the unallocated space and the drive you wish to extend. (The free tool Partition Resizer can help move any partitions without losing data if they are in the way.)
#1 Resize Partition Using CMD Diskpart, Resize C Drive with Disk Management
Here are some video guides to help you understand the basic steps of using Diskpart or Disk Management to extend a volume.
(Non-OS) Video 1 - How to Extend a Non-Boot Drive with Disk Management or Diskpart (Windows 11, 10, 8, 7 Supported)
If the unallocated space is not next to the C drive, you can delete the adjacent partition to extend your C drive. Deleting a partition means you are removing the data stored on that drive.
Here are the steps to delete the adjacent volume on the right side of the C drive using Diskpart to create unallocated space contiguous to the C drive, which will enable the extend function.
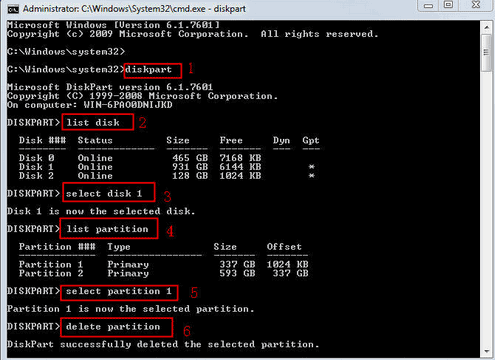
Also read: How to Delete a Partition Using Diskpart
Note: Disk Management cannot delete the system reserved partition or recovery partition. Diskpart and Disk Management cannot extend FAT32 partitions. A third-party free tool, IM-Magic Partition Resizer, can help with this.
Extending a C Boot Drive Using Diskpart in Win PE
If you're extending the C boot drive, you need to use Diskpart in Windows PE mode. Follow these steps if you have already created unallocated space right next to the C drive after booting into PE mode.
To extend the C drive using Diskpart, enter Diskpart in CMD, list the disks, select the disk, and then type "list volume":
 Resize partition with CMD Diskpart
To select the C drive, type "select volume 0" (0 is the volume number in this example):
 Resize partition with CMD Diskpart
To extend the C drive, type "extend size=
 Resize partition with CMD Diskpart
If your unallocated space is not next to the C drive and you are unable to extend your C drive, you can use third-party software.
Extending a NON-OS Drive
The basic Diskpart commands:
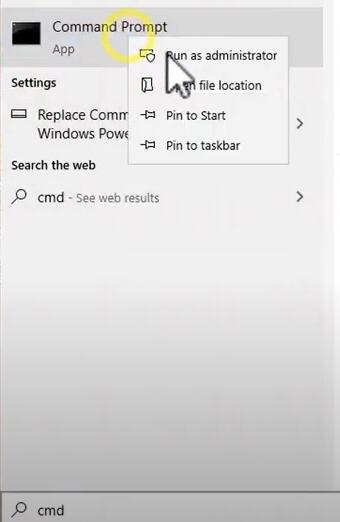
1. Run -> diskpart.exe: This takes you to Diskpart command mode.
2. List Disk: To view the disks connected to your system.
3. Select disk *
4. List partition
5. Select partition *
6. Extend size=1024 (1024 means 1GB; if there is 10GB of free space, you may type extend size=10240 instead)
Diskpart CMD can extend volumes under certain terms and conditions:
- It can only extend NTFS partitions; it won't work on other file systems such as FAT, FAT32, or exFAT volumes. (Also read: How to convert a drive from FAT32 to NTFS) If the C drive has a FAT32 file system, it cannot be changed to NTFS by any method without reinstalling the OS or reformatting the disk.
- The target drive that you want to expand must have adjacent free space on its right side. (The free tool Partition Resizer can help move free space from left to right without losing data.)
(OS) Video 2 - How to Extend C Drive Using Disk Management After Deleting the Adjacent Partition
#2 How to Resize C Partition with IM-Magic Partition Resizer Free
This tool is free to use. The scenarios we discussed, where it is not possible to extend your C drive, are easily resolved by this tool.
Video Tutorial to Resize Partitions with the Partition Tool (Free)
For Windows 11/10/8/7 => Download IM-Magic Partition Resizer Free (100% Free)
For Windows Server => Download IM-Magic Partition Resizer Server (Free Demo)
This tool allows you to move the unallocated partition to the right side of the C drive, enabling you to extend it. With IM-Magic Partition Resizer Free Edition, you can shrink and merge partitions without losing files. The tool is designed with a rollback feature that keeps your data safe in case your computer shuts down during any resizing activity.
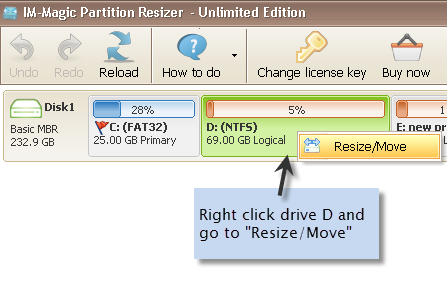 Resize partition with IM-Magic Partition Resizer Free
The tool is available for free for all Windows versions. For server editions, you can download the trial version.
[Guide] Steps to Extend Volume Without Data Loss
 This step-by-step guide will show you the right way to extend any volume for free on Windows 11/10/8/7 computers.
Step 1: Download, install, and launch the program.
Step 2: Right-click the large volume in Partition Resizer, select RESIZE/MOVE PARTITION from the pop-up menu, and then shrink the border of the large partition to create unallocated free space. (The large volume must be on the same disk as the target volume you want to expand; if it's a large volume from another disk, RAID must be applied to build the disks.) Shrink D drive by right-clicking D in Partition Resizer and selecting the "Resize/Move" option
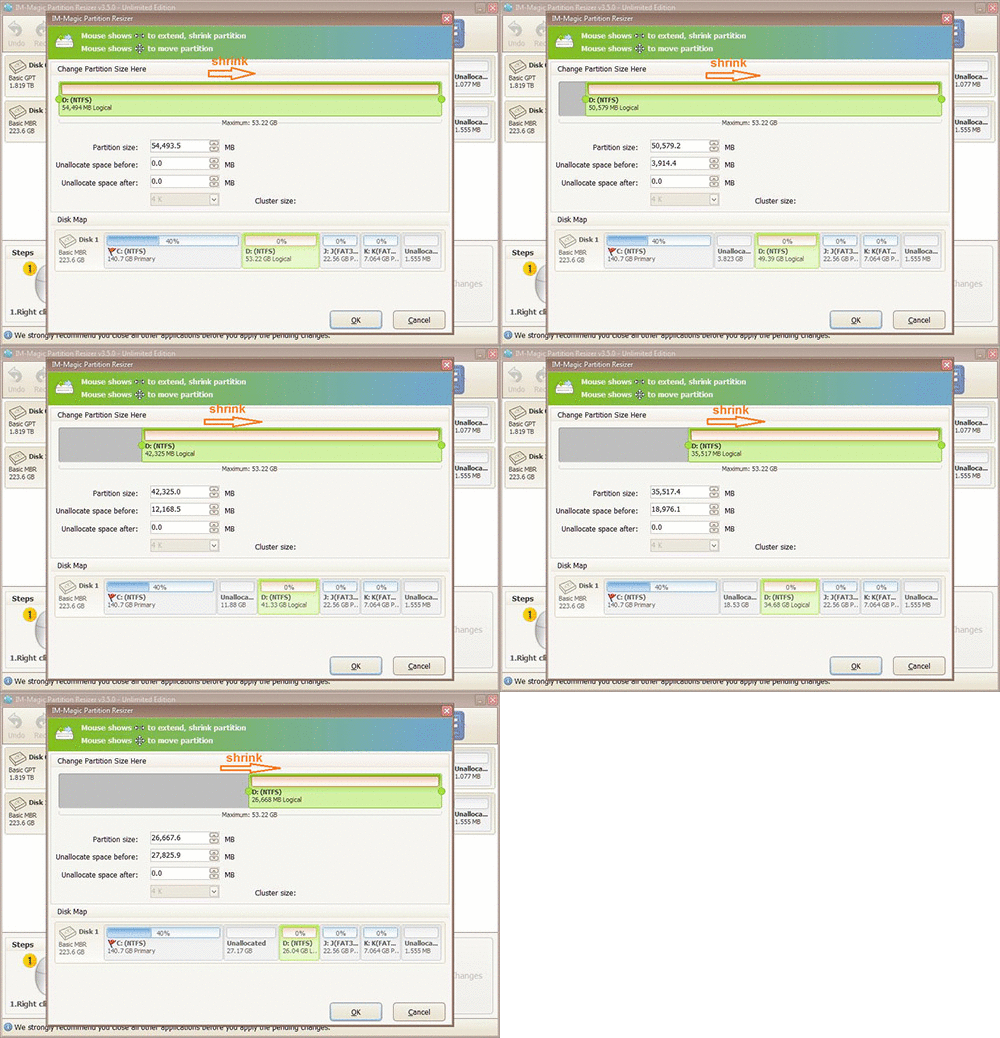
Move the border of the partition to shrink it
Step 3: Then right-click C in Partition Resizer and go to the option RESIZE/MOVE PARTITION, and drag the border to acquire the free space.
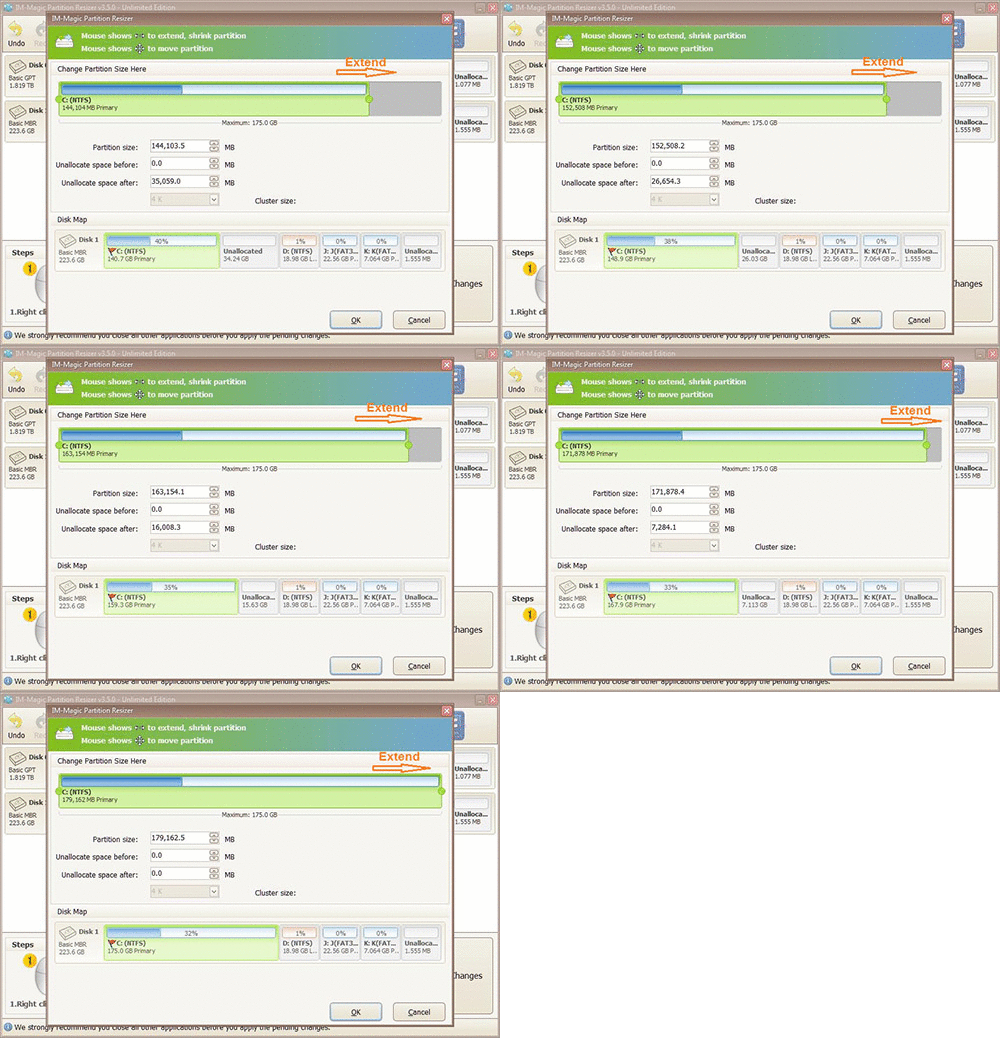
Steps to resize your disk partition
Step 4: Apply the changes.
#3 Cannot Extend C Drive with Diskpart
Here is a list of reasons why Diskpart cannot expand the C drive:
- 1. Lack of adjacent free space on the right side of the drive you wish to enlarge. Consider deleting the adjacent partition if it's not a system partition to create the necessary free space.
- 2. Unable to extend the system partition in Windows 10/11: Use Windows PE for this task, or try the free Partition Resizer tool to assist in expanding the C drive.
- 3. The file system is FAT: The free Partition Resizer can help enlarge a FAT drive, but you may need to create space on another drive if no free space is available.
- 4. The presence of system reserved or recovery partitions between the C drive and the unallocated space can hinder the extension process.
- 5. You are not using Windows PE mode.
- 6. The unallocated space is not on the same disk. Diskpart can only extend a volume using the unallocated space from the same disk. If you want to add space from another disk, RAID is required.
More Diskpart CMD Commands:
- List disk: To view the disks on the computer.
- Select disk *: To select the target disk; * represents the disk number from the "list disk" command. For example, if you want to select disk 1 and change the partition in disk 1, first type "list disk" and then "select disk 1."
- List partition: To view the partitions on the computer.
- Select partition: To select a partition. If you want to perform any disk activity on a partition, you must select it first.
- Shrink: To shrink the drive. This creates unallocated space that can be added to another drive.
- Extend: To extend your drive.
- Format: To format the partition.
- Merge: To merge partitions.
- Create: To create a partition.
- Delete: Use this command to delete a partition.
Possible Risks: Diskpart is a command-based utility, and many users may feel unfamiliar or unsure when typing commands for resizing activities. If you type a command and mistakenly press Enter, you will not be able to cancel the activity. This poses a risk when you are not familiar with Diskpart.
To resize the C drive, move unallocated space, or extend a drive without losing data, IM-Magic Partition Resizer Free Edition is a free tool that handles most important disk-related tasks.
Related Product
- IM-Magic Partition Resizer Server - Partition space redistributing software that works for Windows Server 2003-2022.
