How to Resize Partition on Windows Server 2022? (3 Ways)
Introduction
Extending volume on Windows Server 2022? Here are several ways that you may extend volume with or without software and get data & OS protection without formatting. You can also shrink a volume without data loss to produce unallocated space or extend a volume without losing data when there is unallocated space.
Video: How to extend partition on Windows Server without data loss
Quick Navi
- Part1: Extend volume on Windows Server 2022 [3 methods]
- Part2: Resize C Drive on Server 2022
- Part3: How to Enable Extend Volume When It's Not Available
- Part4: Extend a Volume from Another Disk (Including RAID Setup)
- Shrink C drive Server 2022
Note: Extending a volume is based on unallocated space, or you may merge two volumes to expand a volume. If you want to shrink a volume, Windows built-in tools can help shrink an NTFS volume without data. When shrinking a FAT32 volume, you may use a third-party tool like IM-Magic Partition Resizer, which can help protect the server against unexpected power surges or shutdowns during the resizing procedure with its rollback algorithms.
Part1: 3 Ways to Extend Volume on Server 2022
Method 1: Extend Volume Using Partition Resizer Server (Shrink, Move Partitions Without Data Loss)
In more complex scenarios where Disk Management or Diskpart is not sufficient (e.g., when there is no adjacent unallocated space or when you need to move partitions), a third-party tool like Partition Resizer Server can be a great solution.
Video: How to resize partition without losing data in Server.
Partition Resizer can move partitions around, shrink them, and create unallocated space as well as extend partition without losing data.
Benefits of Using Partition Resizer Server:
- Allows you to extend a partition even if the unallocated space is not adjacent.
- Can move partitions, resize them, and merge volumes without data loss.
- Supports NTFS, FAT32, and other formats.
- Reduces the risk of data loss during disk resizing operations.
Step 1: Download Parition Resizer Server, install and open it. Pick one large drive, right click the large drive, and go to option "Resize/Move"
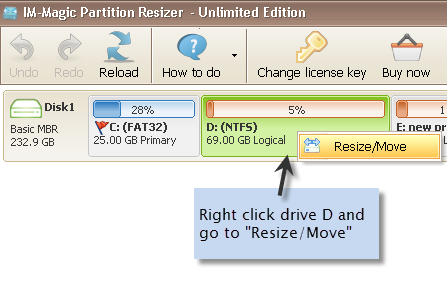
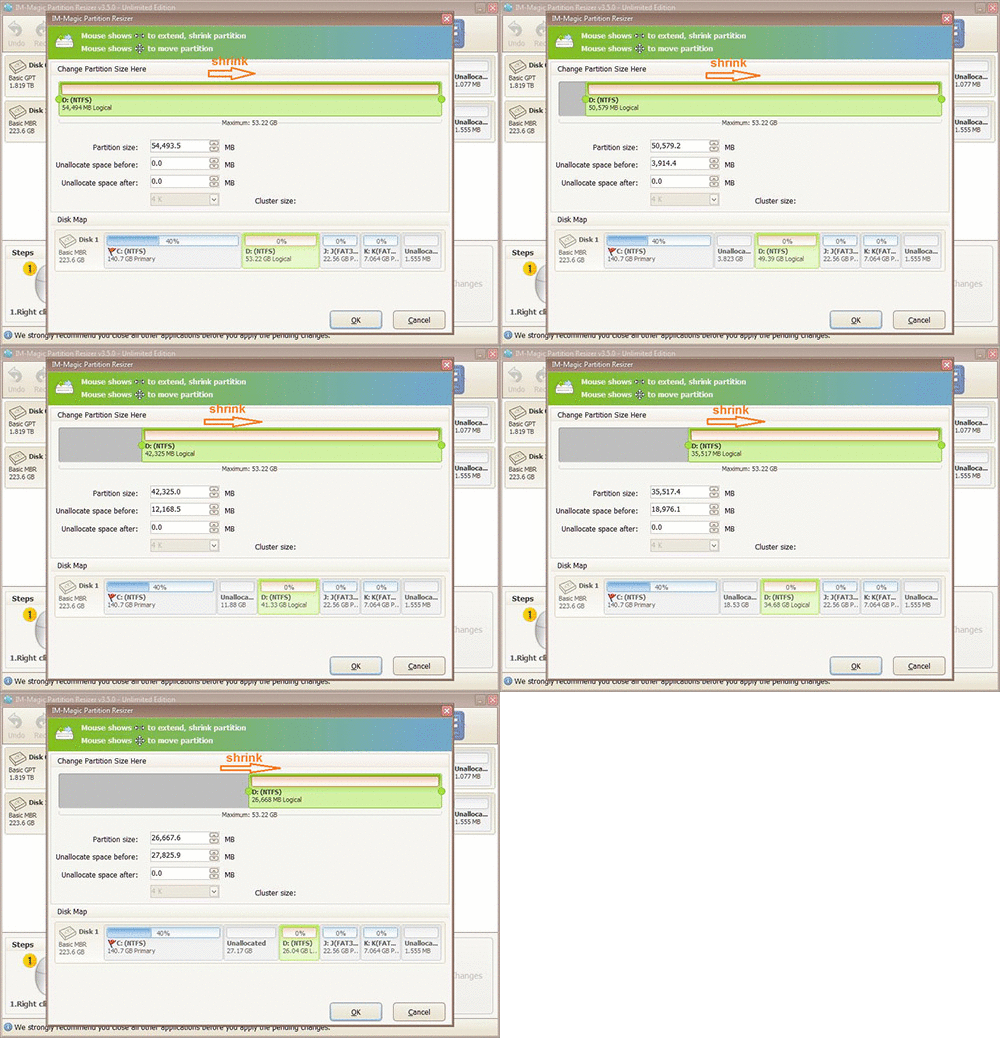
Step 2: Move the border of the large drive from left to right and produce free space unallocated.
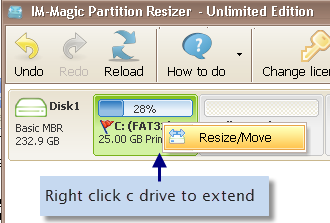
Step 3: Right click on C drive and settle on "Resize/Move." Extend its right side border to claim the unallocated space.
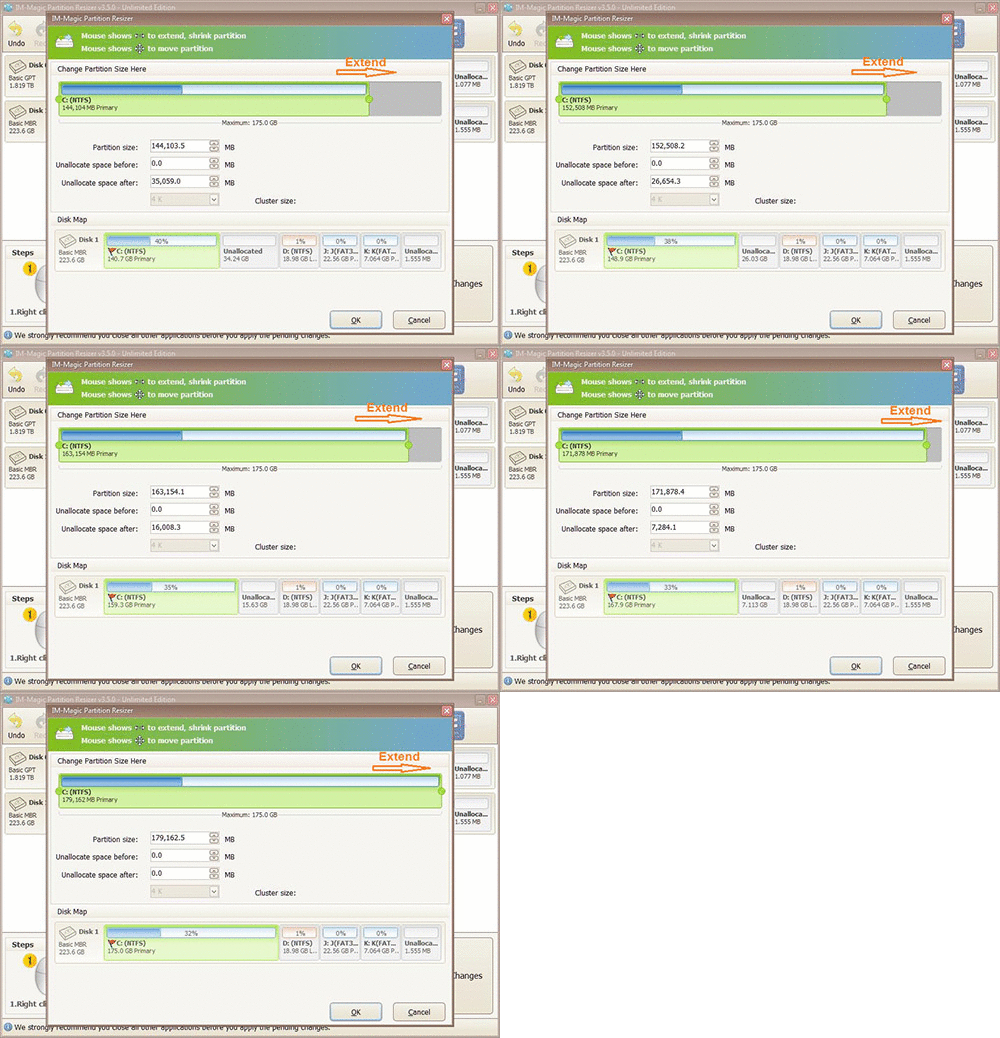
Step 4: Proceed with moving the arrows to add the unallocated volume to the C drive. Tap on the "Apply" button.
Note: If there is partition that stand in between the target drive and unallocated space, you may move partitions safely with Partition Resizer.
How to Move Volume Using Partition Resizer Server:
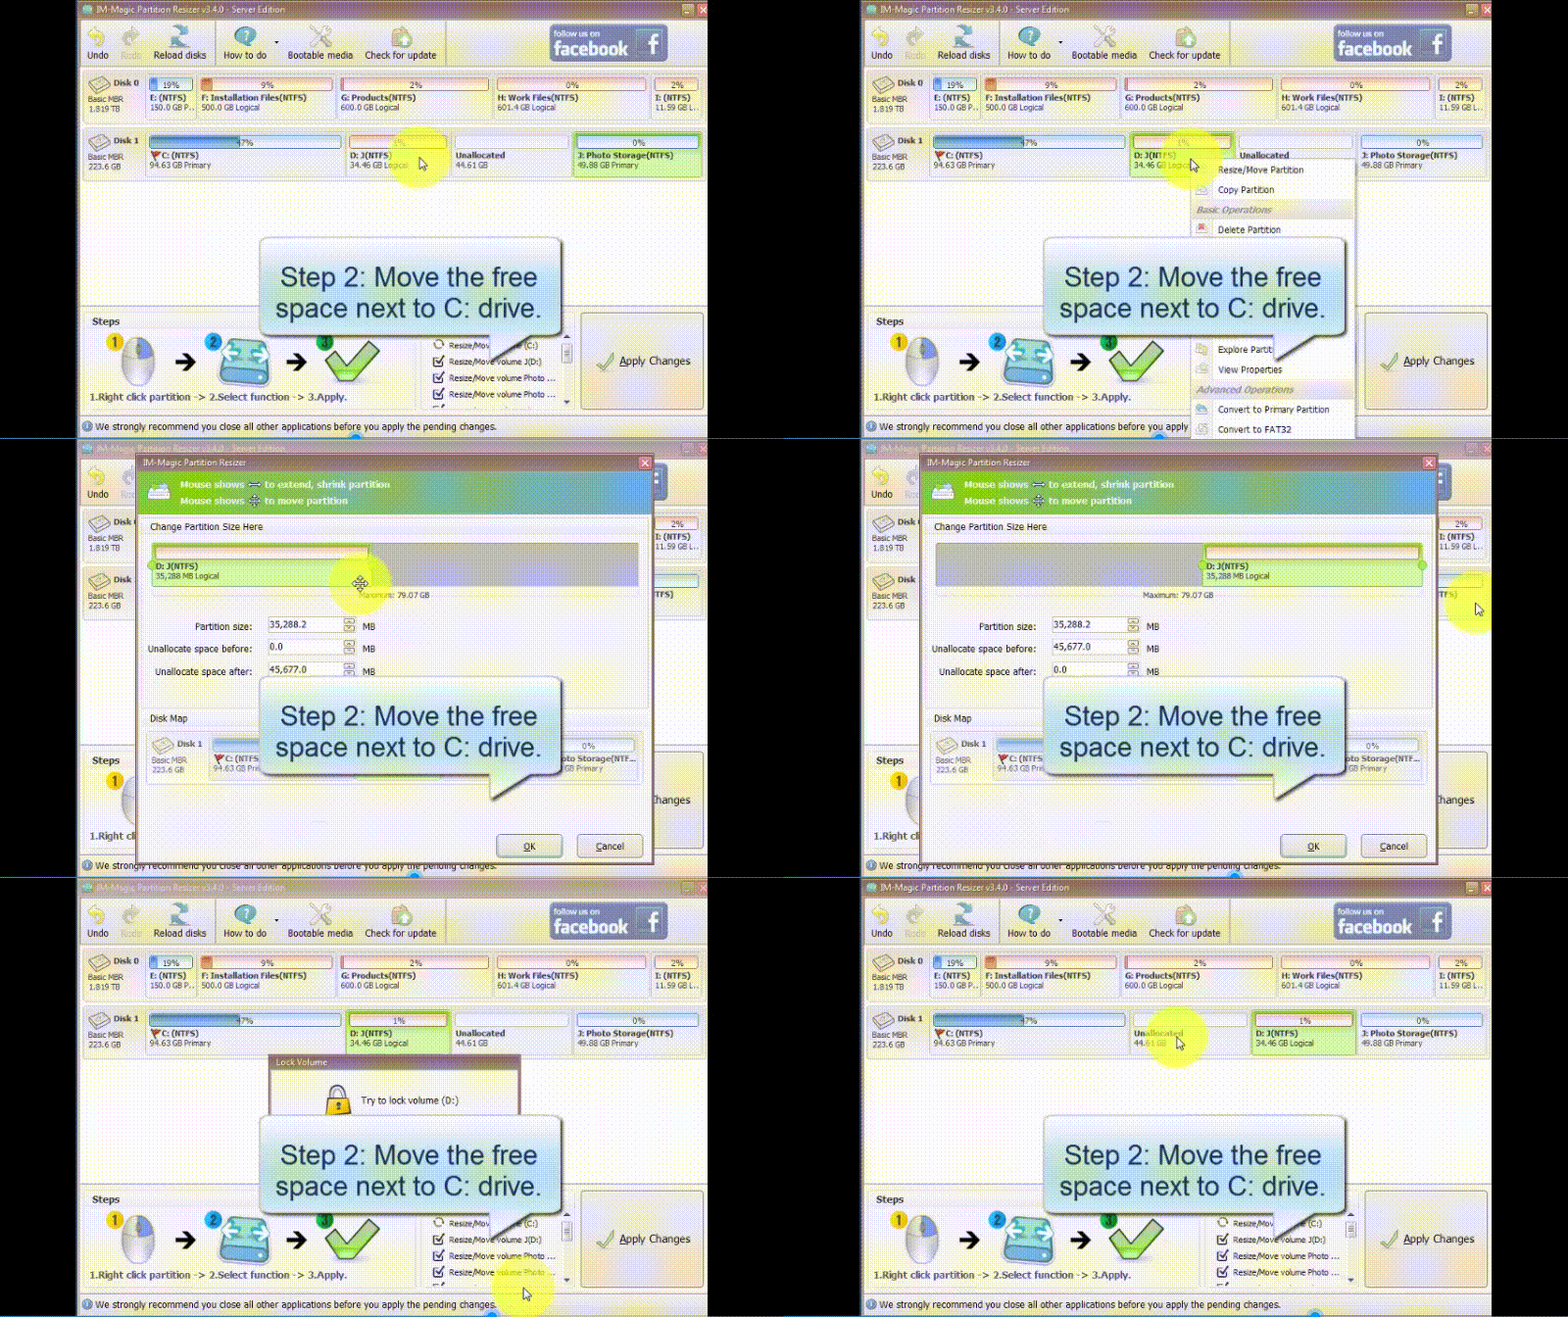
Note: Partition Resizer can also help you with more advanced scenarios, such as resizing and moving partitions without data loss.
Also read: how to move partitions without losing data, how to resize c drive server 2022
Method 2: Using Disk Management to Extend Volume Server 2022
Conditions:
Extending a volume will only show up for drives under the following terms and conditions:
- The target drive must be using the NTFS file system (FAT32 partitions cannot be extended with Disk Management).
- There must be unallocated space immediately adjacent to the partition that you wish to extend. No recovery partition stands in the way, or Disk Management and Diskpart cannot extend the volume.
- The unallocated space must be contiguous with the partition you want to extend. This means the space must be directly next to the partition (usually on the right side).
- If the disk is an MBR disk, it must be smaller than 2TB in size (MBR disks larger than 2TB cannot have unallocated space that is usable for volume extension).
- If the disk is GPT, the "Extend Volume" option will work without the 2TB limitation.
Windows includes a built-in tool called Disk Management, which offers an intuitive graphical interface, making it accessible to most users. Using this tool, you can extend an NTFS partition by allocating adjacent unallocated space. However, before expanding the C drive, you’ll need to delete the D drive or any adjacent partitions.
That said, Disk Management does have its limitations.
Limitations of Disk Management: Disk Management can only extend a partition if there is unallocated space immediately next to it. If there’s a partition (e.g., D:) between the C drive and the unallocated space, you won’t be able to extend the C drive. Furthermore, this tool only supports primary partitions and requires the unallocated space to be contiguous with the partition you wish to extend.
Steps to Extend Volume Using Disk Management:
- Step 1: Press Win + X and select Disk Management from the menu.
- Step 2: Right-click on the volume (e.g., C drive) that you want to extend, and select Extend Volume from the context menu.
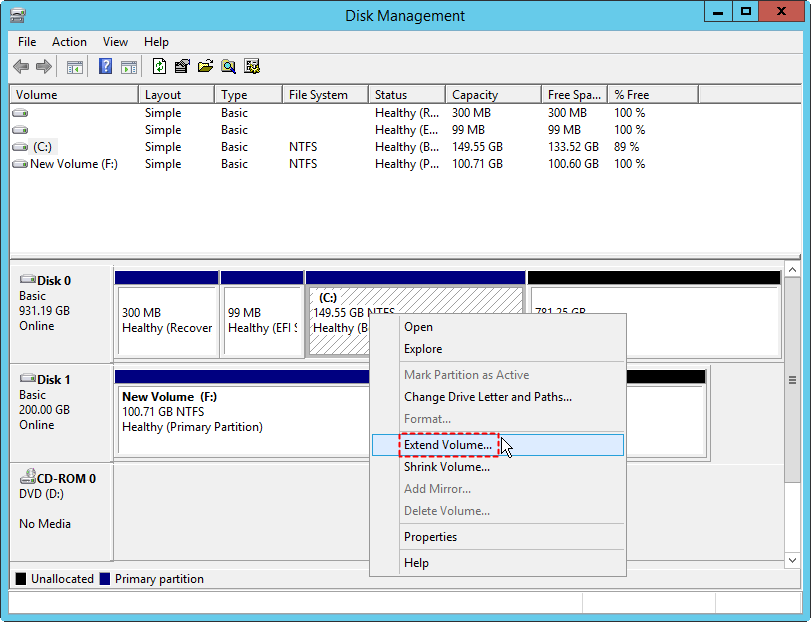
- Step 3: In the "Extend Volume Wizard," click Next and select the amount of space to add. If there’s unallocated space directly adjacent to the C drive, it will be automatically detected and made available for extension.
- Step 4: After selecting the unallocated space, click Next and then Finish to complete the extension.
Method 3: Using Diskpart CMD to Extend Volume Server 2022
DiskPart is a powerful, command-line tool included with Windows that allows you to manage disk partitions. It offers more flexibility than Disk Management, particularly in situations where the graphical tool is unavailable or does not offer the functionality you need. Diskpart allows you to extend partitions even if the space is not immediately adjacent, but the unallocated space must be within the same disk and contiguous with the partition you are extending.
Note: If there is no unallocate space adjacent to the drive, you need to delete a volume to create unallocated space, and it must be the right-side partition that you want to expand.
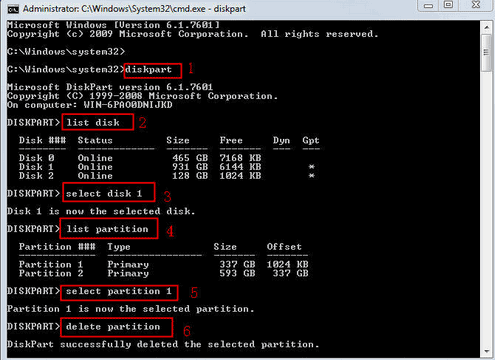
Steps to Extend Volume Using Diskpart:
- Step 1: Press Win + R, type diskpart and press Enter.
- Step 2: Type list volume and press Enter. This will display a list of all available partitions.
- Step 3: Type select volume C (or the volume you want to extend) and press Enter.
- Step 4: Type extend and press Enter. Diskpart will automatically extend the volume using available unallocated space.
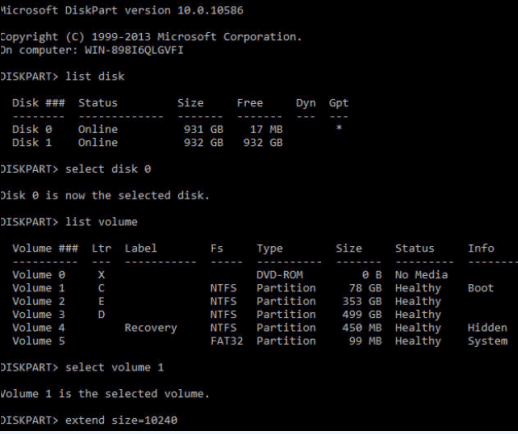
Note: Diskpart only extends a partition if there is unallocated space directly next to it. If the unallocated space is not adjacent, Diskpart will not work.
Part2: Resize C Drive on Server 2022
When the C drive on your Windows Server 2022 is running out of space, you may want to expand it without reinstalling the operating system or losing data. If there’s no unallocated space next to the C drive, you may need to shrink or move another partition to free up space. In this part, we will go through methods to resize the C drive efficiently, including shrinking, moving partitions, and using third-party tools.
#1 Resizing C Drive Using Built-in Disk Management (Only for Adjacent Unallocated Space)
Note that Disk Management only allows you to extend a volume to adjacent unallocated space, and it’s not very flexible when you need to move space between non-adjacent partitions since Disk Management cannot move a partition or unallocated space. (IM-Magic Partition Resizer Server can help move a partition without losing data.)
Here are some cases for extending the c drive.
| Disk Management | |
| C (NTFS), Unallocated Space | Extend C directly |
| C (FAT/FAT32), Unallocated Space | No |
| C, Free Space | Right click the free space in disk management and choose 'Delete Partition' to convert it unallocated space first, and then extend the c drive. |
| C D E |
|
| C Recovery D E | NO |
| C E | Delete E, Extend C |
| Terms and Conditions: The C drive must be NTFS for extending volume. | |
- Case#1 C D E (Solution: Delete D to create adjacent unallocated space for c drive extending)
- Case#2 C Recovery Partition D E ( Disk Management cannot do the c drive extending in this case when the recovery partition stands in the way)
- Case#3 C E
Steps to Resize C Drive Using Disk Management When The Adjacent Unallocated Space Has Been Created:
- Step 1: Press Win + X and choose Disk Management from the list.
- Step 2: Right-click on the C drive and select Extend Volume.

- (If the option is grayed out, there may be several possible causes including FAT32 c drive, unallocated space not adjacent at the right-side of the c drive, 2TB max for MBR disk etc.)
- Step 3: Follow the wizard to extend the volume using the adjacent unallocated space.
#2 Resizing C Drive Using Diskpart (For Advanced Users)
Diskpart is a more powerful command-line tool that performs similar functions to Disk Management but is more complicated to use. Diskpart can extend a volume into adjacent unallocated space; however, it is subject to the same restrictions as Disk Management. Specifically, the unallocated space must be directly next to the C drive. (IM-Magic Partition Resizer Server can help move the partitions, including the recovery partition without losing data.)
Steps to Resize C Drive Using Diskpart After Adjacent Unallocated Space Has Been Created:
- Step 1: Press Win + R, type diskpart and press Enter.
- Step 2: Type list volume to view all available volumes.
- Step 3: Select the C drive with the command select volume C.
- Step 4: Type extend and press Enter. If there’s unallocated space next to the C drive, it will be added to the C drive.
#3 Using Partition Resizer Server to Resize C Drive (Move & Shrink Partitions Without Data Loss)
For situations where you need to resize your C drive but the adjacent space is unavailable or not contiguous, you can use Partition Resizer Server. This third-party tool provides a safer and more flexible way to shrink, move, or extend partitions without data loss.
| IM-Magic Partition Resizer Server | |
| C, Unallocated Space | Extend C directly |
| C, Free Space | Delete the free space to convert it unallocated space first, and then extend the c drive. |
| C D E |
|
| C Recovery D E |
|
| C E |
|
| Terms and Conditions: If it's unallocated space from another hard disk, RAID is required to make the disks into one logical hard drive. NTFS, FAT32 are all supported. Moving partitions can help changing the location of the unallocated space. | |
Steps to Resize C Drive Using Partition Resizer Server:
- Step 1: Download and install Partition Resizer Server.
- Step 2: Open the tool and locate the partition adjacent to the C drive (e.g., D: drive) that you want to shrink to create unallocated space.
- Step 3: Right-click the D drive (or the partition next to C) and select Resize/Move.
- Step 4: Move the left border of the partition to the right, creating unallocated space next to C.
- Step 5: Right-click on the C drive and select Resize/Move again, extending the right side to claim the newly created unallocated space.
- Step 6: Click Apply to commit the changes.
Note: The Partition Resizer tool allows you to move and shrink partitions without affecting the data, and it supports both NTFS and FAT32 formats.
Part3: How to Enable Extend Volume When It's Not Available
If the "Extend Volume" option is grayed out in Windows Server 2022, there could be several reasons why this happens. In this section, we will address the common causes and provide solutions to enable the Extend Volume feature again.
Reasons for Extend Volume Grayed Out
- No Adjacent Unallocated Space: For the "Extend Volume" option to work, there must be unallocated space directly to the right of the volume you wish to extend. If there’s no unallocated space next to the target volume (e.g., C: drive), the option will be disabled. To resolve this, you can either create unallocated space by shrinking an adjacent partition (like D:) or use a third-party tool like Partition Resizer to move the unallocated space.
- Partition is Not NTFS: The "Extend Volume" feature is only available for NTFS (New Technology File System) volumes. If your partition is using the FAT32 or other file systems, the "Extend Volume" option will be unavailable. You must either convert the partition to NTFS or use a third-party tool to resize it. You can convert a FAT32 partition to NTFS without data loss by running the
convertcommand in the Command Prompt:convert [drive letter]: /fs:ntfs. - Unallocated Space is Not Adjacent: Even if there is unallocated space on the disk, if it is not directly next to the volume you want to extend (e.g., if there’s a partition between the C: drive and unallocated space), the "Extend Volume" option will be grayed out. In this case, you can either delete or move the partition standing between the C: drive and the unallocated space using tools like Partition Resizer.
- MBR Disk Limitation: If the disk is using MBR (Master Boot Record) partition style, the "Extend Volume" feature will only work if there is unallocated space less than 2TB in size. MBR disks have a 2TB limit for each partition. If your disk exceeds this limit, you may need to convert the disk to GPT (GUID Partition Table) to enable the extension or reduce the partition size. Partition Resizer can help you convert MBR to GPT without data loss.
- Volume is Dynamic: Dynamic disks allow more advanced features like spanning and striping, but certain operations, such as extending simple volumes, may not be possible if the dynamic disk is not formatted correctly or if the dynamic volume is part of a RAID configuration.
- Windows Recovery Partitions: Sometimes, Windows Server has a recovery partition that cannot be extended. If there is a recovery partition placed right next to the system partition, it may block the "Extend Volume" option. In such cases, you may need to move or delete the recovery partition. Tools like Partition Resizer can help you move or delete these partitions without losing data.
- Unsupported File System or Corrupted Partition: In some cases, the volume you are attempting to extend may have file system errors or corruption. Running a check disk command
chkdskon the partition can sometimes resolve these issues. You can open a command prompt and typechkdsk C: /fto fix errors before attempting to extend the volume again. - RAID Configuration Issues: If your server is using a RAID array, there may be limitations to how you can extend volumes. RAID volumes may require specific management software provided by the RAID controller, and the "Extend Volume" option in Windows may not work for RAID arrays. You may need to use the RAID management tool to add space to the RAID array or extend the logical volume. Alternatively, third-party software like Partition Resizer may allow you to resize partitions even on RAID configurations.
Solutions:
To fix the issue of "Extend Volume" being grayed out, consider the following steps:
- Ensure there is unallocated space immediately adjacent to the volume.
- Convert any non-NTFS partitions (e.g., FAT32) to NTFS if necessary.
- Use third-party partition tools (like Partition Resizer) to move, shrink, or merge partitions to create unallocated space next to the volume you wish to extend.
- If using MBR disk, consider converting it to GPT for larger capacity support.
- Check for and resolve file system corruption using the
chkdskcommand. - If using RAID, consult your RAID controller software for options to extend the volume or array size.
Enable Extend Volume by Deleting the Recovery Partition
This way, you can extend volume server 2022 by deleting the recovery partition. In this process, you must create a USB recovery drive by following the required steps.
Steps to Use:
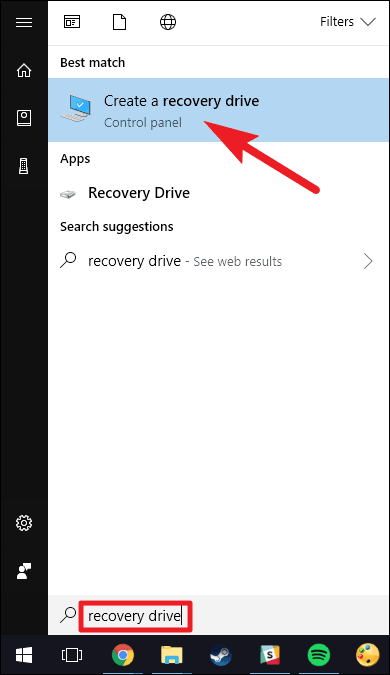
Step 1: Tap on the icon for ‘Search’; in the search box, write ‘Recovery Drive.’ Make a selection of the ‘Create a recovery drive’ option.
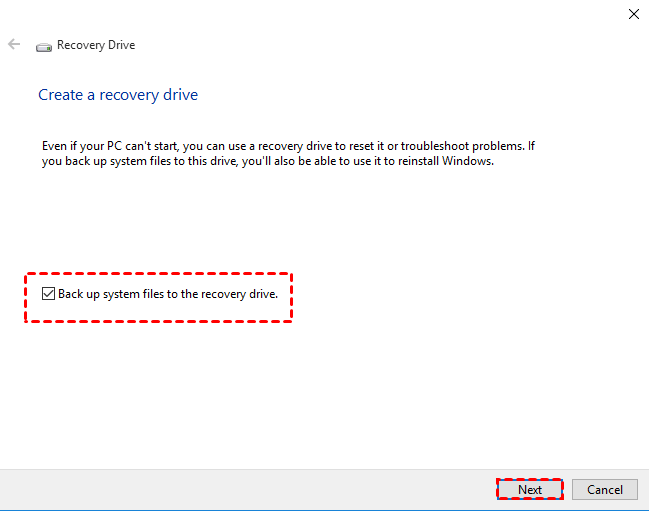
Step 2: Once your tool for the recovery drive opens, select the option of ‘Back up system files to the recovery drive.’ Then make a selection of the ‘Next’ option.
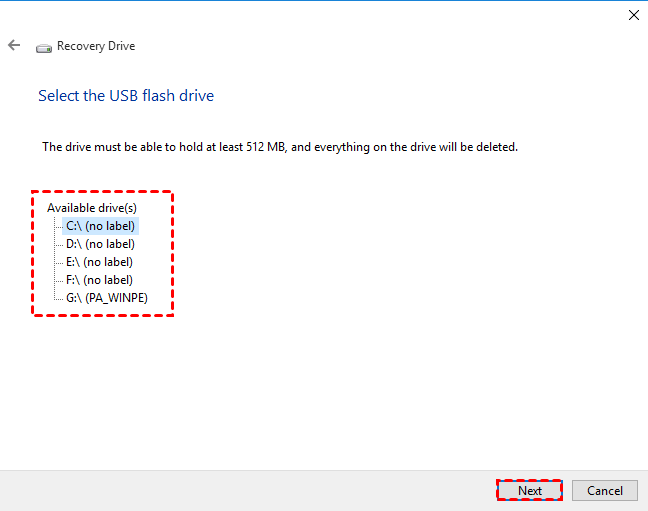
Step 3: Look for a USB flash drive that matches the space requirement on the screen. Select the connected USB flash drive and tap the ‘Next’ option to continue.
Step 4: Tap on the ‘Create’ option for the beginning creation of the recovery drive.
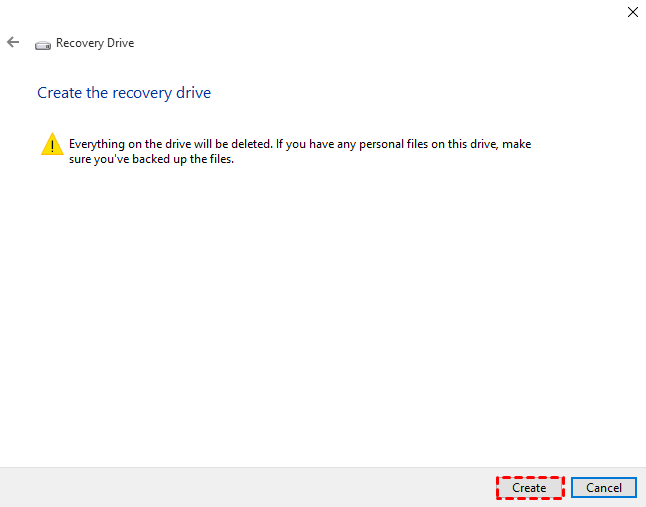
Step 5: Once the process is finished, do not tap on the ‘Finish’ option. Select the ‘Delete the recovery partition’ option to remove the recovery partition from your device. Then, tap on the ‘Delete’ option to free up the space you used to store the image for recovery. Once you have successfully removed it, tap the ‘Finish’ option.
Option: Deleting the recovery partition by IM-Magic Partition Resizer.
Also read: How to delete or move the recovery partition on Window Server
For detailed instructions on how to move, resize, or merge partitions to resolve the "Extend Volume" issue, refer to the full guide on using fixing extend volume greyed out in Windows Server 2022.
Part4: Extend a Volume from Another Disk (Including RAID Setup)
If you have a RAID setup or want to extend a volume using space from another disk, it’s essential to consider a few important factors. In Windows Server 2022, you cannot directly extend a volume from a different disk unless you are using a RAID array that supports this function (such as RAID 0, RAID 1, or RAID 5).
Using RAID to Extend Volume
RAID (Redundant Array of Independent Disks) can help in extending a volume by combining multiple physical disks into one logical volume. If you have RAID set up (using software RAID or a hardware RAID controller), you can extend a volume across multiple disks. However, you need to ensure that:
- The RAID array is functioning and configured correctly.
- You have enough free space on the RAID array to extend the existing volume.
- Your RAID configuration is supported by the version of Windows Server you are using (e.g., RAID 5 is supported for fault tolerance and performance in Server 2022).
Steps to Extend a Volume Using RAID
Partition Resizer Server can help add unallocated space from another disk to any volume once you have set up these disks with RAID and when Windows built-in tools fails. You may try using Windows built-in tools first to see whether it would work in your case.
Step 1: Check your RAID array to ensure it’s healthy and has unallocated space. You can do this via your RAID controller management software or the built-in Windows tools.
Step 2: Open Disk Management. Right-click on the volume you want to extend, and if the RAID is correctly set up with unallocated space, you will see the option to extend the volume.
Step 3: If you're using hardware RAID, you may need to expand the virtual disk on your RAID controller software before extending it in Windows. If it’s a software RAID, ensure you have configured additional space and mirror or stripe the new disk as part of the RAID array.
Step 4: Once the RAID array has unallocated space and is configured correctly, follow the standard method (using Disk Management or Partition Resizer) to extend the volume on the new, expanded RAID array.
Important Note: Extending a volume in a RAID setup may require additional steps depending on the type of RAID and disk layout. Always back up important data before performing disk operations.
More Related Articles You May Like
Related Product
- IM-Magic Partition Resizer Server - Partition space redistributing software that works for Windows Server 2003-2025.
