How to Shrink Volume on Server 2022/2019/2016 without Losing Data
Summary
Safely shrinking volumes on Windows Server 2008 2012 2016 2019 2022 computers without losing data with safe tool provided by Windows or 3rd party software.
Table of Contents
| Disk Management | Diskpart (No UI) |
Partition Resizer (Easy UI) |
|
| Shrink Partition |  |
 |
 |
| Shrink FAT32 Partition | NO | NO |  |
| Move partition/unallocated space | NO | NO |  |
| Extend FAT32 partition |  YES if unallocated space is on the right YES if unallocated space is on the right |
 |
 |
| Extend FAT32 C Drive | NO | NO |  |
| Extend NTFS C Drive with Adjacent Unallocated Space |  |
 |
 |
| Backup Disk/Partition | NO | NO |  |
| Add Space from Another Disk | RAID REQUIRED (Cannot move partition) |
RAID REQUIRED (Cannot move partition) |
 RAID REQUIRED RAID REQUIRED |
| Move Recovery Partition | NO | NO |  |
| Migrate OS to Larger Disk | NO | NO |  |
| Download for Server |
Shrink Partition on Server 2022/2019/2016 with Disk Management
Shrinking volume varies in Disk Management. Here are some can and can't tips.
- Shrinking NTFS volumes with Disk Management: YES
- Shrinking FAT32 volumes with Disk Management: NO ( Shrink fat32 drive with Partition Resizer)
- Add unallocated space to other drives wth Disk Management: NO (Move in-between partitions with Partition Resizer to move unallocated spaces safely)
Shrinking an NTFS volume is possible in Disk Management, and it only allows creating a new drive with the produced unallocated space after shrinking NTFS volume with Windows built-in tools (Disk Management or Diskpart, same story.)
Here are the steps for shrinking a volume in Disk Management when it's ntfs. (For shrinking fat32 partitions, be free to use tool Partition Resizer Server.)
Step 1 - Open Disk Management in your computer, you may click the Start icon -> Run, and type Diskmgmt.msc
Step 2 - Right click the drive, click Shrink Volume option in the pop up box to go ahead.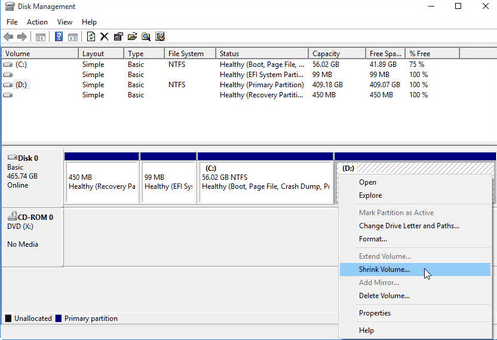
Step 3 - Enter the size that you want to shrink, eg, if you want to shrink 10GB, you may enter 10240, which is the result of 1024*10, if you want to shrink 100GB, you may enter 102400, which is 1024*100.
Step 4 - Click Shrink button in the box and confirm the changes.
And then the disk partitions will have some Free space available on the disk map like this.

Step 5 - Right click the Free space to delete volume since deleting free space will make it unallocated space in Disk Management. 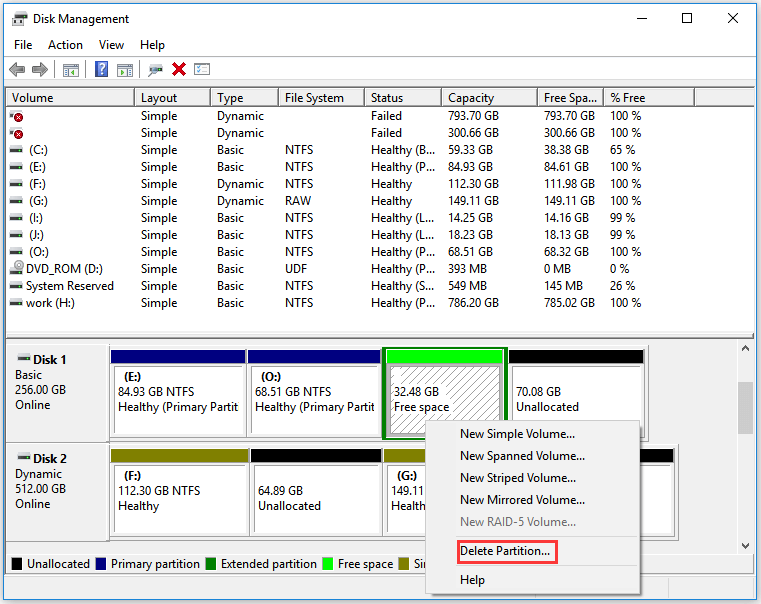
What can you do with the free space or unallocated space?
- 1, Add the unallocated space to closeby partition
- 2, Copy partition to unallocated space as bakcup
- 3, Create a new drive
- 4, Move unallocated space to other drives (Partition Resizer Server can do the job when Disk Management or Diskpart couldn't)
- 5, Other partition functions...
Note: how to change free space to unallcoated space, or how to shrink fat32 partition
Tutorial: Shrink Volume with Partition Resizer Server (100% Safe, No data loss)
Partition Resizer Server can help change disk volume sizes without losing data. It can help protect OS and data even from a sudden power failure during the changing processes.
Follow these simple steps to shrink volume on server 2022/2019:
1. Right click drive and select Resize/Move Partition:
 Resize partition without partition tool.
2. In the next step, drag the the border from left side or right side to shrink the free space and make it unallocated after the shrinking.
 Steps to resize your partition
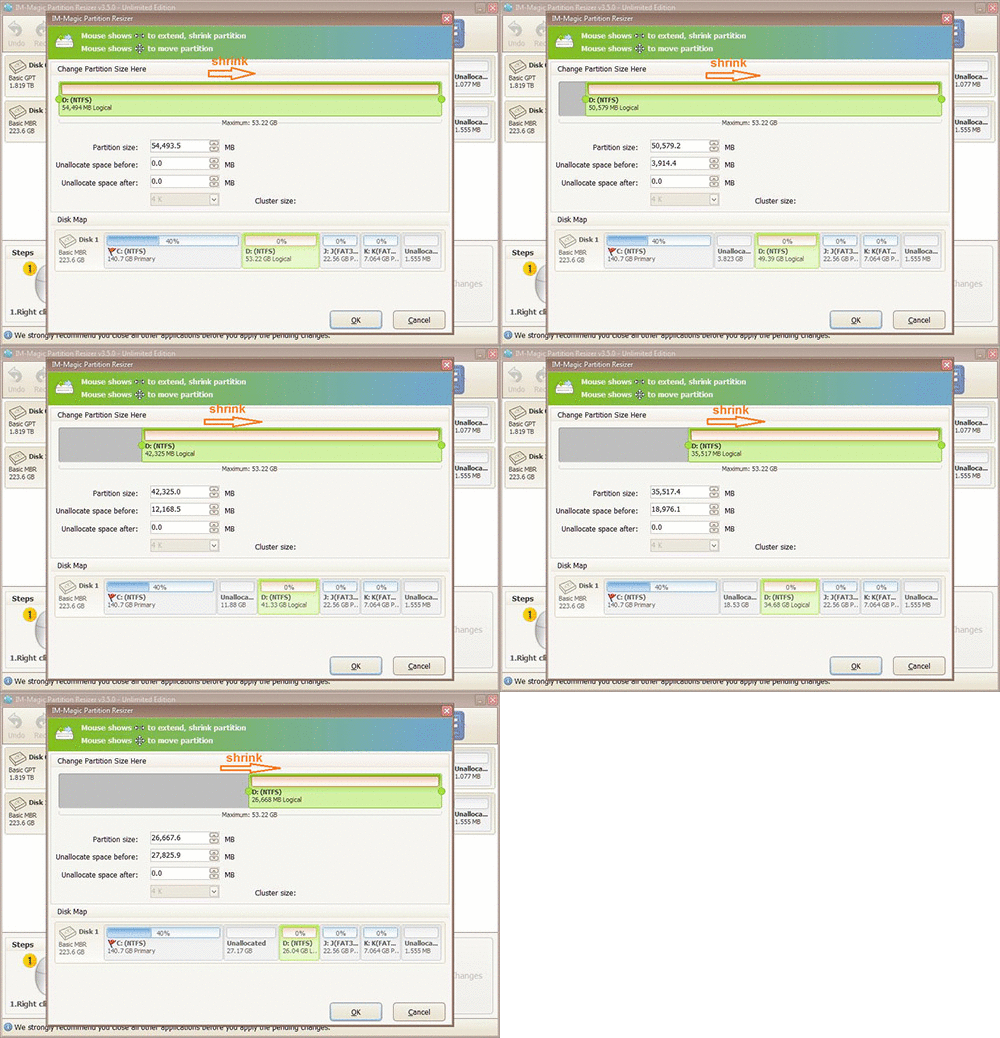 Steps to resize your partition
3. You will see your drive size is reduced and also an unallocated space is created as shown below.
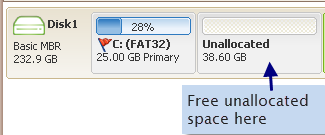
Create a new drive: Right click the unallocated space and select Create Volume to start making a new drive on your machine.
Moving the unallocated space to an unadjacent drive: You need to move the in-between partitions by right clicking a drive and go to RESIZE/MOVE PARTITION and then move the whole drive left or right forward to change the location of the unallocated space with IM-Magic Partition Resizer Server.

Also read: how to move unallocated space
4. Click APPLY button in the software to get every step applied.
Video - This following image shows how to move a partition safely in Partition Resizer Server
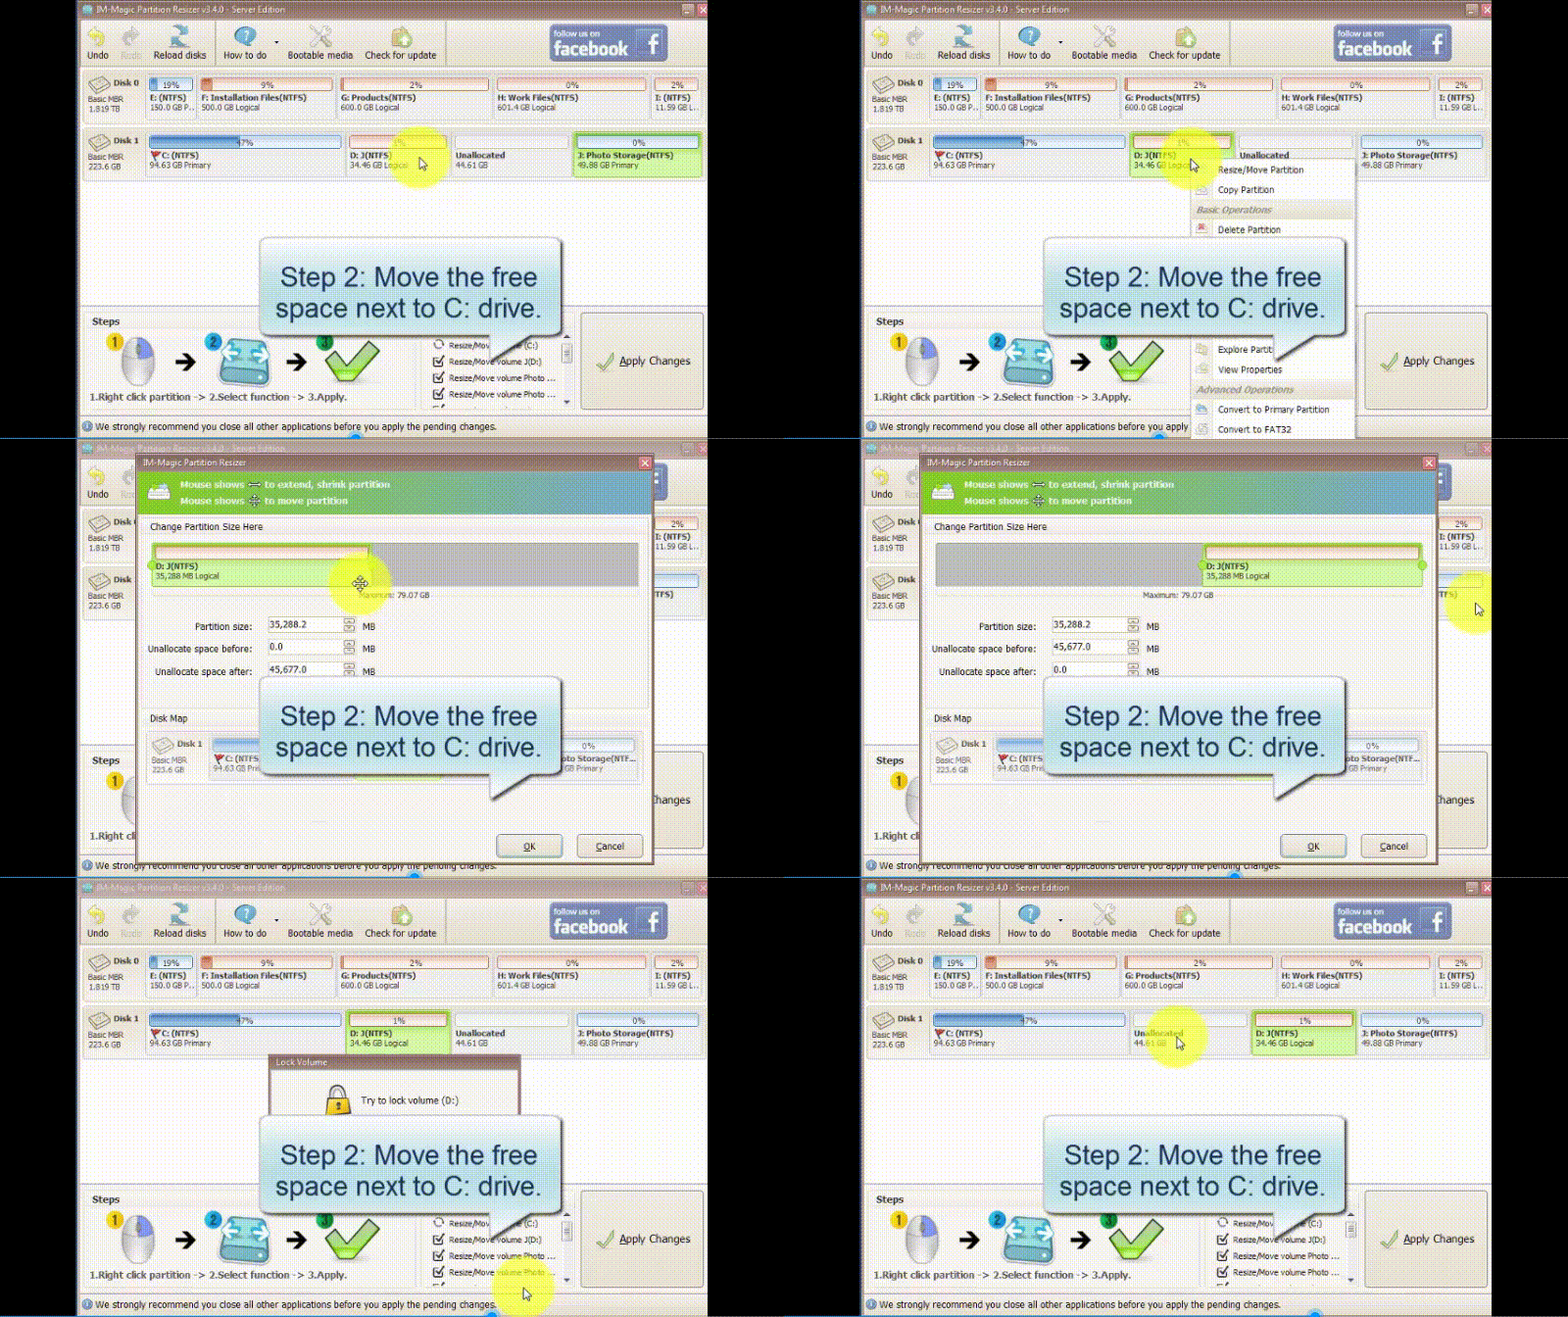
Also read: how to move unallocated space to c drive or targeted drive
How to shrink volume using diskpart cmd in server 2022/2019/2016/2012
To shrink a volume using Diskpart cmd in Windows Server 2022, you can follow these steps:
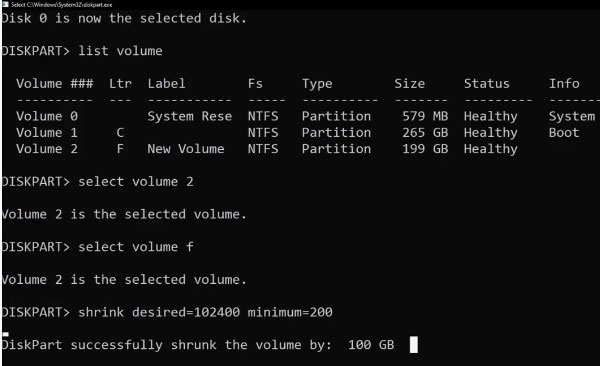
- Open an elevated command prompt by pressing Win+X and selecting "Command Prompt (Admin)" or "Windows PowerShell (Admin)".
- Type "diskpart" and press Enter to open the Diskpart command-line utility.
- Type "list volume" and press Enter to see a list of all volumes on your system. Identify the volume you want to shrink.
- Type "select volume X" (where "X" is the number of the volume you want to shrink) and press Enter.
- Type "shrink desired=SIZE" (where "SIZE" is the amount of space you want to shrink the volume by, in megabytes) and press Enter. For example, if you want to shrink the volume by 10 GB, you would type "shrink desired=10240".
-
Wait for Diskpart to complete the operation. This may take several minutes depending on the size of the volume and the amount you're shrinking it by.
-
Once Diskpart has finished, you can exit the utility by typing "exit" and pressing Enter.
Note that shrinking a volume can cause data loss or corruption if there are files located in the space that you're shrinking, so be sure to back up any important data before proceeding.
Also read: how to shrink volume with diskpart
Shrink volume and extend c drive (shrink D/E/F/H/G and extend c)
You need to use 3rd party tool Partition Resizer Server to shrink a volume and add the space to extend c drive since Disk Management can only delete volume(c drive right side volume) to make unallocated space and extend c drive.
Disk Management cannot extend volume even after deleting drive D when:
- The c drive is fat32 file system
- The c drive is ntfs drive but unallocated space is a logical drive, not primary drive
- The c drive is ntfs drive but there is recovery partition or something that stands in between the c drive and the unallocated space
- The c drive disk has MBR disk limits under 2TB (When the disk is 4TB for instance, the c drive cannot be extended when there are partitions already taking 2TB disk capacities.)
Also read: how to shrink drive and extend c
How to shrink c drive without losing data
When the c drive is NTFS file system, you can use Disk Management or Diskpart to shrink it safely. When the c drive has FAT32 file system, Partition Resizer Server can help shrink c drive safely when Disk Management and diskpart failed.
More Related Articles You May Like
Related Product
- IM-Magic Partition Resizer Server - Partition space redistributing software that works for Windows Server 2003-2022.
