How to Create a Partition in Windows 7 for Free [4 Ways]
It is necessary to create more than one partition on Windows 7 in order to install operating system and store different kinds of data. Usually, you should divide a hard drive into several sections when installing it on your computer, but sometimes you may need to shrink a volume to create a partition after installing hard drive on Windows 7. This article will tell how to create new partition in Windows 7 for free.
The key: Creating a new volume is based on unallocated space (No unallocated space? Shrink a large volume to create unallocated space, details: how to shrink c drive to create partition), or create a partition from a new disk, or reinstall OS and create new partitions.
Method#1: Windows 7 Disk Management to Create New Partition
Without relying on any partition software, you can create new partition on Windows 7 under Disk Management. Usually, you can repartition hard drive and create new partition with Windows 7 Disk Management without touching any previous data stored on each partition. You can follow the guide below to create new partition with Windows 7 Disk Management:
Step1. Open Disk Management on Windows 7 to show all partitions on your computer.

3 possible methods to open disk management in Windows 7 system:
1. Right click "Computer" icon on desktop of Windows 7 > "Manage" > "Disk Management"
2. Click "Start" button on Windows 7 > "Control Panel" > "System and Security" > "Administrative Tools" > double click the "Computer Management" > click "Disk Management"
3. Press Windows + R to launch Run dialog window > type "diskmgmt.msc" in the box and then press "Enter" button to open disk management.
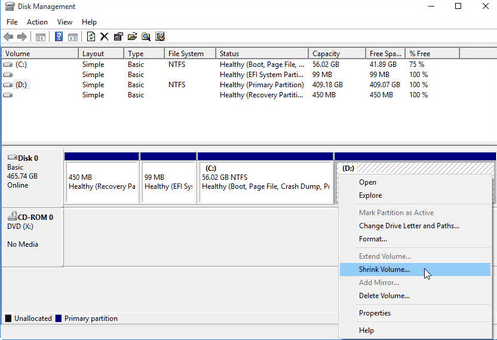
Step2. Right click a partition that has much free space and click "Shrink Volume" option so as to get some unallocated space.

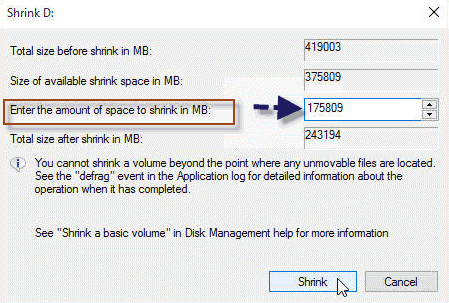
After clicking "Shrink Volume" option, it will pop up a window on which you can enter amount of space to shrink.

Step3. When the shrinking is completed, you can get some unallocated space. You just need to right click the unallocated space and click "New Simple Volume".

When it shows the "New Simple Volume Wizard", you can set the size of the new volume and then format it to NTFS or FAT32 file system.

When the formatting is completed, you can get a new partition on Windows 7.

Method#2: Create New Partition on Windows 7 with Free Partition Magic
In addition to all methods mentioned above, you have another choice to crate new partition on Windows 7 easily, namely use partition magic for Windows 7. IM-Magic Partition Resizer Free is free partition management tool that enables you to squeeze free space from another partition so as to create a new volume. With this partition tool, you can create new volume without reinstalling system or erasing any data, so you do need to backup data by using this software to create new volume on Windows 7.

Attention: You can shrink more than one partition to get enough free space, but you are only allowed to move free space on the same hard drive to increase size of C drive on Windows 7.
For Windows 11/10/8/7 => Download Partition Resizer Free [100% Free]
For Windows Server 2025-2003 => Download Partition Resizer Server [Free Demo]
Method#3: Make New Volume on Windows 7 by Reinstall System
You can also reinstall Windows 7 operating system and redistribute disk space to make new volume. With this method, you had better backup all important data to another computer or storage media because system reinstall and disk repartition usually erase everything stored on the hard drive. Therefore, you should always remember to backup data in advance before reinstalling system.
Method#4: New Hard Drive Added to Make New Partitions on Windows 7
You can add two or more hard drives on your computer, so you can simply install a new hard drive if you want to create new partition on Windows 7. Before adding new hard drive to your computer, you should check if the new added hard drive is compatible with the system. After adding a new hard drive, it will show under Disk Management. You need to initialize the new added hard drive under Disk Management and then format it to NTFS or FAT32 file system in order to make it workable.
More Related Articles You May Like
- windows 8 low disk space warning on system partition c - how to fix low disk space problem when you receive the message on system partition win8...Read more >>
- windows 8 disk management grayed out failed to extend volume - free to extend volume on windows 8 even when disk management grayed out stops working...Read more >>
- windows 7 disk management - disk management to free manage disk space on windows 7 so as to resolve different problems...Read more >>
-
Create d drive from c drive - solution for partition creation without formatting disk or reinstalling os...
Related Product
- IM-Magic Partition Resizer Server - Partition space redistributing software that works for Windows Server 2003-2025.