Free Resize Partition in Windows 11/10/8/7 (5 Free Ways)
Is there any free partition tool to resize disk partitions on Windows 11/10/8/7 without losing datas?
Today, when you buy a new computer, the hard disk is often divided into several partitions, and the operating system is installed on one of these partitions. During the usage of your computer, you may need to resize the hard disk partition due to unreasonable disk space allocation.
Whether you have upgraded your computer to the Windows 10 operating system or your computer is running Windows 10 slowly, you probably need a free partition tool to redistribute disk space. Why choose the free tool IM-Magic Partition Resizer? Here is a table that shows the scenarios where you might need it.
| Diskpart | Disk Management | IM-Magic Partition Resizer* | |
|---|---|---|---|
| Extend FAT32 C Drive | NO | NO |  |
| Extend NTFS C Drive |
 YES when the unallocated space is contiguous to the right of C YES when the unallocated space is contiguous to the right of C
|
 YES when the unallocated space is contiguous to the right of C YES when the unallocated space is contiguous to the right of C
|
 |
| Create Partition |  |
 |
 |
| Shrink Partition |  |
 |
 |
| Move Unallocated Space | NO | NO |  |
| Move Partition | NO | NO |  |
| Move System Reserved/Recovery Partition | NO | NO |  |
| Delete System Reserved/Recovery Partition | YES | NO |  |
| Clone Disk | NO | NO |  |
| Migrate OS | NO | NO |  |
| Price | FREE | FREE | FREE |
|
Download for Windows 11-7 (100% Free) Download for Windows Server (Free Demo) |
|||
Content Table - 5 Free Ways
Part 1 - Freeware to Resize Partition in Windows 10/8/7 (64-bit & 32-bit) - 3 Steps
You can use the free partition software IM-Magic Partition Resizer Free (100% freeware) to resize any partition, including the system partition, on Windows 11/10/8/7 computers without losing data, formatting the disk, repartitioning, or reinstalling the operating system.
For Windows 11/10/8/7 => Download Partition Resizer Free [100% Free]
For Windows Server 2025-2003 => Download Partition Resizer Server [Free Demo]
Preparations: Download and install the freeware on your computer. If the disk is external, connect it to your computer.
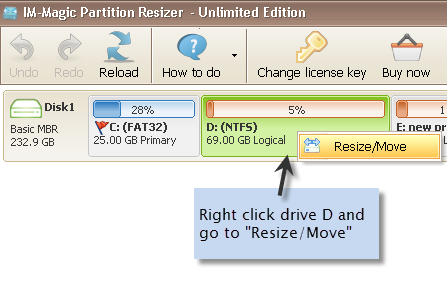
Step 1: Run IM-Magic Partition Resizer, right-click the partition you want to resize, and select the 'Resize/Move' option. For example, resize a large volume if you want to change its size (shrink it or resize it for another partition).
Step 2: Shrink the volume by moving its border to the left or right.
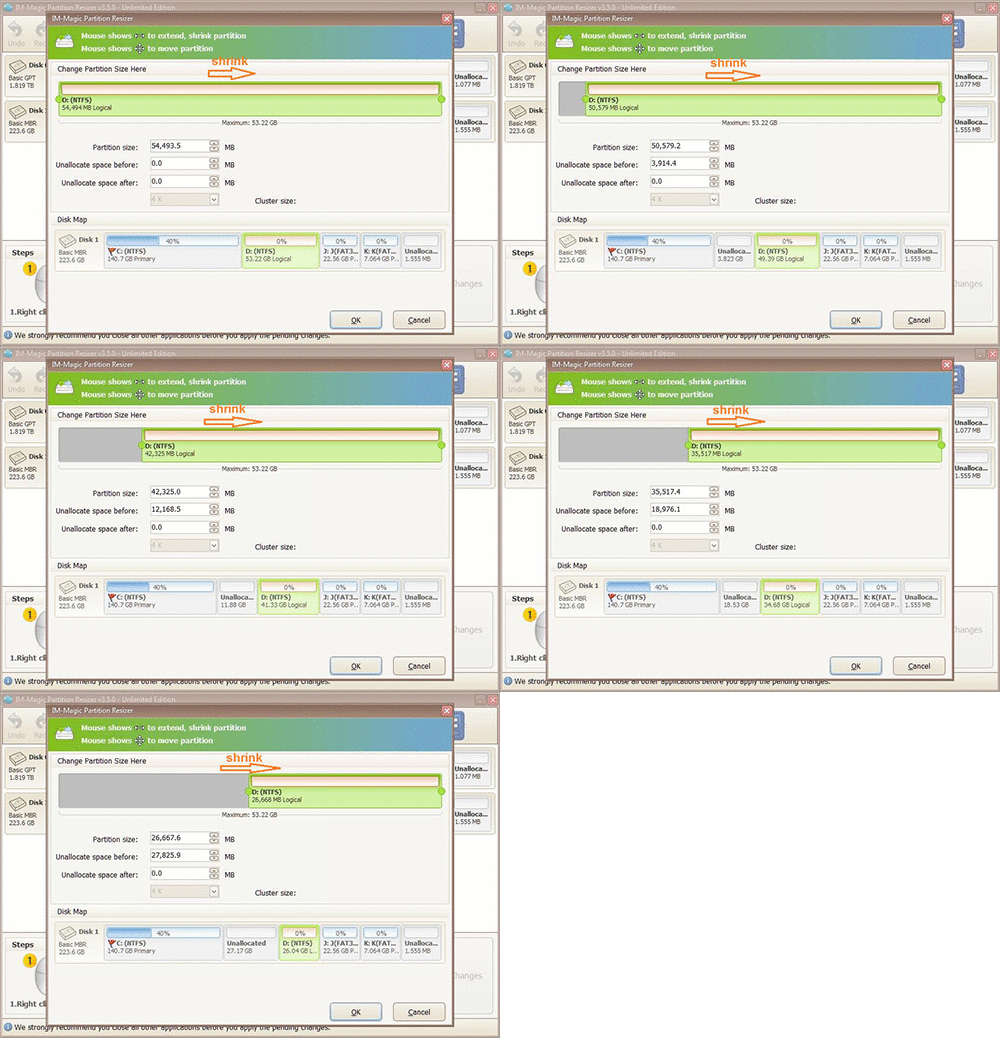
Steps to resize partition by shrinking it
Note: If the target volume is the C: drive you want to resize, you may shrink the D: or another large volume by moving its border to the right, making free space next to the C: drive (drag the border from the left to move it forward).
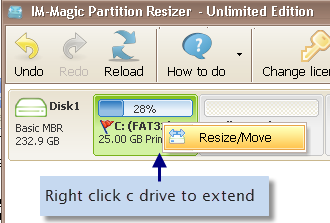
Step 3: Right-click the C: drive you want to extend, select 'Resize/Move', and claim the free space by moving its border to the right.
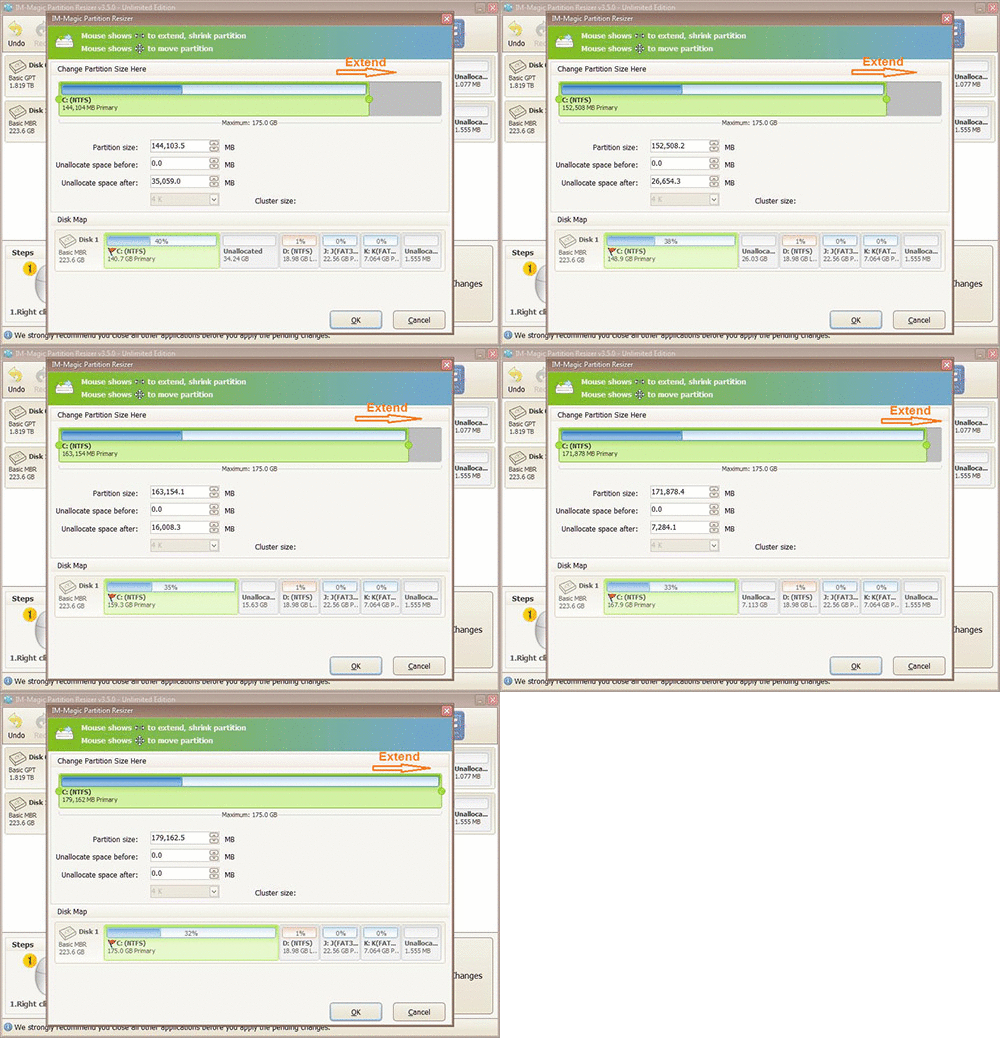
Steps to extend your disk partition
Step 4: Click the 'Apply' button to complete the process.
This freeware supports Windows 11/10/8/7/Vista/XP/2000 and can increase partition size without losing data or formatting the disk.
Part 2: Resize Partition with Disk Management in Windows 11/10/8/7
Disk Management, a built-in Windows utility, allows you to manage partitions easily and free of charge. Whether you want to expand or shrink a partition, Disk Management in Windows 11/10/8/7 has tools to assist you.
Open Disk Management

Step 1: Open Disk Management
To get started with resizing your disk partition, first open Disk Management:
- Press Windows + X keys together.
- Select Disk Management from the menu that appears.
- The Disk Management window will open, showing all available drives and partitions.
Extending a Partition with Disk Management
Once you have opened Disk Management, follow these steps to extend a partition:
Note: Disk Management can only expand a drive if there is adjacent unallocated space on its right side. The C: drive must be formatted as NTFS. If these conditions are not met, consider using a free tool like Partition Resizer.
- Right-click the partition you want to expand.
- Select Extend Volume.
- A wizard will guide you through the process. Ensure there is unallocated space adjacent to the partition you want to expand.
If there is no unallocated space, you might need to delete the partition to the right. 
Example: Deleting a disk partition to create unallocated space
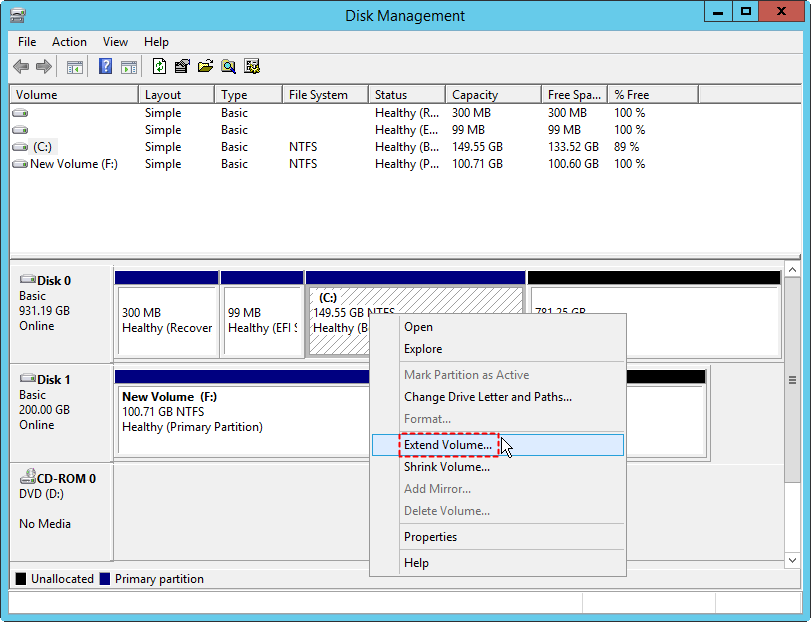
Example: Extending a disk partition in Disk Management
Also read: Extend Volume Grayed Out Fixes, How to Delete Recovery Partition, or Cannot Delete Volume Fixes.
Change Partition Size by Shrinking to Create Free Space
To create unallocated space for a different partition:
- Right-click the partition you wish to shrink.
- Select Shrink Volume.
- Enter the amount of space to shrink in the dialog box and confirm.
Disk Management cannot move unallocated space between partitions. Use a tool like Partition Resizer for more flexibility.
Troubleshooting Tips
![]() If you cannot extend or shrink a partition due to grayed-out options, use a third-party tool like Partition Resizer Free.
If you cannot extend or shrink a partition due to grayed-out options, use a third-party tool like Partition Resizer Free.
Also read: How to Move Space from D: Drive to C: Drive
Part 3: Resize Partition in Windows 10 Using Diskpart
Why Is Extending a Disk Partition Necessary?
Are you seeing a warning on your Windows PC screen about storage space running out? This indicates that the disk volume is low on space, which can gradually slow down your PC and prevent apps from loading smoothly.
To resolve this issue, you can uninstall unnecessary programs or files, or move some applications to another drive. Alternatively, you can extend the volume or partition on your PC.
Diskpart is an in-built tool that assists users in extending partitions.
Let’s explore this process in detail below:
Steps to Follow:
Step 1: Press ‘WIN+R’ or start by typing ‘diskpart’ in the search bar. Then press the Enter key to open it.

Step 2: At the Diskpart prompt, enter the following commands in the specified order:
- List disk
- Select disk 0 (where 0 is the disk containing the target partition)
- List partition
- Select partition 4 (where 4 is the target partition)
- Extend size=100 (where 100 is the size, in MB, to extend the partition)

Once completed, you will see a message confirming the partition extension. When finished, type exit to close Diskpart. If you are using a dynamic disk, use the term 'volume' instead of 'partition.'
Part 4: Resize Partition in Windows 11/10 Using Bitlocker
Windows Bitlocker protects your valuable data by encrypting the entire system volume. It uses a microchip called the Trusted Platform Module (TPM) to safeguard Windows OS and prevent data tampering.
Decrypting a Bitlocker Drive Using the Built-in Decryption Tool in Windows
Before resizing a Bitlocker-encrypted partition, you need to decrypt the drive. Follow these steps:
Steps to Follow:
Step 1: Open the Run dialog box by pressing Windows + R. Type Control Panel and click "OK."

Step 2: Switch to large icons for better visibility, then click on ‘Bitlocker Drive Encryption.’

Step 3: Select the drive you want to decrypt and click ‘Turn Off Bitlocker.’

Step 4: A prompt will inform you that the decryption process may take some time. Confirm by clicking ‘Turn Off Bitlocker’ to start the process.

Step 5: Monitor the decryption process via the system tray icon. Double-click it to check the progress.

After decryption, use IM-Magic Partition Resizer to resize the Windows partition.
IM-Magic Partition Resizer is a free tool that lets you expand, shrink, move, or merge partitions without losing data. It helps users rearrange disk partitions with a few simple clicks.
Steps to Follow:
Step 1: Shrink a large volume on the same disk to create free space for expansion.
Step 2: Redistribute the free space, placing it adjacent to the volume you want to extend using IM-Magic Partition Resizer.
Step 3: Add the free space to the smaller partition to extend its volume.
Part 5: Resize Partition in Windows 10 Using PowerShell
If you find that a partition on your PC is running out of space, you can use PowerShell to resolve the issue. PowerShell allows you to resize partitions, shrink large partitions to create unallocated space, and extend small partitions to use available space.

Steps to Follow:
Step 1: First, locate the search bar on your PC and type "PowerShell." Next, click on "Run as Administrator." You will receive a User Access Control prompt, click "Yes" to proceed.

Step 2: In the PowerShell prompt, identify the disk containing the partition you wish to resize. Type the following command and press Enter:
Get-Disk
Pro Tip: Note the disk number of the disk you want to allocate partition changes to, and proceed with the following steps.

Step 3: Next, identify the partition number you wish to resize. Type the following command and press Enter:
Get-Partition
Pro Tip: Ensure you enter the partition number you wish to resize.
Step 4: To determine the maximum size of your partition, use the PartitionSupportedSize cmdlet and assign the resulting value to a variable:
PartitionSize = (Get-PartitionSupportedSize -DiskNumber

Step 5: Finally, resize the partition by using the Resize-Partition cmdlet:
Resize-Partition -DiskNumber

Part 6: Resize EFI Partition in Windows 11
EFI stands for Extensible Firmware Interface, and it is a partition found on the primary hard drive used by PCs with UEFI (Unified Extensible Firmware Interface). The EFI partition should be formatted with the FAT32 file system and contains essential files such as device drivers, boot loaders, BitLocker data, etc. If you want to resize an EFI partition without complications, you can use the IM-Magic Partition Resizer software. This tool helps you resize any partition without data loss, and you don’t need to repartition your hard disk or reinstall the operating system.
You can download the software by clicking on: https://www.resize-c.com/
Free Solution for Partition Resizing on Windows 10 Without Software (Data Needs to Be Moved to Another Disk)
Low disk space, whether on a system partition or data partition, can cause some inconvenience. It is essential to reallocate disk space on Windows 10 to resolve the low disk space issue. Here are some free solutions for resizing partitions on Windows 10:
1. Free Repartitioning of Hard Disk
You can repartition your hard disk to reallocate space to the partition that is running low on space. Be sure to back up your data before repartitioning the hard disk.
2. Reinstall Windows 10 System
You can reinstall the Windows 10 operating system and reformat the system partition to free up space. However, make sure to back up all important data, as reinstalling the OS will erase everything.
3. Free Up Disk Space on Windows 10 System Partition Without Resizing
If the low disk space issue on the system partition is not causing significant problems, you can free up disk space without resizing the partition. Start by moving all files from the desktop to another drive or deleting unnecessary files. Then, run the Disk Cleanup tool regularly on the C: drive to free up additional space.
These methods may allow you to reallocate disk space on Windows 10, but be cautious to avoid data loss.
Also read: How to Free Up Disk Space on Windows 11/10
FAQs
Question: How to change partition size in Windows 10 without formatting or losing data?
Answer: You can use built-in tools like Windows Disk Management to change the partition size without losing data, provided the conditions are met. If these tools don't meet your requirements, you can use a free tool like IM-Magic Partition Resizer to change the partition size without formatting or losing data.
Also read: How to increase partition size without formatting
Question: How to increase partition size in Windows 10 without formatting?
Answer: You can redistribute disk space and increase partition size without formatting or losing data by using the free tool IM-Magic Partition Resizer. If you want to add extra disk space to increase the current partition size, you may need to build a RAID configuration to add space from another disk.
See: How to add a disk to RAID
Last updated on 2025/01/5
More Related Articles You May Like
-
windows 2012 cannot extend volume disk management - download partition software when disk management cannot extend volume on windows 2012...Read more >>
windows 2012 asks to free up disk space on c drive - how to free up disk space on windows server 2012 when c drive runs on low disk space...Read more >>
Related Product
- IM-Magic Partition Resizer Server - Partition space redistributing software that works for Windows Server 2003-2025.