Change Partition Size without Formatting Windows 11/10/7/Server
Summary
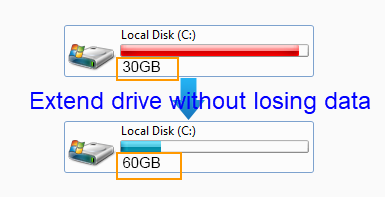
This tutorial guides computer users on how to extend the size of disk partitions, including both system and data partitions, without the need to format the partition. Using a free, professional partition manager or built-in system tools, users can safely resize partitions without data loss or third-party software.
Solution Navigation:
- #1 Use a free tool to increase partition size without formatting on Windows 11/10/7
- #2 Add partition size with unallocated space using Diskpart
- #3 Increase disk partition size using Disk Management (delete the right-side volume to create unallocated space if none exists)
#1 Free Tool: IM-Magic Partition Resizer
IM-Magic Partition Resizer is a 100% free tool for managing disk partition sizes without data loss. Additionally, it can clone disks, migrate OS, and convert disks, similar to the now-discontinued PowerQuest PartitionMagic, previously owned by Symantec.
Video: How to increase partition size within a disk
For Windows 11/10/8/7 > Download Partition Resizer Free [100% Free]
For Windows Server 2025-2003 > Download Partition Resizer Server [Free Demo]
Increase Partition Size in 4 Steps Using a Windows Free Tool
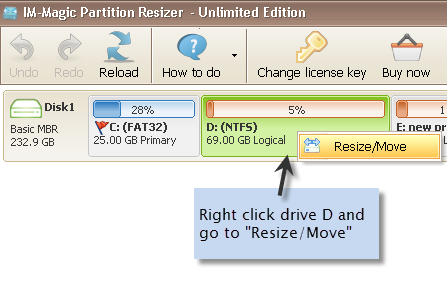
Redistribute disk space from a larger volume in Windows Server
Step 1:
Download, install, and open IM-Magic Partition Resizer on your computer. Right-click a partition with ample free space and select the "Resize/Move" option.
Step 2:
Decrease the size of the selected partition by moving the slider. This will create an unallocated volume next to the selected partition.
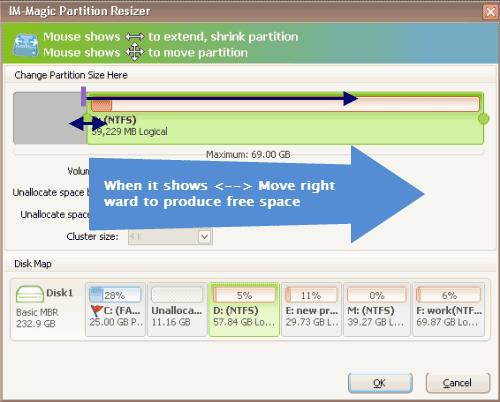
Shrink another large partition to free up space for the C drive
Step 3:
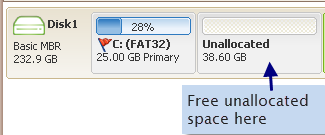
Move the unallocated space next to the partition you want to expand. Right-click the target partition and select "Resize/Move" again.
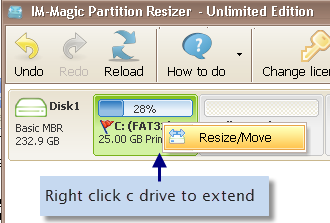
Right-click the C drive to start the extension process
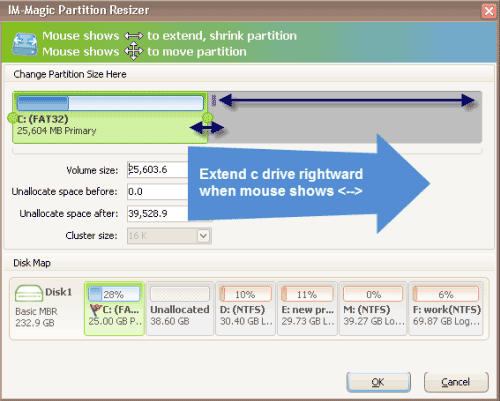
Step 4:
Increase the size of the selected partition, then click the "Apply" button to expand it.
#2 Increase Partition Size Using Diskpart
Diskpart is a powerful command-line utility in Windows that allows users to manage disk partitions directly through commands. It is especially useful for resizing partitions when Disk Management cannot perform the action due to limitations. However, expanding a partition using Diskpart requires that certain conditions are met:
- There must be unallocated space contiguous to the right side of the partition you want to expand. Diskpart cannot move partitions, so the unallocated space must be immediately next to the target partition.
- There must be no recovery, OEM, or reserved partitions between the target partition and the unallocated space. These partitions can prevent Diskpart from extending the volume.
- A 2TB limit applies if the disk is using the MBR (Master Boot Record) disk style. MBR disks can only address up to 2TB, so volumes on these disks cannot be extended beyond this limit.
- The unallocated space must not originate from a logical partition. Diskpart only allows the expansion of primary partitions using unallocated space, so space from a logical partition will not work.
- The unallocated space must be located on the same physical disk. Diskpart cannot extend a partition using space from a different disk.
If the conditions above are met, you can proceed with the following steps to use Diskpart to expand the partition size:
- Press Win + R to open the Run dialog, type
diskpart, and press Enter. This opens the Diskpart command prompt. You may be prompted to grant administrator permission to proceed. - In the Diskpart window, type
list volumeand press Enter to display a list of all volumes. Identify the volume number of the partition you wish to extend. - Next, type
select volume X(replace X with the number of the volume you want to extend) and press Enter. - Type
extendand press Enter. Diskpart will add the unallocated space to the selected volume, extending its size.
- If successful, you will see a confirmation message. Type
exitand press Enter to close Diskpart.
By following these steps, you can increase the partition size using Diskpart, provided all conditions are met. If Diskpart cannot extend the partition, consider using third-party partition management software for additional flexibility and functionality.
Also read: How to extend c drive using Diskpart, Extend partition diskpart Windows 11
#3 Increase Volume Size Using Disk Management
Disk Management is a built-in Windows tool that allows users to manage their disk drives and partitions. One of its features is the ability to extend the volume size, but this is only possible under specific conditions. To extend a volume in Disk Management, there must be unallocated space located immediately to the right of the volume you want to extend. Without this unallocated space in the correct location, Disk Management will not allow the extension of the volume.
Note: Disk Management has a few limitations to be aware of. It cannot expand:
- Volumes formatted with the FAT32 file system. Only NTFS-formatted volumes are supported for expansion.
- Volumes on MBR (Master Boot Record) disks that have reached the 2TB limit. MBR disks are capped at 2TB, so volumes on these disks cannot be extended beyond this size.
- Unallocated space created from logical drives, which shows up as “free space” rather than “unallocated space” in Disk Management. Disk Management does not allow you to extend a primary partition with free space from a logical drive.
Here are the steps to extend the volume size using Disk Management:
- Right-click on the Start button and select Disk Management from the menu.
- In the Disk Management window, locate the volume you wish to extend and ensure there is unallocated space immediately to its right.
- Right-click the volume you want to extend and choose Extend Volume from the context menu.
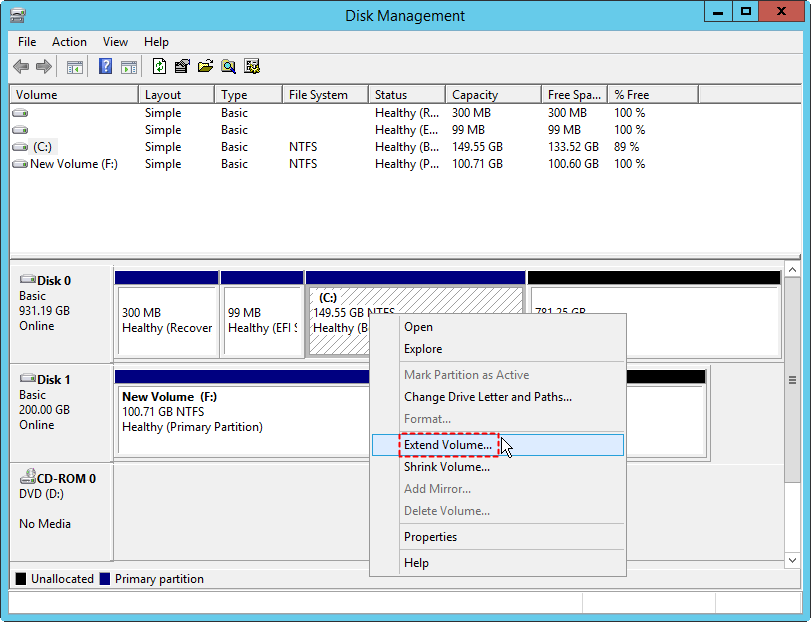
- The Extend Volume Wizard will open. Click Next to proceed.
- In the next window, select the amount of unallocated space you want to add to the volume, then click Next.
- Click Finish to complete the process. Your volume should now be extended to include the unallocated space.
By following these steps, you can increase the size of your existing volume as long as the unallocated space and formatting requirements are met. If Disk Management does not allow you to extend the volume, you may need to use a third-party partition management tool to overcome these limitations.
Also read: How to resize partition in Windows 10
FAQs
Question: How can I change the partition size in Windows 11 without formatting?
Answer: To resize a partition in Windows 11 without formatting, you can use the built-in Disk Management tool or the command-line utility Diskpart. These tools allow you to shrink or extend partitions without data loss as long as there is unallocated space available on the disk. To use Disk Management, right-click on the Start button, select Disk Management, right-click the partition you want to resize, and choose either Shrink Volume or Extend Volume. If extending the volume, make sure there’s unallocated space directly to the right of the partition. For more advanced resizing, third-party partition management tools can also be useful as they often offer greater flexibility and can work around system limitations.
Question: How can I change partition size in Windows 10 without losing data?
Answer: In Windows 10, you can change partition sizes without losing data by using Disk Management or Diskpart. Disk Management, available in the Control Panel, allows you to adjust partition sizes without affecting stored data. Right-click the Start button, select Disk Management, and then right-click the partition you want to resize. Choose Shrink Volume to make it smaller or Extend Volume to increase its size if unallocated space is available next to it. Diskpart, accessed through the command prompt, also lets you resize partitions but requires careful use of commands to avoid data loss. For greater control, you may consider using trusted third-party software, which typically offers more flexibility and detailed resizing options while ensuring data is retained.
Question: Are there risks involved in resizing partitions?
Answer: Resizing partitions always carries some risk, as there’s a chance of data loss if the process is interrupted or if there are errors. It's recommended to back up important data before resizing partitions and to use built-in tools or reputable third-party software for the best results. Partition resizing tools like Disk Management and Diskpart are generally reliable, but backups add an extra layer of security.
Increase C Partition Size by Shrinking E Partition
If you don't want to get low disk space warning on C partition anymore, you need to ensure that C partition has enough free space by increasing size of the partition. You can expand the C partition by shrinking another partition such as E partition. In order to do this, you need to rely on a third-party partition software such as IM-Magic Partition Resizer. Imagining E partition still has a lot of free disk space, you can run IM-Magic Partition Resizer to shrink the E partition to produce an unallocated volume. Then you can move the unallocated volume close to C partition and add the free space to C partition. You can shrink any partition that has enough free disk space to create an unallocated volume so that you can expand C partition.
How to increase partition size without formatting?
Formatting is not the solution for increasing partition size. In fact, formatting may cause data loss, which can lead to disastrous outcomes. If you want to increase partition size without risking data loss, a free tool IM-Magic Partition Resizer can meet your needs. Losing important data due to repartitioning can be a major issue, but IM-Magic Partition Resizer helps you expand both system and data partitions without formatting.
#1 Change OS disk partition size without formatting (Change partition size within a disk without formatting)
Solution: The free tool IM-Magic Partition Resizer can help add space to any partition, including the OS partition, without formatting. This is especially helpful given the limitations of Windows built-in tools when managing disk partitions. With IM-Magic, both data and the OS remain fully protected during resizing.
#2 Add space from another disk without formatting
Solution: To add space from another disk, you’ll need to set up a RAID configuration, as RAID allows management across multiple disks. This process can be complicated.
Based on the information above, if you want to increase partition size across disks, a RAID array is required.
Check more details here: Adding space to RAID without losing data
Scenario: Extend Volume Grayed Out
A possible issue occurs when the "Extend Volume" option is grayed out in Disk Management due to one of the following reasons:
- The C drive is not formatted with the NTFS file system.
- There is no adjacent contiguous unallocated space to the right of the partition you want to expand.
- A recovery, system reserved, or OEM partition exists between the unallocated space and the partition you wish to extend.
- If the disk uses the MBR partition style, it is limited to a maximum of 2TB.
- The unallocated space is located on a different disk.
More Related Articles You May Like
- Partition magic software free download- free download partition magic software to extend system partition or data partition with ease...
- C partition runs low disk space on sbs- when c drive is running low disk space on sbs, you need to resize the disk partition to resolve the problem...
- partition magic to resize system partition - partition magic for windows server users like server 2000 2003 2008 2012, etc to resize system partition in a safe way...
- partition software to reszie c partition on windows sbs 2003 - resize c drive on windows sbs 2003 without deleting or moving any data from the original place...
Related Product
- IM-Magic Partition Resizer Server - Partition space redistributing software that works for Windows Server 2003-2025.
