Windows 7 Disk Management
What does Windows 7 Disk Management do? As its name showing, Disk Management is a manger that provides solution for disk space management. As a disk management tool, Windows 7 Disk Management has the basic functions including mark partition as active, change drive letter and paths, format volume and delete volume. You can also check the Properties of each partition on your computer under Disk Management on Win7. In addition to those basic functions, Windows 7 Disk Management has two new features compared to Windows XP, which are extend volume and shrink volume.

3 Ways to Access Windows 7 Disk Management
If you want to perform any task under Disk Management in Windows 7, you must know how to access it. Here are 3 common methods to access Disk Management tool in Windows 7
Method1. Right click "Computer" icon on Windows 7 desktop > click "Manage" > click "Disk Management"
This method is usually easy to handle, so most Windows 7 users would like to access Disk Management with this method.

Method2: Click "Start" button on taskbar of Windows 7 > click "Control Panel" > "click "System and Security" > "click "Administrative Tools" > double click the "Computer Management" > click "Disk Management"

Method3: Click "Start" button on the Windows 7 taskbar and click "Run" option (you can also press Win + R to open Run box) > type "diskmgmt.msc" in the box and then press "Enter" button to open disk management.

Features of Disk Management in Win7
Based on its name, it is easy to understand that you can format partition, delete partition, change drive letter and paths, extend partition and shrink partition after accessing Disk Management in Win 7. Based on those basic features, you can resolve some related problem occurred on Windows 7. Here are some related possible issues that you can resolve with Windows 7 Disk Management:
1. Create a new partition with Disk Management in Windows 7
During the usage of your computer, you may want to create a new partition sometimes. On Windows 7, you do not need to repartition hard drive in order to create a new partition. You just need to follow the guide below to create new partition on Windows 7:
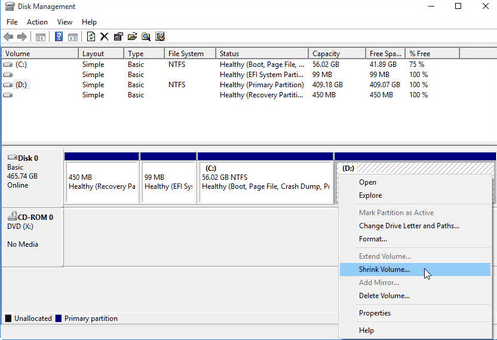
Step1. Right click a partition under Disk Management on Windows 7 and click "Shrink Volume" option.

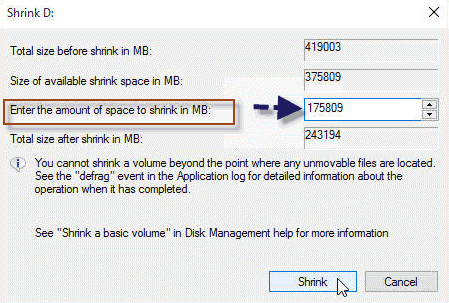
Step2. Enter the amount of space you want to shrink and then click "Shrink" button so that you can get some unallocated space.

Step3. Right click the unallocated volume and click "New Simple Volume"

Step4. Follow the wizard to format the unallocated space and assign a drive letter to this volume, after which you can create a new partition.

2. Fix low disk space problem on Windows 7 with Disk Management
Another feature is that you can fix low disk space problem on Windows 7 with Disk Management. When a partition, especially system partition is running out of disk space, Windows 7 will report low disk space warning to ask you to free up disk space. If you encounter the low disk space issue on Windows 7, you can rely on the shrink volume and extend volume functions on Disk Management to resolve this problem on Windows 7.
First of all, you can refer to step1 and step2 mentioned above to get some unallocated space in Disk Management on Win7. Then, you can right click the partition which shows before the unallocated space and then click "Extend Volume" to add the unallocated space to the selected partition.
Tip: You can only extend the partition which is contiguous to the unallocated space on Windows 7 Disk Management.
Free Partition Software Similar to Windows 7 Disk Management
If you have ever run Windows 7 Disk Management to perform some tasks to resolve problem, you may find that it sometimes has limitations. In this situation, you can run free partition software which works similarly to Disk Management but has no limitation to format partition, delete partition, shrink partition, extend partition, move partition and do more on Windows 7.
Features of IM-Magic Partition Resizer
- Clone disks or partitions
- Migrate OS from smaller to larger HDD/SSD
- Resize partitions without data loss
- Convert GPT disks without losing data
- Convert NTFS to FAT32 without data loss
- Change a logical drive to primary
- Move partitions safely
- Extend volumes without losing data
- 100% data and OS safety
- Rollback protection against unexpected power surges
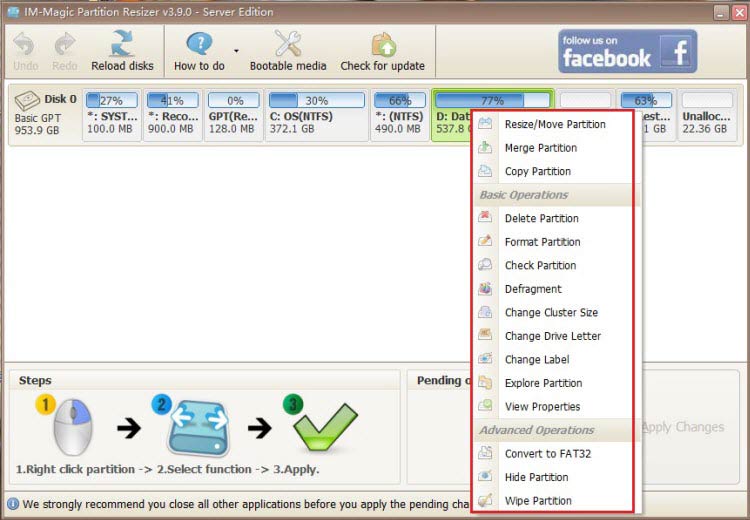
If you right-click a partition in Partition Resizer, you will see the following options. Details may vary depending on the volume properties.

If you right-click a disk in Partition Resizer, different options will appear based on the disk properties.

Video: How to resize partitions without losing data
Download IM-Magic Partition Resizer Free Edition
More Related Articles You May Like
- free merge unallocated space to system partition in windows 10 - freeware for adding unallocated space to system partition on windows 10...Read more >>
- how to free up disk space on windows 10 - free up disk space when windows 10 reports low disk space on system partition...Read more >>
- windows 10 redistribute disk space - how can you redistribute disk space for free without repartitioning disk on windows 10...Read more >>
- windows 10 diskpart extend volume - free increase size of disk partition on windows 10 with built-in diskpart command...Read more >>
- free to shrink move windows 10 partition - free partition software for windows 10 to shrink volume and move unallocated space...Read more >>
- free partition software for hard drive in windows 10 - free download partition software to resize the hard drive space without reinstalling windows 10...Read more >>
- how to manage system partition in windows 10 - manage disk space on system partition on Windows 10 when it runs out of disk space...Read more >>
- windows 8 partition software - free partition software download for windows 8 to partition hard drive when there is not enough free space...Read more >>
- windows 8 disk management - windows 8 disk management to free manage disk space on windows 8 without relying on software...Read more >>
- how to resize partition under windows 8 - partition software to free resize partition to create new volume, extend volume on windows 8... Read more>>
Related Product
- IM-Magic Partition Resizer Server - Partition space redistributing software that works for Windows Server 2003-2022.
