How to Fix Shrink Volume Greyed Out and Enable Shrink Volume
Summary
This guide explains why the shrink volume option is greyed out or disabled in Disk Management and how to shrink the C drive or any other drive using free partition software.
 Updated on 2025/01/02
by Andrew Wright
| Disk Management | Diskpart | Partition Resizer* | |
| Shrink FAT32 partition | NO | NO |  |
| Shrink NTFS partition | |
|
|
| Extend FAT32 partition | YES when unallocated space is on the right side |
YES when unallocated space is on the right side |
|
| Extend FAT32 C drive | NO | NO | |
| Price | FREE | FREE | FREE |
| Download Win 11-7 (100% Free) Download Win Server (Free Demo) |
Can't Shrink Volume - The Causes
The "Shrink Volume" option may be greyed out in Disk Management due to the following causes. (Shrinking volumes will not work in diskpart.exe for the same reasons.)
- 1. FAT file system (The "Shrink Volume" option is greyed out on FAT32 partitions in Disk Management, or diskpart cannot shrink a FAT32 volume.)
- 2. It’s the C drive.
- 3. It’s a USB flash drive or disk without an MBR/GPT partition table.
Based on the above causes, here are some possible scenarios:
- Can't shrink USB drive.
- Can't shrink volume because the shrink option is greyed out in Disk Management.
- Windows Disk Management is unable to shrink the C drive.
So, how do you shrink the C drive in Windows 11/10/8/7? Or how do you shrink a D/E/F/H drive when the shrink volume option is greyed out? 
Solution 1 - Shrinking Volume with Partition Resizer Free (Shrink C Drive)
Shrinking the C drive is possible with the free tool Partition Resizer. This example will show you how to shrink the C volume without losing data. You can also shrink any other volume using Partition Resizer without losing data.
Video 1: Shrink D/E or another drive to extend C
Video 2: Shrink C and create another drive
For Windows 11/10/8/7 => Download Partition Resizer Free [100% Free]
For Windows Server 2025-2003 => Download Partition Resizer Server [Free Demo]
Step 1: Download and install Partition Resizer, then open it.
Step 2: Right-click the C drive in Partition Resizer and then select the option RESIZE/MOVE PARTITION. 
Step 3: Shrink the partition by moving its left border forward when the mouse shows double arrows, and then adjust the border to shrink the space. 
If it’s the C drive that you want to shrink, move the left border of the partition forward, and free space will be created on the right side of the C drive. 
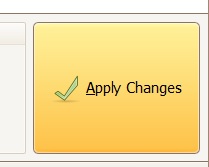
Step 4: Click the APPLY CHANGES button in the software to shrink the drive.
Also read: How to shrink the C drive
IM-Magic Partition Resizer Server is for Windows Server 2008, 2012, and other Windows Server versions such as Windows 2016, 2019, 2022, 2025, etc.
For all Windows Server versions => Download IM-Magic Partition Resizer Server
After shrinking a volume, you may want to:
- Create a new partition
- Add the free unallocated space to another partition
- Move free space
- Convert free space to unallocated space by right-clicking it and deleting the volume
Note: When it's unable to shrink a FAT32 partition with Disk Management or Diskpart, you can use the free tool Partition Resizer to easily resize the FAT32 partition without losing data.
Shrink Partition Using Disk Management or Diskpart
#1 How to Shrink the D Drive with Disk Management - Free Method Without Software
Disk Management is a built-in Windows tool to resize disk partitions. You can use Disk Management to shrink a volume when you need to free up space, but keep in mind that it can only shrink partitions when there is unused space available for reduction.
Follow these steps to shrink the D partition using Disk Management:
Step 1: Right-click the 'Start' icon in the bottom-left corner of your PC and
choose “Disk Management” (Admin privileges required).

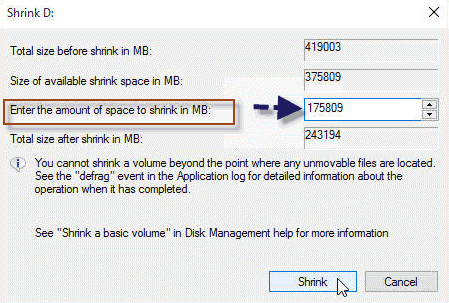
Step 2: Select the D drive, right-click it, and choose Shrink Volume. Enter the amount of space you wish to shrink the D drive by.
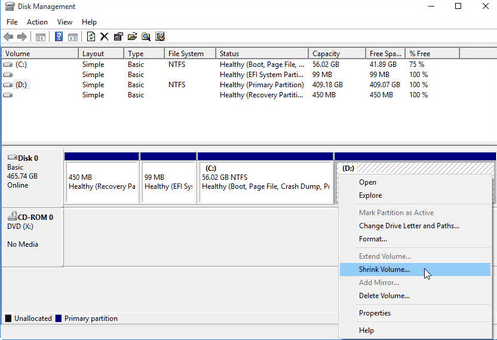
You can specify the volume size to shrink D. Once completed, unallocated space will be created next to the D drive.
This method allows you to shrink the volume without affecting the data on the drive. After shrinking D, unallocated space will appear. However, since it’s adjacent to the C drive, you can't extend the C drive right away. But you can create a new volume with the unallocated space if desired.
If the unallocated space isn’t next to C, use the free tool Partition Resizer Free to move the space to the right of the C drive.
#2 Shrink Partition with Diskpart
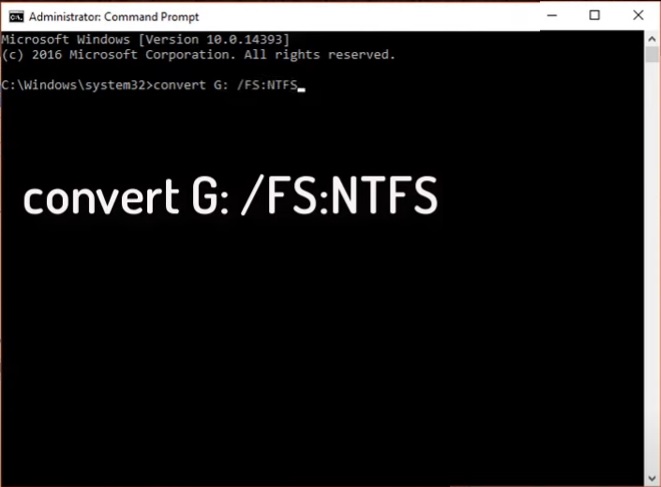
Preparations: Type diskpart in the Run dialog to start diskpart.exe, after you have converted the file system to NTFS.
- 1. Type "list volume".
- 2. Type "select volume *" (replace * with the correct volume number).
- 3. Type "shrink" or "shrink desired=10000" if you want to shrink around 10GB, and press Enter.
- 4. Type "exit".

Note: Shrinking a volume will not work on a USB flash drive, whether using cmd or third-party partition software.
Shrink FAT32 Partition with Diskpart?
The problem: Diskpart and Disk Management will not shrink a FAT32 drive. The file system is labeled as FAT or FAT32 in Disk Management or diskpart.
Solutions:
- 1. Shrink the FAT32 partition using the free tool Partition Resizer.
- 2. Convert the FAT32 drive to NTFS, and then the "Shrink Volume" option will be available. (Note: This won’t work on the C drive.)
The question: Is it safe to convert a drive from FAT32 to NTFS?
Answer: Yes, it’s safe to convert a non-OS disk from FAT32 to NTFS without formatting or data loss using the convert command in the Command Prompt.
Video - How to convert FAT32 to NTFS without formatting:
Once you have converted the drive to NTFS, you can shrink the volume using diskpart or other tools.