3 Ways to Resolve the C Drive Red Bar Problem in Windows 11/10/7
Have you ever noticed a red bar appear on a partition in Windows' My Computer? You might wonder why the C drive, in particular, shows a red bar and whether you need to fix it. Perhaps you've not paid much attention to this before, or haven't experienced issues related to it until now.
How to Resolve the C Drive Red Bar Issue in Windows - 3 Effective Methods
When the C drive displays a red bar, the best approach is to increase the size of the C drive.
Here are three methods you can use to extend the C drive partition in Windows:
Method 1: Extend the C Drive Using Disk Management
If you want to expand the C drive because of the red bar, you can use Windows Disk Management to resize the drive on your computer. Disk Management lets you remove the red bar by deleting an adjacent volume (such as D drive) and then extending the C drive, provided it uses the NTFS file system.
Step 1: Delete the adjacent volume (in this example, the D drive).

Step 2: Extend the C drive.
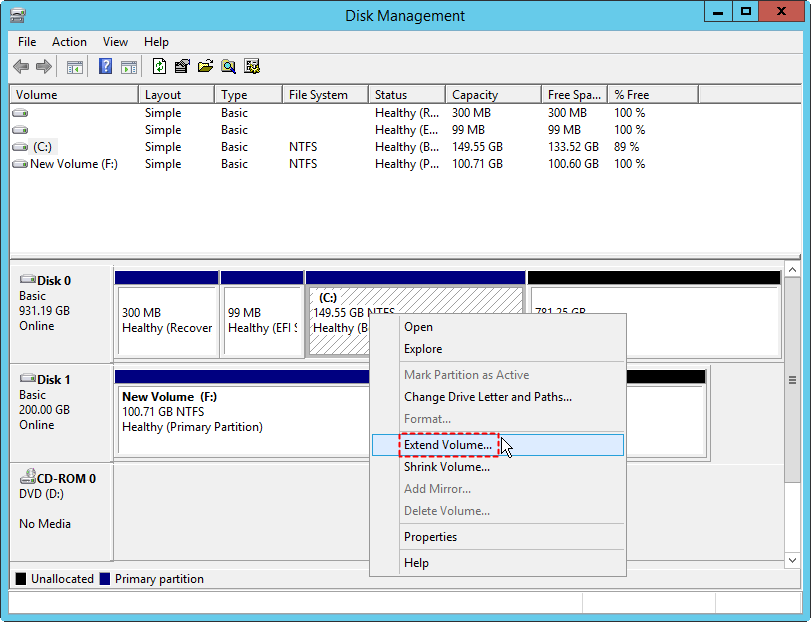
Note: If the C drive is formatted as FAT32, the "Extend Volume" option in Disk Management will be grayed out. In that case, you can use a free tool like Partition Resizer to extend a FAT32 volume without data loss.
Also see: how to extend C drive space with non-adjacent unallocated space in Windows Disk Management.
Method 2: Repartition the Hard Drive to Increase C Drive Space (Advanced)
Another option is to repartition your hard drive to allocate more space to the C drive. Note that this method requires reinstalling the system, so be sure to back up your data before proceeding.
Method 3: Fix the Red Bar Issue with Free Partition Software
The previous methods use built-in Windows tools. Alternatively, you can use Windows partition software to redistribute disk space and resolve low space issues when the C drive shows a red bar.
IM-Magic Partition Resizer Free is a tool that allows you to resize partitions without reinstalling the system. You can use this tool to shrink a larger volume and extend the system partition, effectively resolving the red bar issue.
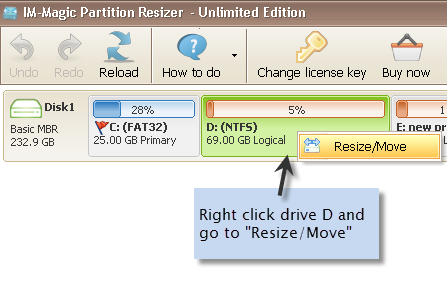
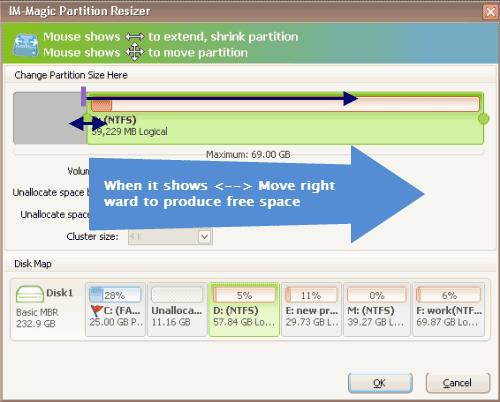
Step 1: Shrink a large volume to create unallocated space, such as the D drive in this example.
Right-click the D drive in the software.
Drag the border of the D drive to the right to create unallocated space.
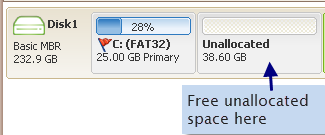
Step 2: Right-click the C drive and select RESIZE/MOVE PARTITION.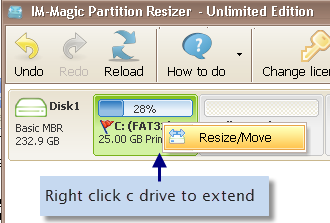
Claim the unallocated space and add it to the C drive to resolve the red bar issue.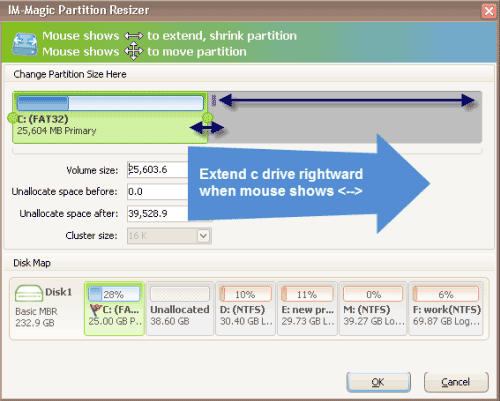
Step 3: Click Apply Changes to save the adjustments.
What Does a Red Bar Mean on a Windows Disk Partition?
In Windows' My Computer, each partition shows how much used and free space it has. A partition with ample free space will show a blue bar, while one with limited free space will show a red bar. Thus, a red bar on the C drive usually indicates low disk space.
Impact of Low Disk Space (Red Bar) on the C Drive in Windows 10/7
If partitions like D or E show a red bar, it may only prevent you from storing large files. However, if the C drive runs out of disk space and displays a red bar, it can cause serious issues.
Since the C drive is the system partition, Windows will frequently display low disk space warnings. Continuous low disk space on the system partition may result in the following issues:
1. Slow PC performance. Programs may take longer to open, and general responsiveness may lag.
2. Slow boot times. The computer may take significantly longer to start.
3. Inability to install Windows updates due to insufficient free space on the system partition.
Also read: how to disable partition red bar [7 fixes]
Updated on 2025/01/8
More Related Articles You May Like
- free to merge two partition on windows 10 without data loss
- free to merge windows partitions to increase size of c drive - how to combine partitions to extend c drive space on windows xp vista 7 8 10...
- system partition is nearly full - System partition c drive is full or running out of space...
- fix insufficient space on disk partition in windows 10 8 7 - hard disk partition has not enough free space on Windows 8 10 how to repaire the issue...
- how do i extend the c drive without having to format it - free to increase size of c drive on windows or windows server without formatting c partition...
- free to extend c drive in windows 8 without formatting - how to expand the size of c partition without formatting disk on windows 11...
Related Product
- IM-Magic Partition Resizer Server - Partition space redistributing software that works for Windows Server 2003-2025.
